| deploymentagent | ||
| docs | ||
| infrastructure | ||
| nixos | ||
| vault | ||
| .gitignore | ||
| .gitlab-ci.yml | ||
| config.json | ||
| LICENSE.md | ||
| Makefile | ||
| README.md | ||
Between November 2020 and January 2021, I served the remainder of my mandatory national duty as a civil servant, employed by the Kantonsspital St. Gallen (KSSG) at the department of infectious diseases and hospital epidemiology. One of the two teams responsible for developing and operating the IT services tasked me to work on a proof of concept for replacing Heroku as the hosting platform with a single virtual machine and an open source infrastructure stack, to serve the web application https://guidelines.ch based on Golang, Express.js, PostgreSQL and Elasticsearch. As non-functional requirements, the IT team predetermined that all infrastructure must be provisioned as code and that NixOS must be used as the operating system, while running on Hetzner Cloud.
The primary challenge has been to replace the functionalities built into Heroku, such as
- Heroku Platform API for deployments -> Instead of manually deploying or polling Docker registry tags for their latest changes, the IT wanted to keep the existing deployment pipelines in Gitlab to schedule replacements of Docker containers via an API call (see
deploymentagent/)- Automated certificates for HTTP/TLS -> At the time, Hetzner Cloud load balancers had no built-in support for Let's Encrypt and Certbot had no support or plugin for Hetzner Cloud either. Instead of trying to write a plugin, a simple wrapper around Certbot has been created (see
infrastructure/modules/compute/certbot.sh)- Secrets management -> Introduction of Hashicorp Vault
I appreciated a lot that I was given time to dig into Go and NixOS, as I had used neither technology before. In retrospect and based on the impression I had at the end of my service, I don't think that replacing Heroku in this way would be worth it. From a software lifecycle perspective, the web application https://guidelines.ch had already entered the maintenance stage and Heroku did prove itself as a reliable service. The only gripe the IT team had with Heroku was the high cost, which in case of self managing a solution based on NixOS simply would have been transferred to the operations side of things.
Hetzner Cloud Environment
Project Structure
.
|-- Makefile         # Wrapper to simplify interaction
|-- deploymentagent  # Can be used to trigger deployments manually or from a pipeline
|-- infrastructure   # Terraform modules
|   |-- compute      # Loads the compute module
|   |-- environment  # Loads the environment module and provides outputs
|   |-- ingress      # Loads the ingress module and provides outputs
|   |-- storage      # Loads the storage module
|   `-- modules      # Contains the code for all the modules
|-- nixos            # NixOS image builder with Packer
|-- config.json      # Read by Make, Terraform, Packer
|-- secrets.json     # Read by Make, Terraform, Packer
`-- vault            # Policy examples
Overview
Tools and Dependencies
- Terraform 0.13.x https://releases.hashicorp.com/terraform/
- Packer 1.6.x https://releases.hashicorp.com/packer/
- Make & Unix command line tools
- Vault CLI 1.6.x https://releases.hashicorp.com/vault/
Configuration
Configuring a Hetzner Cloud Project
Login: https://accounts.hetzner.com/login
Visit the projects tab to either create a new project or to pick an existing one. A project will contain resources (servers, snapshots, load balancers, volumes, ..) as well as a security service to manage API tokens and TLS certificates (which can be used with load balancers). Check the links below to see which resources are available and how to use them.
- General documentation: https://docs.hetzner.com/cloud/
- API documentation: https://docs.hetzner.cloud/
To build and provision resources with Packer and Terraform, an API token is required, which can be created in the Security tab.
Hetzner Cloud Limitations
Floating IPs: Persistent (floating) IP addresses currently can only be assigned to cloud servers. This means that when you delete a load balancer, you will also lose the public IP you have been using for the services behind it. You will probably not delete load balancers in the production environment, but for staging and testing environments, load balancers can be scaled up and down via the Hetzner Cloud web UI or their API/Terraform if you want to save some money. There appear to be plans to add support for load balancers with floating IPs.
Certificates: Certificates stored within the security service on Hetzner Cloud cannot be updated, only replaced.
Before a certificate can be deleted, it must be dereferenced from services which were set up on load balancers.
For this creason, Certbot needs to be wrapped by a script which takes care of certificate replacement (see infrastructure/modules/compute/certbot.sh).
Unfortunately, Hetzner does not keep a public roadmap, but there seem to be plans to add support for Let's Encrypt directly to cloud load balancers as well.
config.json
The config.json and secrets.json files are read by Make, Packer and Terraform.
This way all changing settings and secrets between environments can be stored in a central place and HCL files used by Packer and Terraform only need to be touched in case the infrastructure is intended to be "refactored".
Due to some technical limitations in Terraform, it can be tricky to track state with backends in different environments.
To avoid solutions involving templates or third party tools such as Terragrunt, a simple wrapper has been included in the Makefile which can set up backends automatically for different environments.
Secrets
secrets.json (with git-secrets)
To decrypt the secrets.json file, run the following command on your shell
git secret reveal
Gitlab
Secrets, such as the SSH key pair for the default system user are stored in the Gitlab CI/CD settings page of this Git project (for now), in the Variables section.
'id_rsa_operator_pub' is baked into the image generated by Packer (see nixos/nix/system.nix).
NixOS
Building NixOS Images (Snapshots) with Packer
The nixos target in the Makefile wraps around the execution of Packer to build a NixOS image from the default Ubuntu 20.04 image provided by Hetzner Cloud.
Two arguments may be supplied, VERSION= to specify the desired NixOS release (see NixOS Release Notes) and BUILD= with which you can track versions of the images that have been created.
Example:
$ make nixos VERSION=20.09 BUILD=1.0.0
After a build has been successful, Packer will display the ID of the created snapshot on the very last line of the output.
When provisioning servers via Terraform, the used image ID will be read from the nixos_snapshot_id key in the config.json file.
In case you missed the ID in the build output, you can query the Hetzner Cloud API like this to retrieve a list of created snapshots.
$ curl -H "Authorization: Bearer $HCLOUD_TOKEN" 'https://api.hetzner.cloud/v1/images' | jq '.images[] | select(.type == "snapshot")'
It makes sense to use the same NixOS image across all environments. (testing/staging/production/..)
Infrastructure
Working with Terraform
Have a look at their documentation. To learn more about its configuration language HCL, see
- Resources
- Variables and Outputs
- Functions
- State
Refer to the Provider documentation to see how to manage resources with Terraform on Hetzner Cloud.
Provisioning Infrastructure
Modules Overview
Rough overview of resources and outputs across the four modules.
environment
  - hcloud_network
  - hcloud_network_subnet
  - outputs
    - dc_default_id (identifier of the datacenter in nuremberg)
    - environment_name (name of the environment, read from config.json)
    - network_primary_id
    - network_subnet_a_id
ingress
  - hcloud_load_balancer
  - hcloud_load_balancer_network (attach to network/subnet configured in envionment module)
  - hcloud_load_balancer_service
  - hcloud_load_balancer_target (servers are implicitly assigned to load balancers via their labels)
storage
  - hcloud_volume
  - outputs
    - volume_data1_id
compute
  - hcloud_server
  - hcloud_server_network (attach servers to networks/subnets configured in envionment module)
  - hcloud_volume_attachment (directly attach volumes created in the storage module to servers)
Initializing State Backends for Each Module
You will need to (re-)initialize the state backend each time you change environments via config.json (see later sections).
$ make infra-init-backends MODULES="compute" # one module
$ make infra-init-backends MODULES="compute ingress" # multiple modules
$ make infra-init-all-backends # all modules
Applying Modules
You will need to manually confirm with 'yes' before the changes are applied.
$ make infra-apply MODULE=compute
Destroying Modules
$ make infra-destroy MODULE=compute
Operations Guide
Components
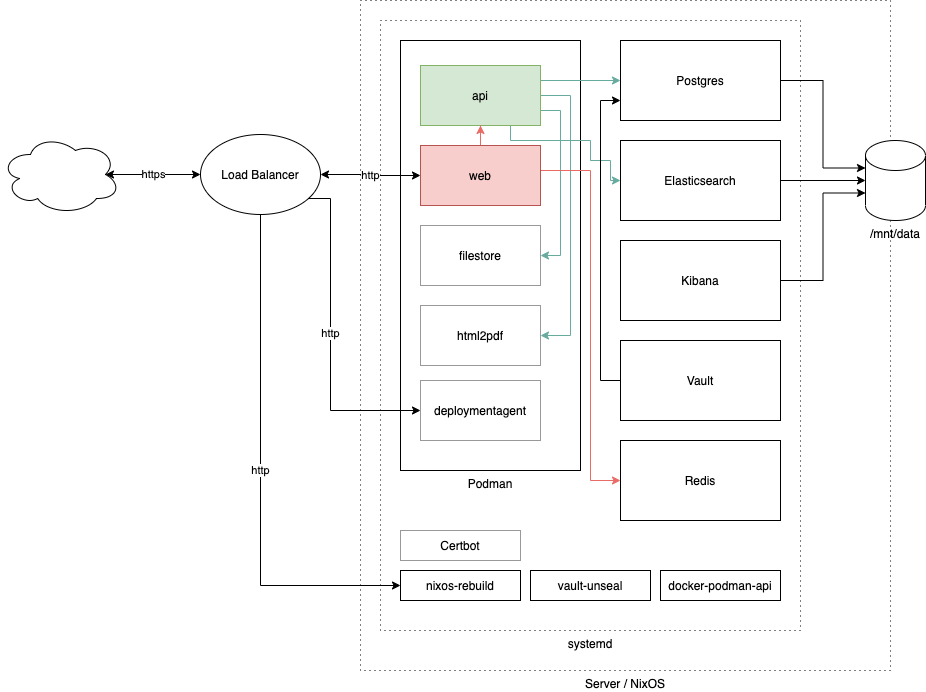 (the file
 docs/diagram.png can be edited with https://app.diagrams.net/
Sytemd Units
The different services can be found via their name in systemctl.
Containers managed by Podman are prefixed with podman-, for example: podman-api, podman-web etc.
Rebuild NixOS via Systemd
There is a special unit called 'nixos-rebuild' with which nixos-rebuild switch can be called in the background, either manually, periodically or based on an event, such as via socket activation:
$ nc -v localhost 4444
The connection will be kept open and closed by Systemd as soon as the rebuild and switch have been completed (switch only in case the build has been successful).
Data
Ephemeral Data
In case the server is deleted, these files will be lost and need to be re-supplied via Cloud-Init again upon server creation.
/opt/
Data in /opt is supplied by Cloud-Init and should not be modified.
The files will be read by different components such as Nix as well as the Certbot wrapper, which is located at /opt/certbot.sh.
- /opt/certbot.sh
- /opt/cloud-init-misc-data/
  - aws_access_key_id # used by Certbot to manage DNS records
  - aws_secret_access_key # used by Certbot to manage DNS records
  - domain_alternative_names # used by Certbot to create certificate
  - domain_name # used by Certbot to create certificate
  - hcloud_token # used by Certbot to manage load balancers
  - elasticsearch_password # default password for users 'elastic' and 'kibana'
  - environment # name of the environment which is consumed by guidelines.nix
  - guidelines.json # default launch specification (see `./deploymentagent/`)
  - vault_db_password # default password for Postgres Vault storage backend
/etc/nixos
/etc/nixos contains all the Nix files part of the base image created with Packer as well as the files supplied via Cloud-Init.
Persistent Data
An external volume provided by Hetzner Cloud is mounted Data which is stored in /mnt/data0
- /mnt/data
- guidelines.json # launch specification (see `./deploymentagent/`)
- elasticsearch # Elasticsearch home
- kibana # Kibana home
- letsencrypt # Let's Encrypt data (configuration, logs, ..) generated and used by Certbot
- postgresql # PostgreSQL data directory
- vault-deploymentagent-token
- vault-guidelines-api-token
- vault-master-key # optional: Can be added to automatically unseal Vault
Setting Up a New Environment
The following sections assume the environment to be called 'production'.
Configure Environment in config.json and secrets.json
Set the environment name, domain names and desired NixOS image/snapshot ID in config.json:
{
    "terraform_packer_environment": "production",
    "nixos_snapshot_id": "1234567",
    "domain_name_production": "guidelines.ch",
    "domain_alternative_names_production": "*.guidelines.ch"
}
It's best to use your personal Gitlab deployment token and a generic Hetzner Cloud token, since the latter will also be used by the created server(s).
secrets.json:
{
    "terraform_gitlab_backend_username": "",
    "terraform_gitlab_backend_password": "",
    "terraform_gitlab_backend_project": "",
    "gitlab_deploy_token_username": "",
    "gitlab_deploy_token_password": "",
    "aws_access_key_id": "",
    "aws_secret_access_key": "",
    "elasticsearch_password_production": "",
    "hcloud_token_production": "",
    "vault_db_password_production": ""
}
Provisioning Infrastructure with Terraform
Just to be sure, re-initialize all the Terraform state backends for the desired environment.
$ make infra-init-all-backends
Roll out all the resources by applying each Terraform module. The environment module must be applied first, the compute module last.
$ make infra-apply MODULE=environment
$ make infra-apply MODULE=ingress
$ make infra-apply MODULE=storage
$ make infra-apply MODULE=compute
Take note of the public IP from the load balancer (used to access your services) and the server (used to manage the NixOS system) in the Hetzner Cloud web UI or via their API:
$ curl -H "Authorization: Bearer $HCLOUD_TOKEN" 'https://api.hetzner.cloud/v1/servers?label_selector=environment==production' | jq '.servers[].public_net'
$ curl -H "Authorization: Bearer $HCLOUD_TOKEN" 'https://api.hetzner.cloud/v1/load_balancers?label_selector=environment==production' | jq '.load_balancers[].public_net'
You can now connect to the newly created server, using the default key pair stored on Gitlab CI/CD as user operator.
$ ssh operator@168.119.230.44
Changing Passwords of System Users
As a first step you should change the passwords of the root and operator users.
$ sudo -i
# passwd
# passwd operator
Configuring Certbot
In case you have an existing configuration for Certbot, you can copy it to /mnt/data/letsencrypt, otherwise you can set up a new configuration either locally, or directly on the server itself:
$ export AWS_ACCESS_KEY_ID="..."
$ export AWS_SECRET_ACCESS_KEY="..."
$ export LETSENCRYPT_DIR=/mnt/data/letsencrypt
$ export domains="..." # list of domain_name_production and domain_alternative_names_production in config.json, each one prefixed with the `-d` flag
$ certbot certonly --dry-run --non-interactive --agree-tos -m webmaster@"$DOMAIN_NAME" --work-dir "$LETSENCRYPT_DIR"/lib --logs-dir "$LETSENCRYPT_DIR"/log --config-dir "$LETSENCRYPT_DIR"/etc --dns-route53 --preferred-challenges dns $domains
At this point you should test whether the configuration is working, to prevent Certbot to create or renew the certificate, you can supply the --dry-run flag.
To know which IAM permission Certbot needs on Amazon Route53, refer to the Certbot documentation
Now that the configuration for Certbot is available, rebuild the NixOS system and deploy the certificates to the load balancers.
$ systemctl start nixos-rebuild
$ systemctl start hetzner-certbot
$ journalctl -u hetzner-certbot
Keep in mind that when running the hetzner-certbot unit, all services exposed by the load balancer will be briefly "offline" (~ 5-10 seconds) as due to the before mentioned limitations, the certificate references will need to be deleted and recreated by certbot.sh.
Configuring Vault
Accessing Vault
To access the Vault API and web UI from your local machine, you will need to configure a port forwarding via SSH.
$ while :; do ssh -L 4443:10.0.1.51:8200 -N <server ip>; done
The vault web UI can then be accessed via http://localhost:4443/ui/
Initial Setup of Vault
As a first step, you will need to create a master key (set) which is used to unseal Vault on each startup. To use just one master key, initialize Vault with "Key shares" and "Key threshold" both set to "1". The "initial root token" is used to authenticate as an administrator with the Vault API or web UI. The "key" is used to unseal Vault in case it has been sealed (manually or due to a restart). You can now set up the key-value based secrets engine which is supported by the settings package (only V2 is supported). See the Vault documentation.
Unsealing Vault
To unseal Vault manually, you can either use curl, the Vault CLI, or use the prompt on the web UI.
$ curl -XPUT http://localhost:4443/v1/sys/unseal -d '{"key": "master key"}'
$ vault operator unseal -address=http://localhost:4443
Key (will be hidden):
Note that 'v1' of the Vault API is unrelated to 'v2' of the secret engines.
Unsealing Vault Automatically
You can manually write the created master key to /mnt/data/vault-master-key.
If this file exists and contains a valid master key, Vault will be unsealed automatically on startup.
Example Role
path "kv/data/guidelines/production/api" {
  capabilities = ["read"]
}
'kv' relates to the name of the secrets engine created. The path segment '/data/' must always be placed between the name of the secret engine and secret path when using V2 of the engine APIs.
Creating Vault Tokens for Services
Refer to the Vault documentation to see how to manually create a token with a policy. To take it a step further and generate Vault tokens upon container start (with some help of additional tooling) refer to the AppRole Authentication Method
Configuring Elasticsearch
The 'elastic' admin user as well as the user for Kibana are derieved from the elasticsearch_password_<env> key in secrets.json
Kibana can be accessed on port 8443 via any hostname behind the load balancer https://guidelines.ch:8443/.
Deployment Agent
The deployment agent can be accessed on port 9443 via any hostname behind the load balancer https://guidelines.ch:9443/.
See ./deploymentagent for how to work with it.
In a new environment, every container of the Guidelines service will be provisioned based on the 'latest' tag.
Configuring Guidelines
Create a database
CREATE DATABASE guidelines;
CREATE USER guidelines WITH ENCRYPTED PASSWORD 'changeme';
GRANT ALL PRIVILEGES ON DATABASE guidelines TO guidelines;
For the time being, until Vault support has been rolled out to all services, change the file ./infrastructure/modules/compute/nix/guidelines.nix locally before deploying a server with Terraform or manually edit /etc/nixos/guidelines.nix on the server directly and rebuild with systemctl start nixos-rebuild to get your services up and running for the testing environment