mirror of
https://github.com/GrandDuke1106/AutoApiSS.git
synced 2025-02-20 23:27:21 -05:00
300 lines
14 KiB
Markdown
300 lines
14 KiB
Markdown
|
|
# Microsoft 365 E5开发者订阅自动续订脚本
|
|||
|
|
|
|||
|
|
本文来自[此处](https://b2og.com/archives/6),遵循CC BY 4.0协议,有问题欢迎邮箱联系或者博客直接留言。
|
|||
|
|
|
|||
|
|
# 0. 写在前面
|
|||
|
|
|
|||
|
|
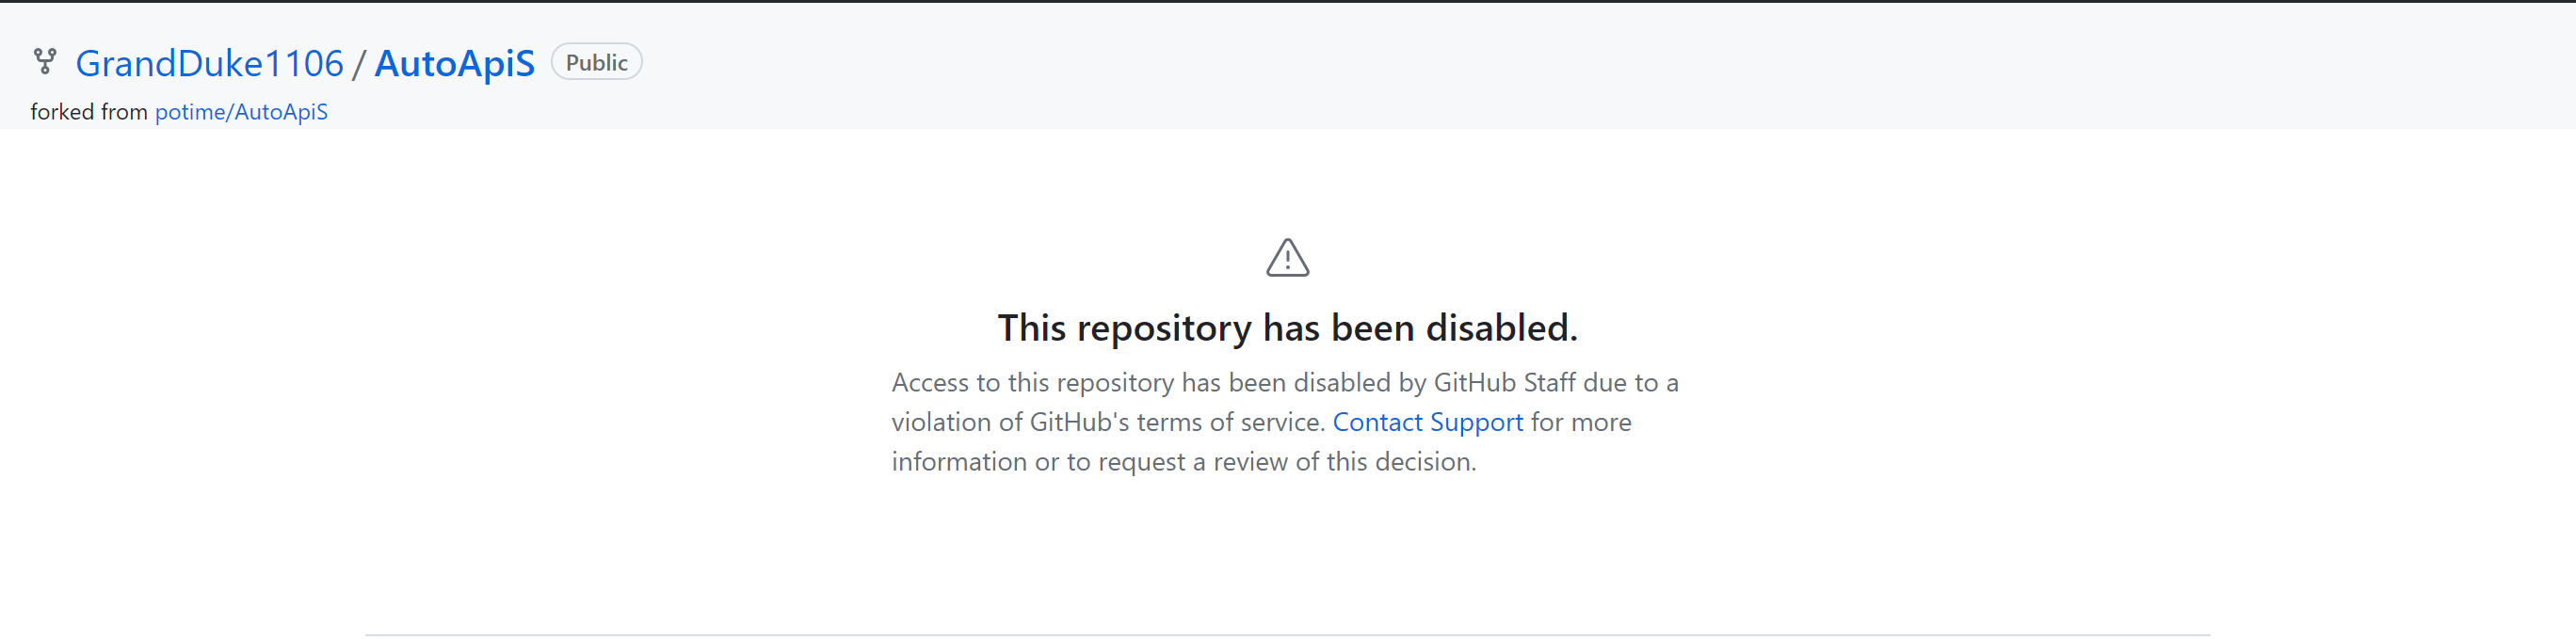
之前,在浏览github的时候发现我的存储库少了几个,最后发现是E5自动续订的存储库因为违反github服务协议而被ban了,包括AutoApiSR(模仿人为应用开发版), AutoApiS(超级版),上游仓库无一幸免,全被ban了。
|
|||
|
|
|
|||
|
|
|
|||
|
|
|
|||
|
|
为了避免今后续订不上的问题,我自己从一开始用的是超级版,而且并非直接fork其他人的仓库,而是自行修改了workflow工作流的一些bug(也就是修改了一部分代码),自行上传到了github,因而避免了仓库被ban。
|
|||
|
|
|
|||
|
|
而且仓库原来的readme中图片早已无法访问,而且由于github政策的影响,仓库随时可能被ban,因此再写一份超级版教程以备不时之需。
|
|||
|
|
|
|||
|
|
若今后仓库再次被ban,会考虑将续订脚本转移到自己的云服务器上,今后会再出教程。
|
|||
|
|
|
|||
|
|
脚本会放在文末,需要自取。
|
|||
|
|
|
|||
|
|
# 1. 新建用户
|
|||
|
|
|
|||
|
|
*这一步可选,你可以直接使用管理员账户,但不建议。*
|
|||
|
|
|
|||
|
|
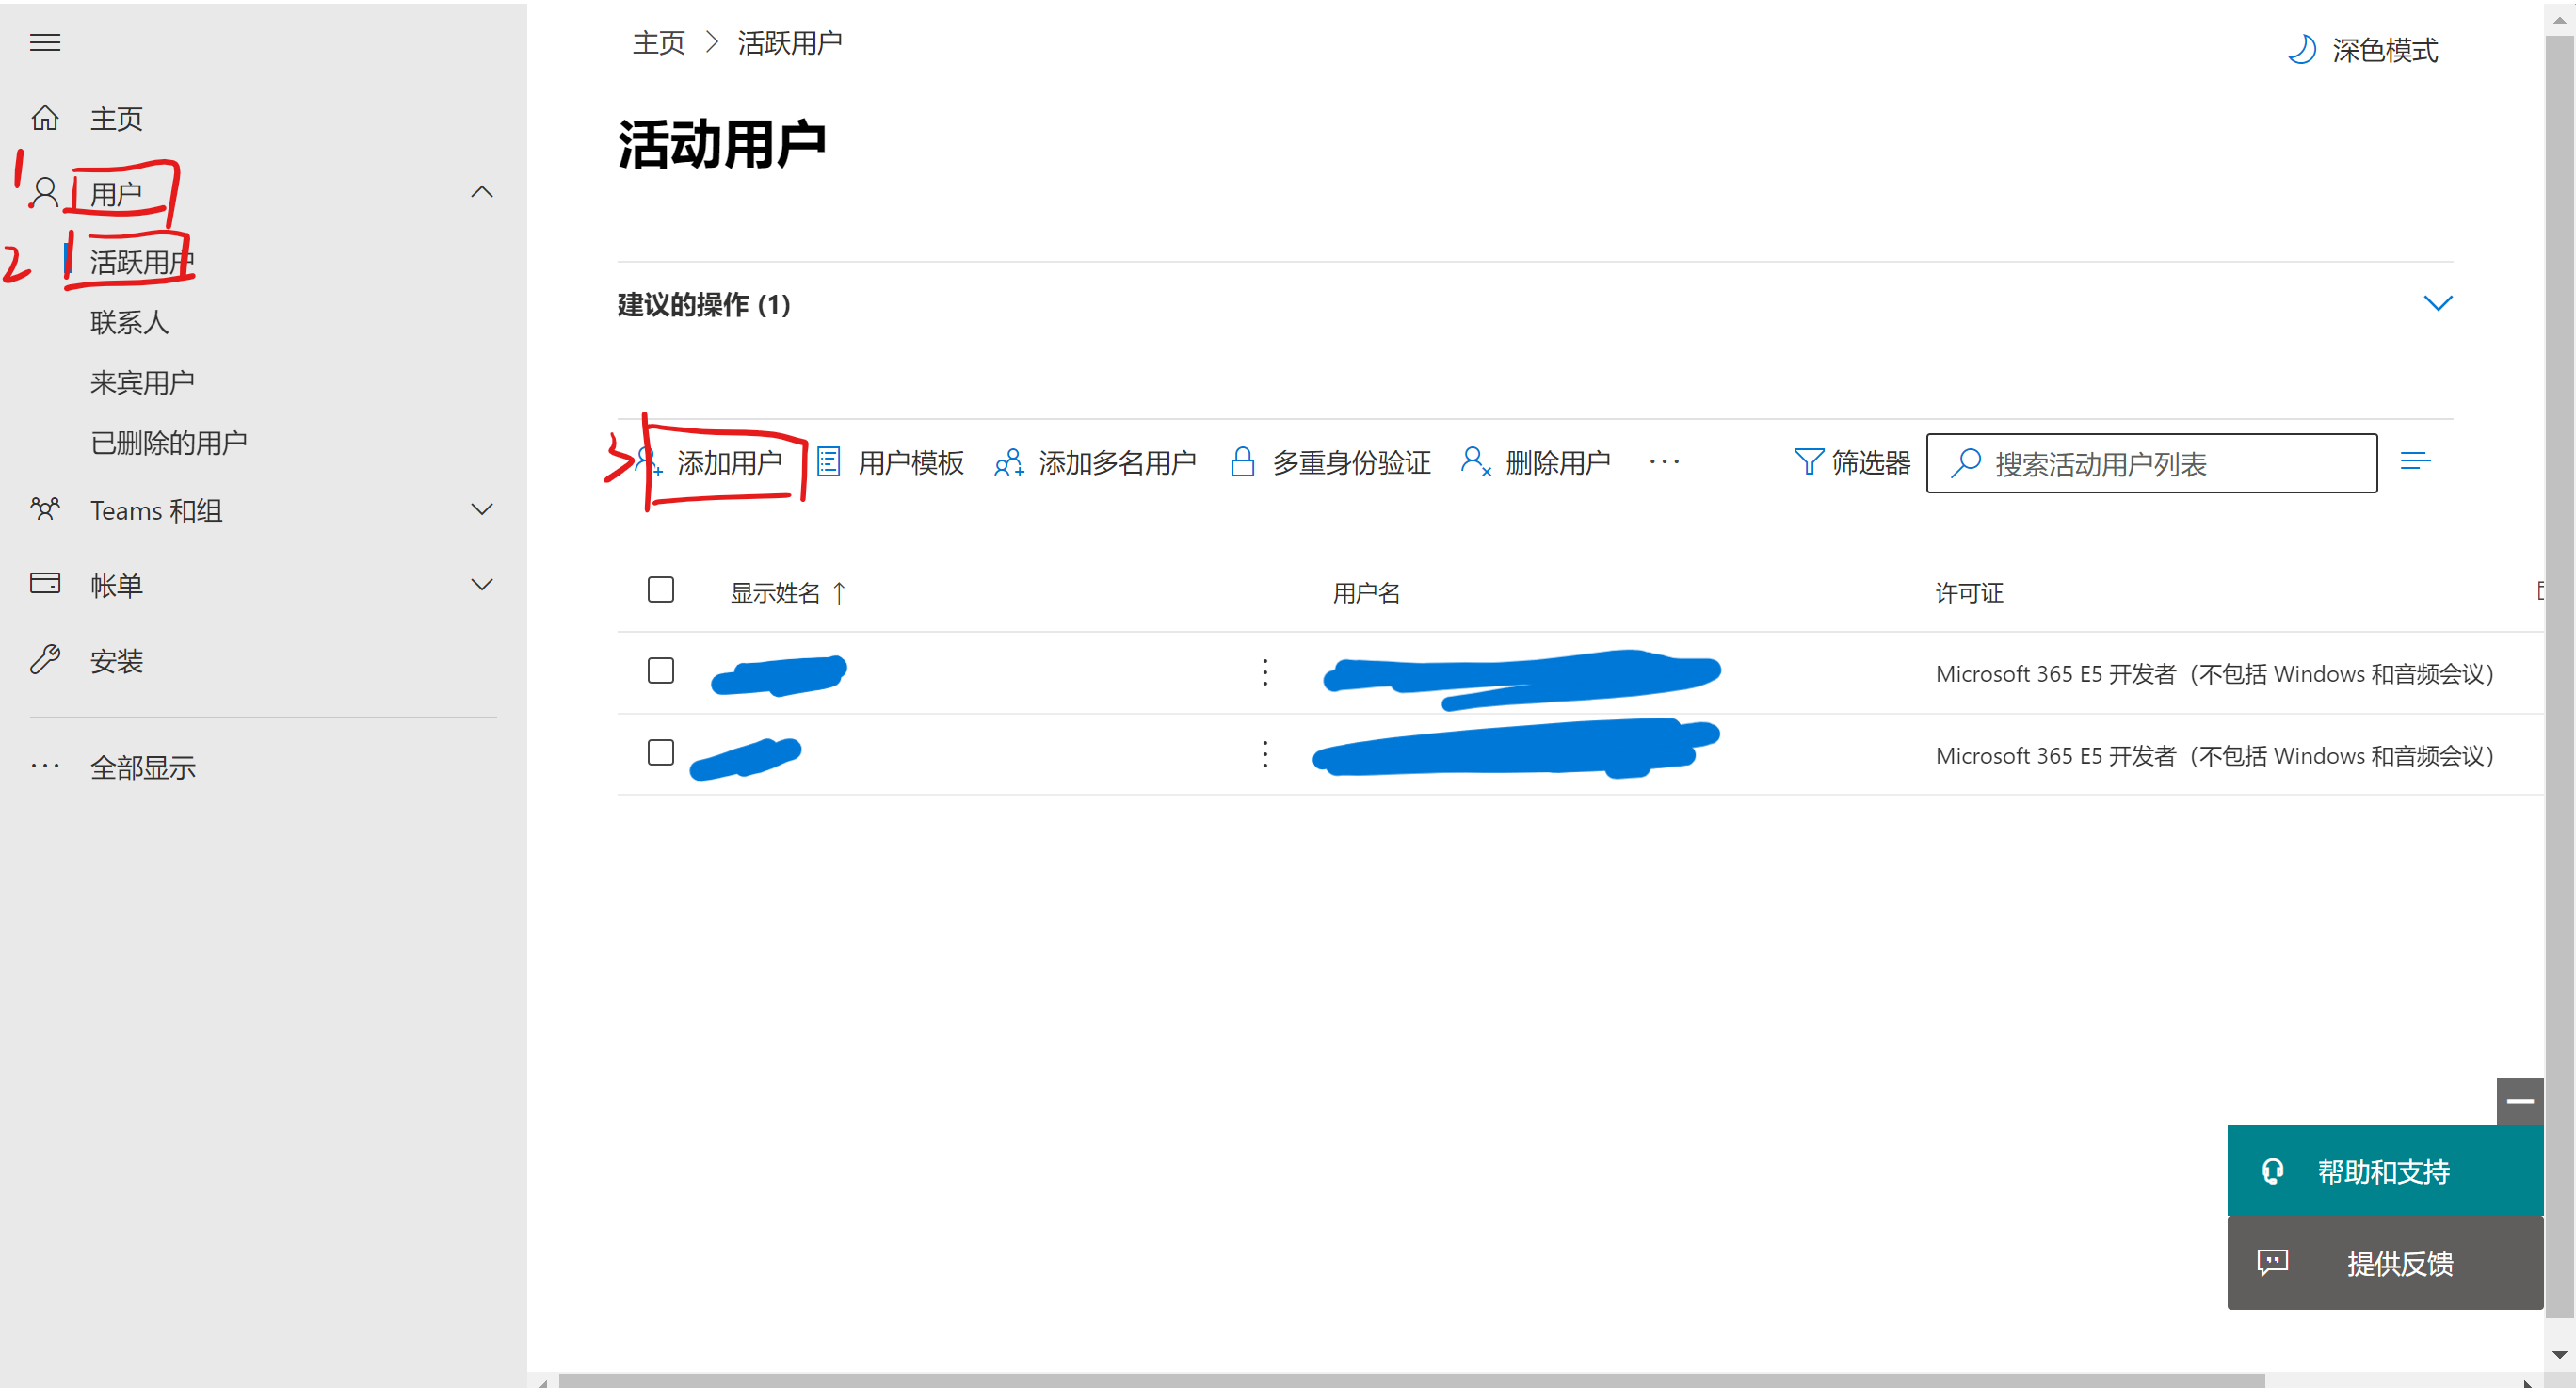
在注册了e5开发者后,使用管理员账号登录[Microsoft 365 管理中心](admin.microsoft.com)。
|
|||
|
|
|
|||
|
|
点击``用户``,``活跃用户``,``添加用户``。
|
|||
|
|
|
|||
|
|
|
|||
|
|
|
|||
|
|
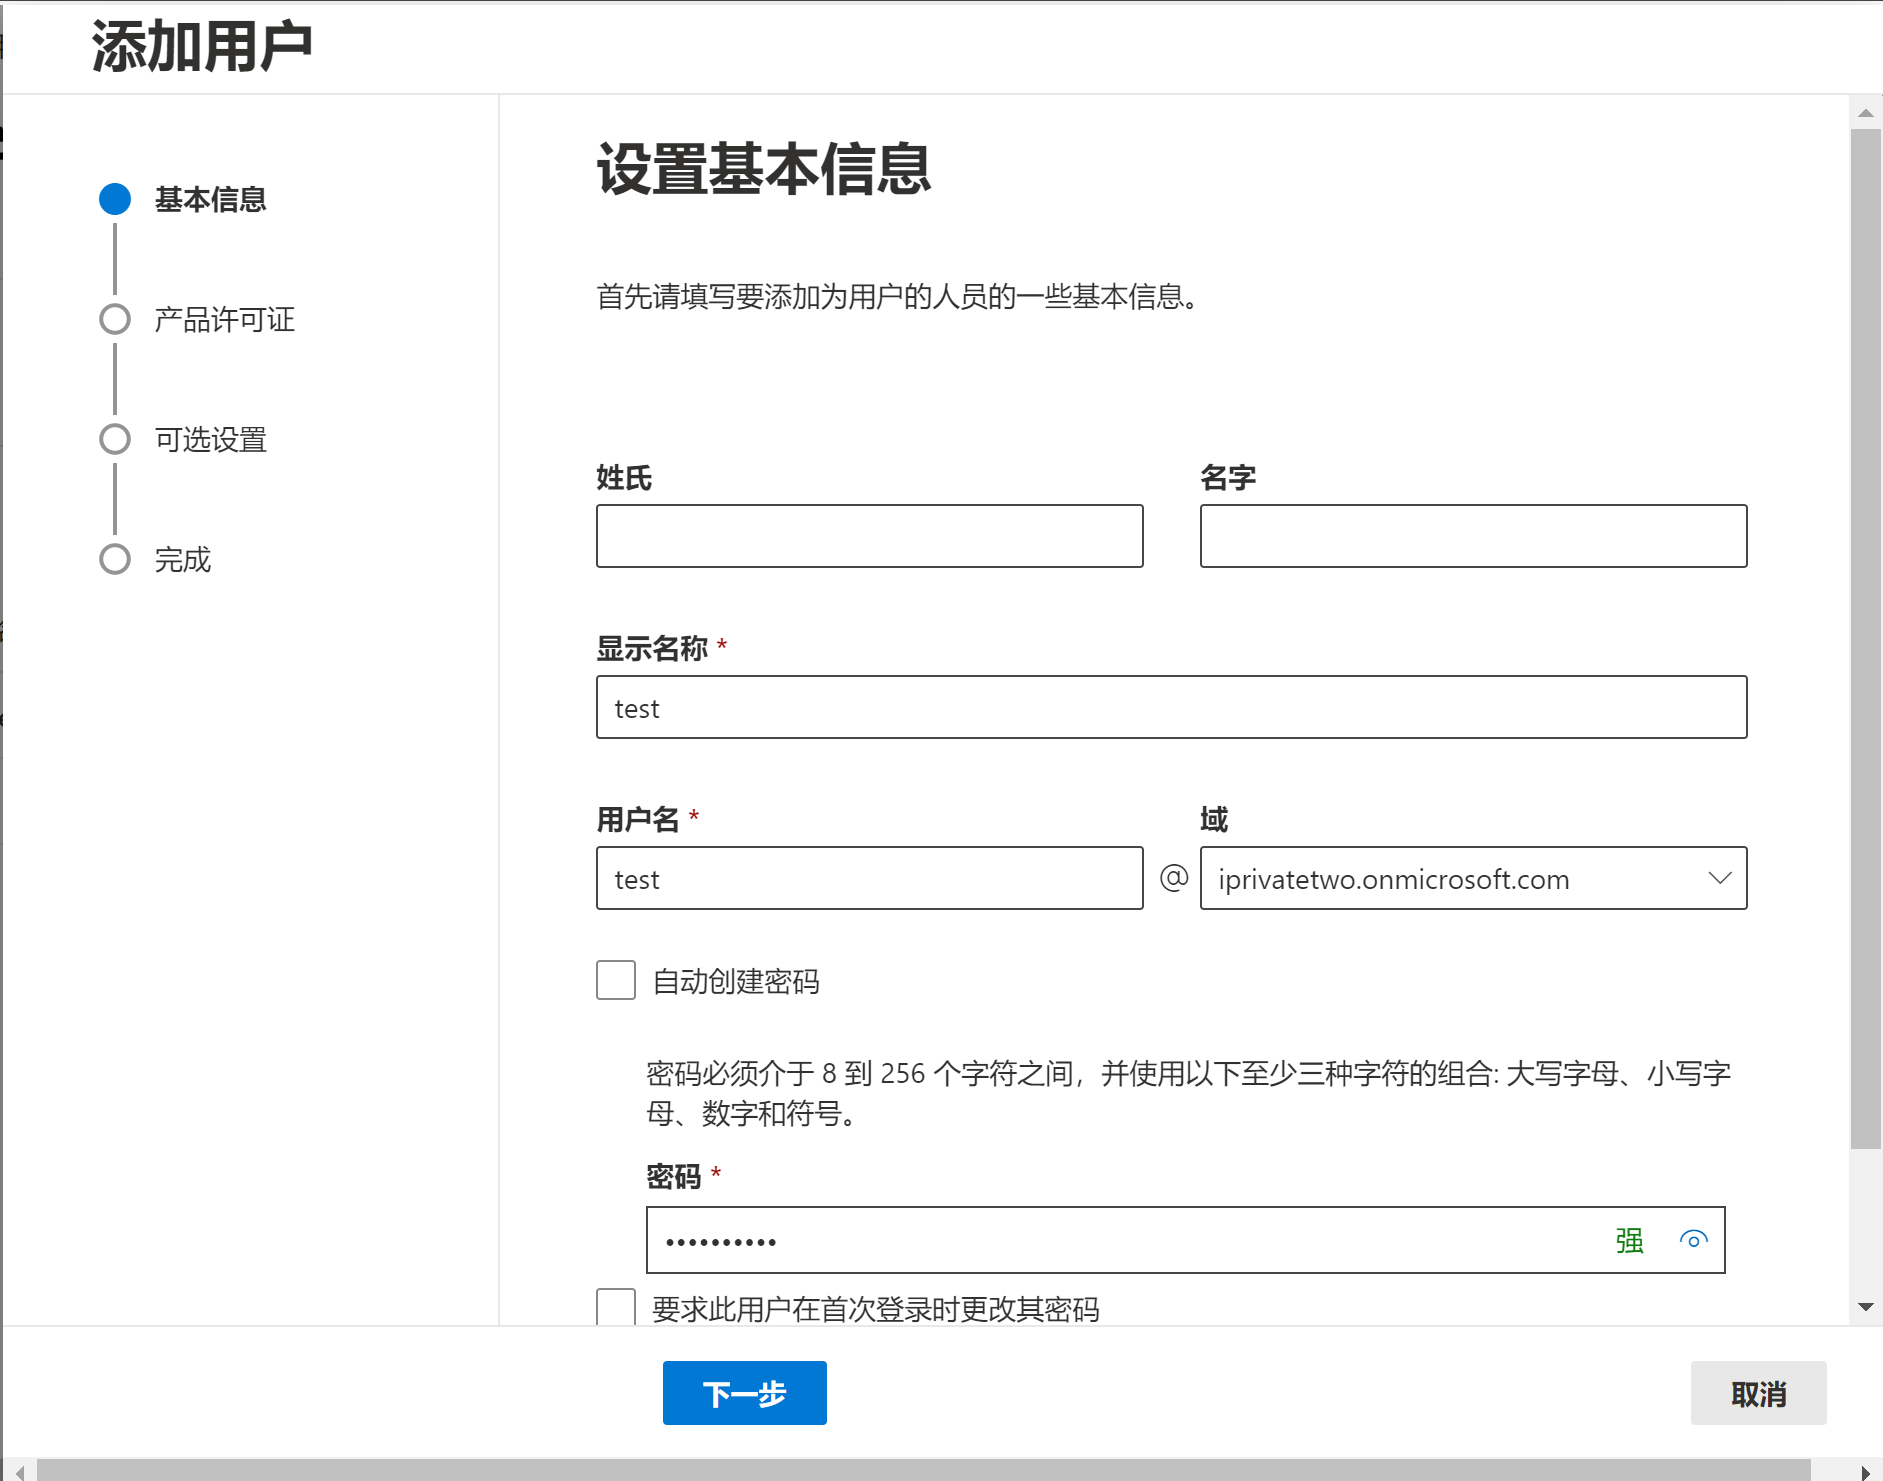
按需填写``显示名称``、``用户名``、以及``密码``。
|
|||
|
|
|
|||
|
|
|
|||
|
|
|
|||
|
|
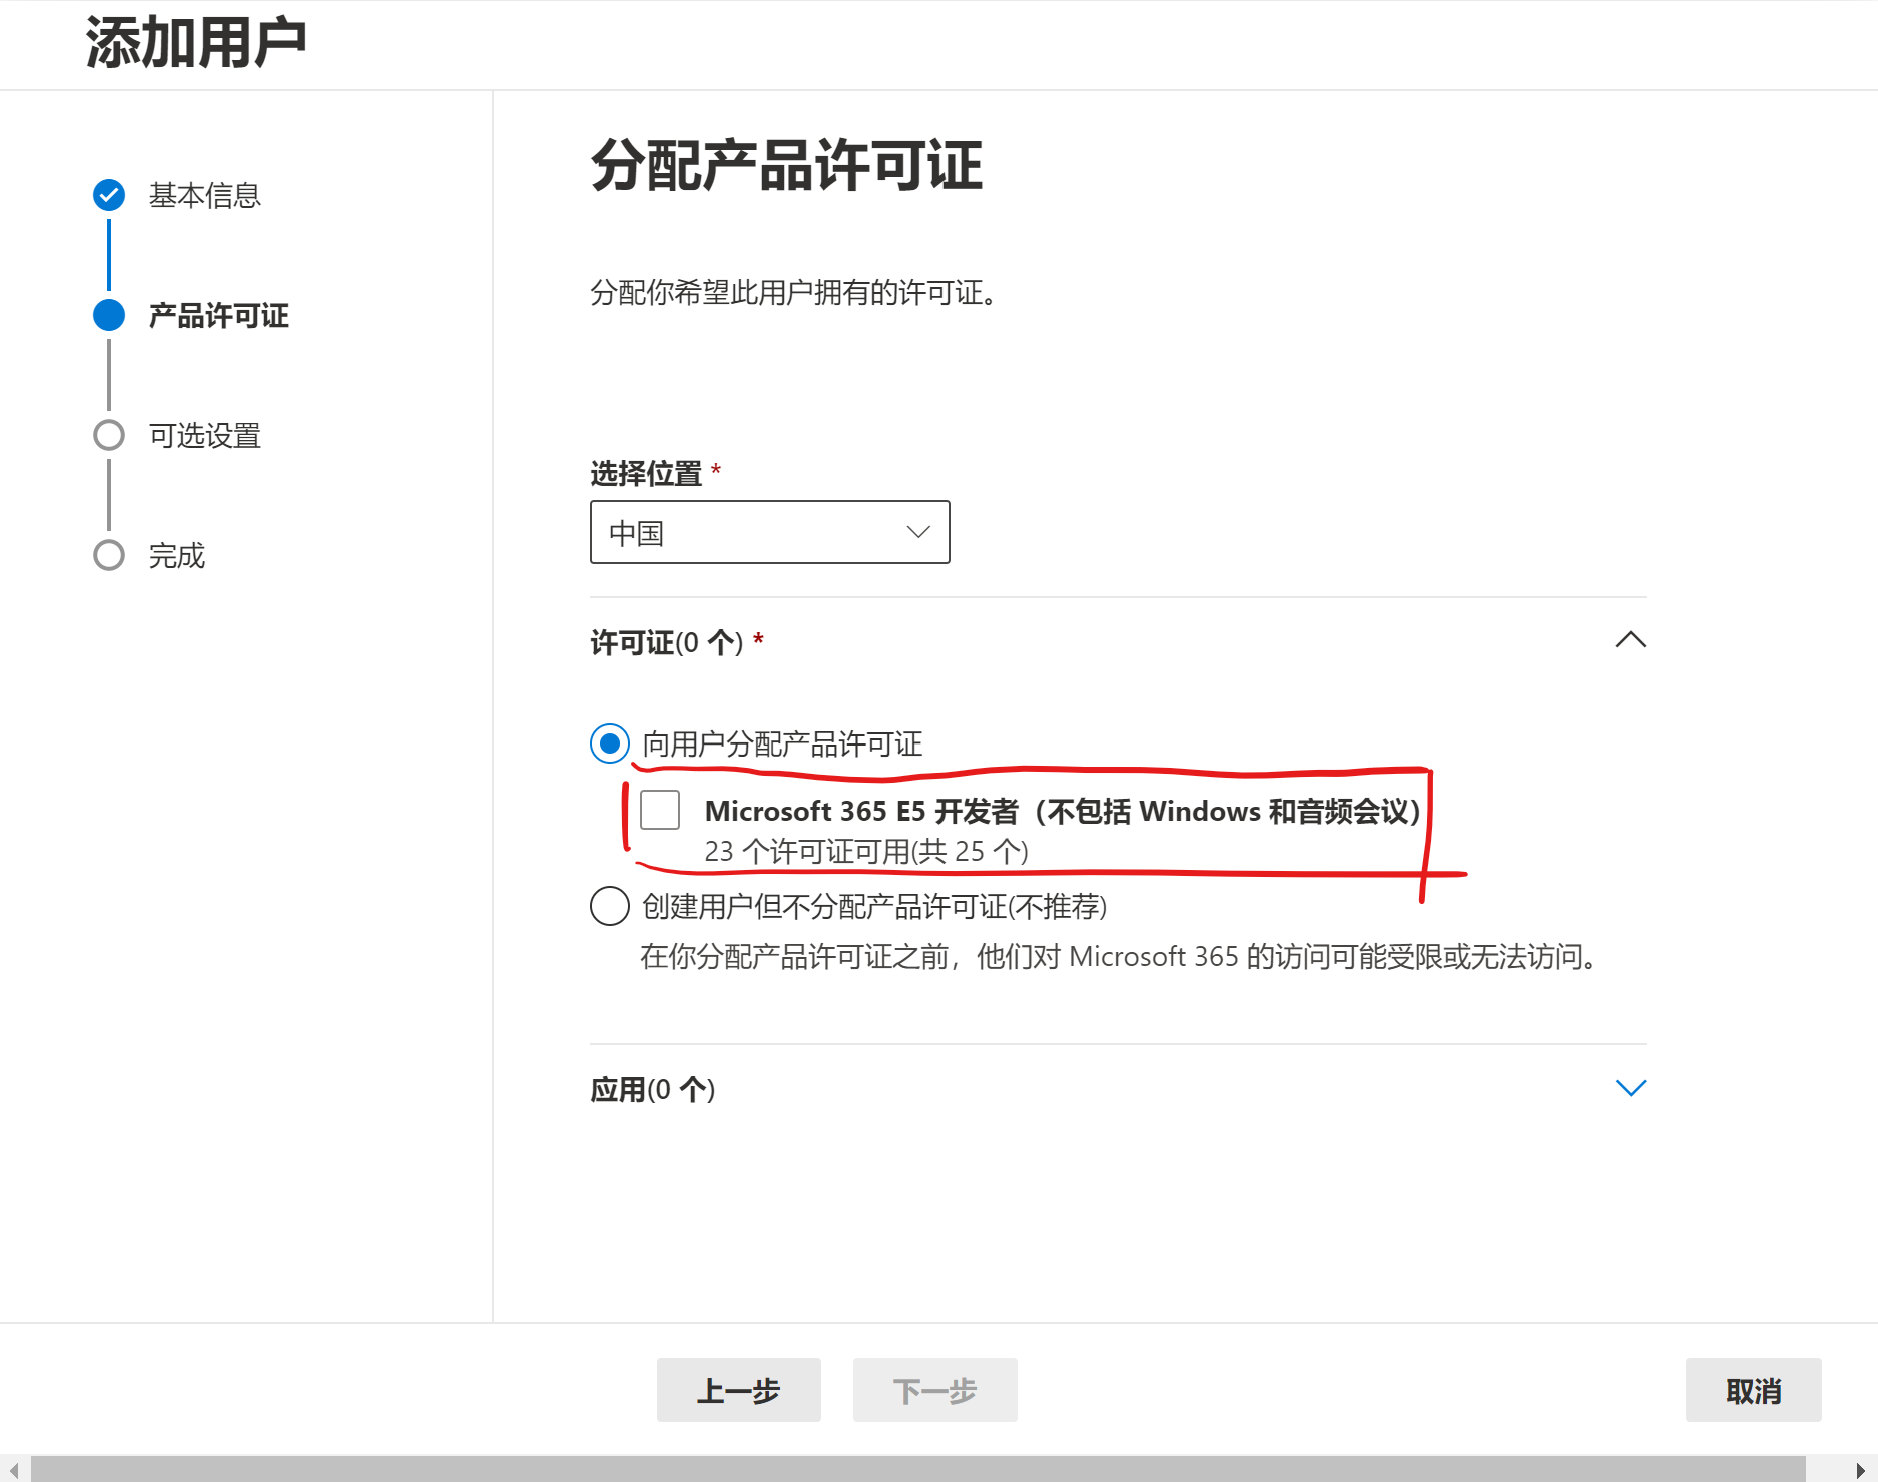
并勾选E5授权``Microsoft 365 E5 开发者``。
|
|||
|
|
|
|||
|
|
|
|||
|
|
|
|||
|
|
可选设置无需填写,点击完成即可。
|
|||
|
|
|
|||
|
|
# 2. 注册新应用
|
|||
|
|
|
|||
|
|
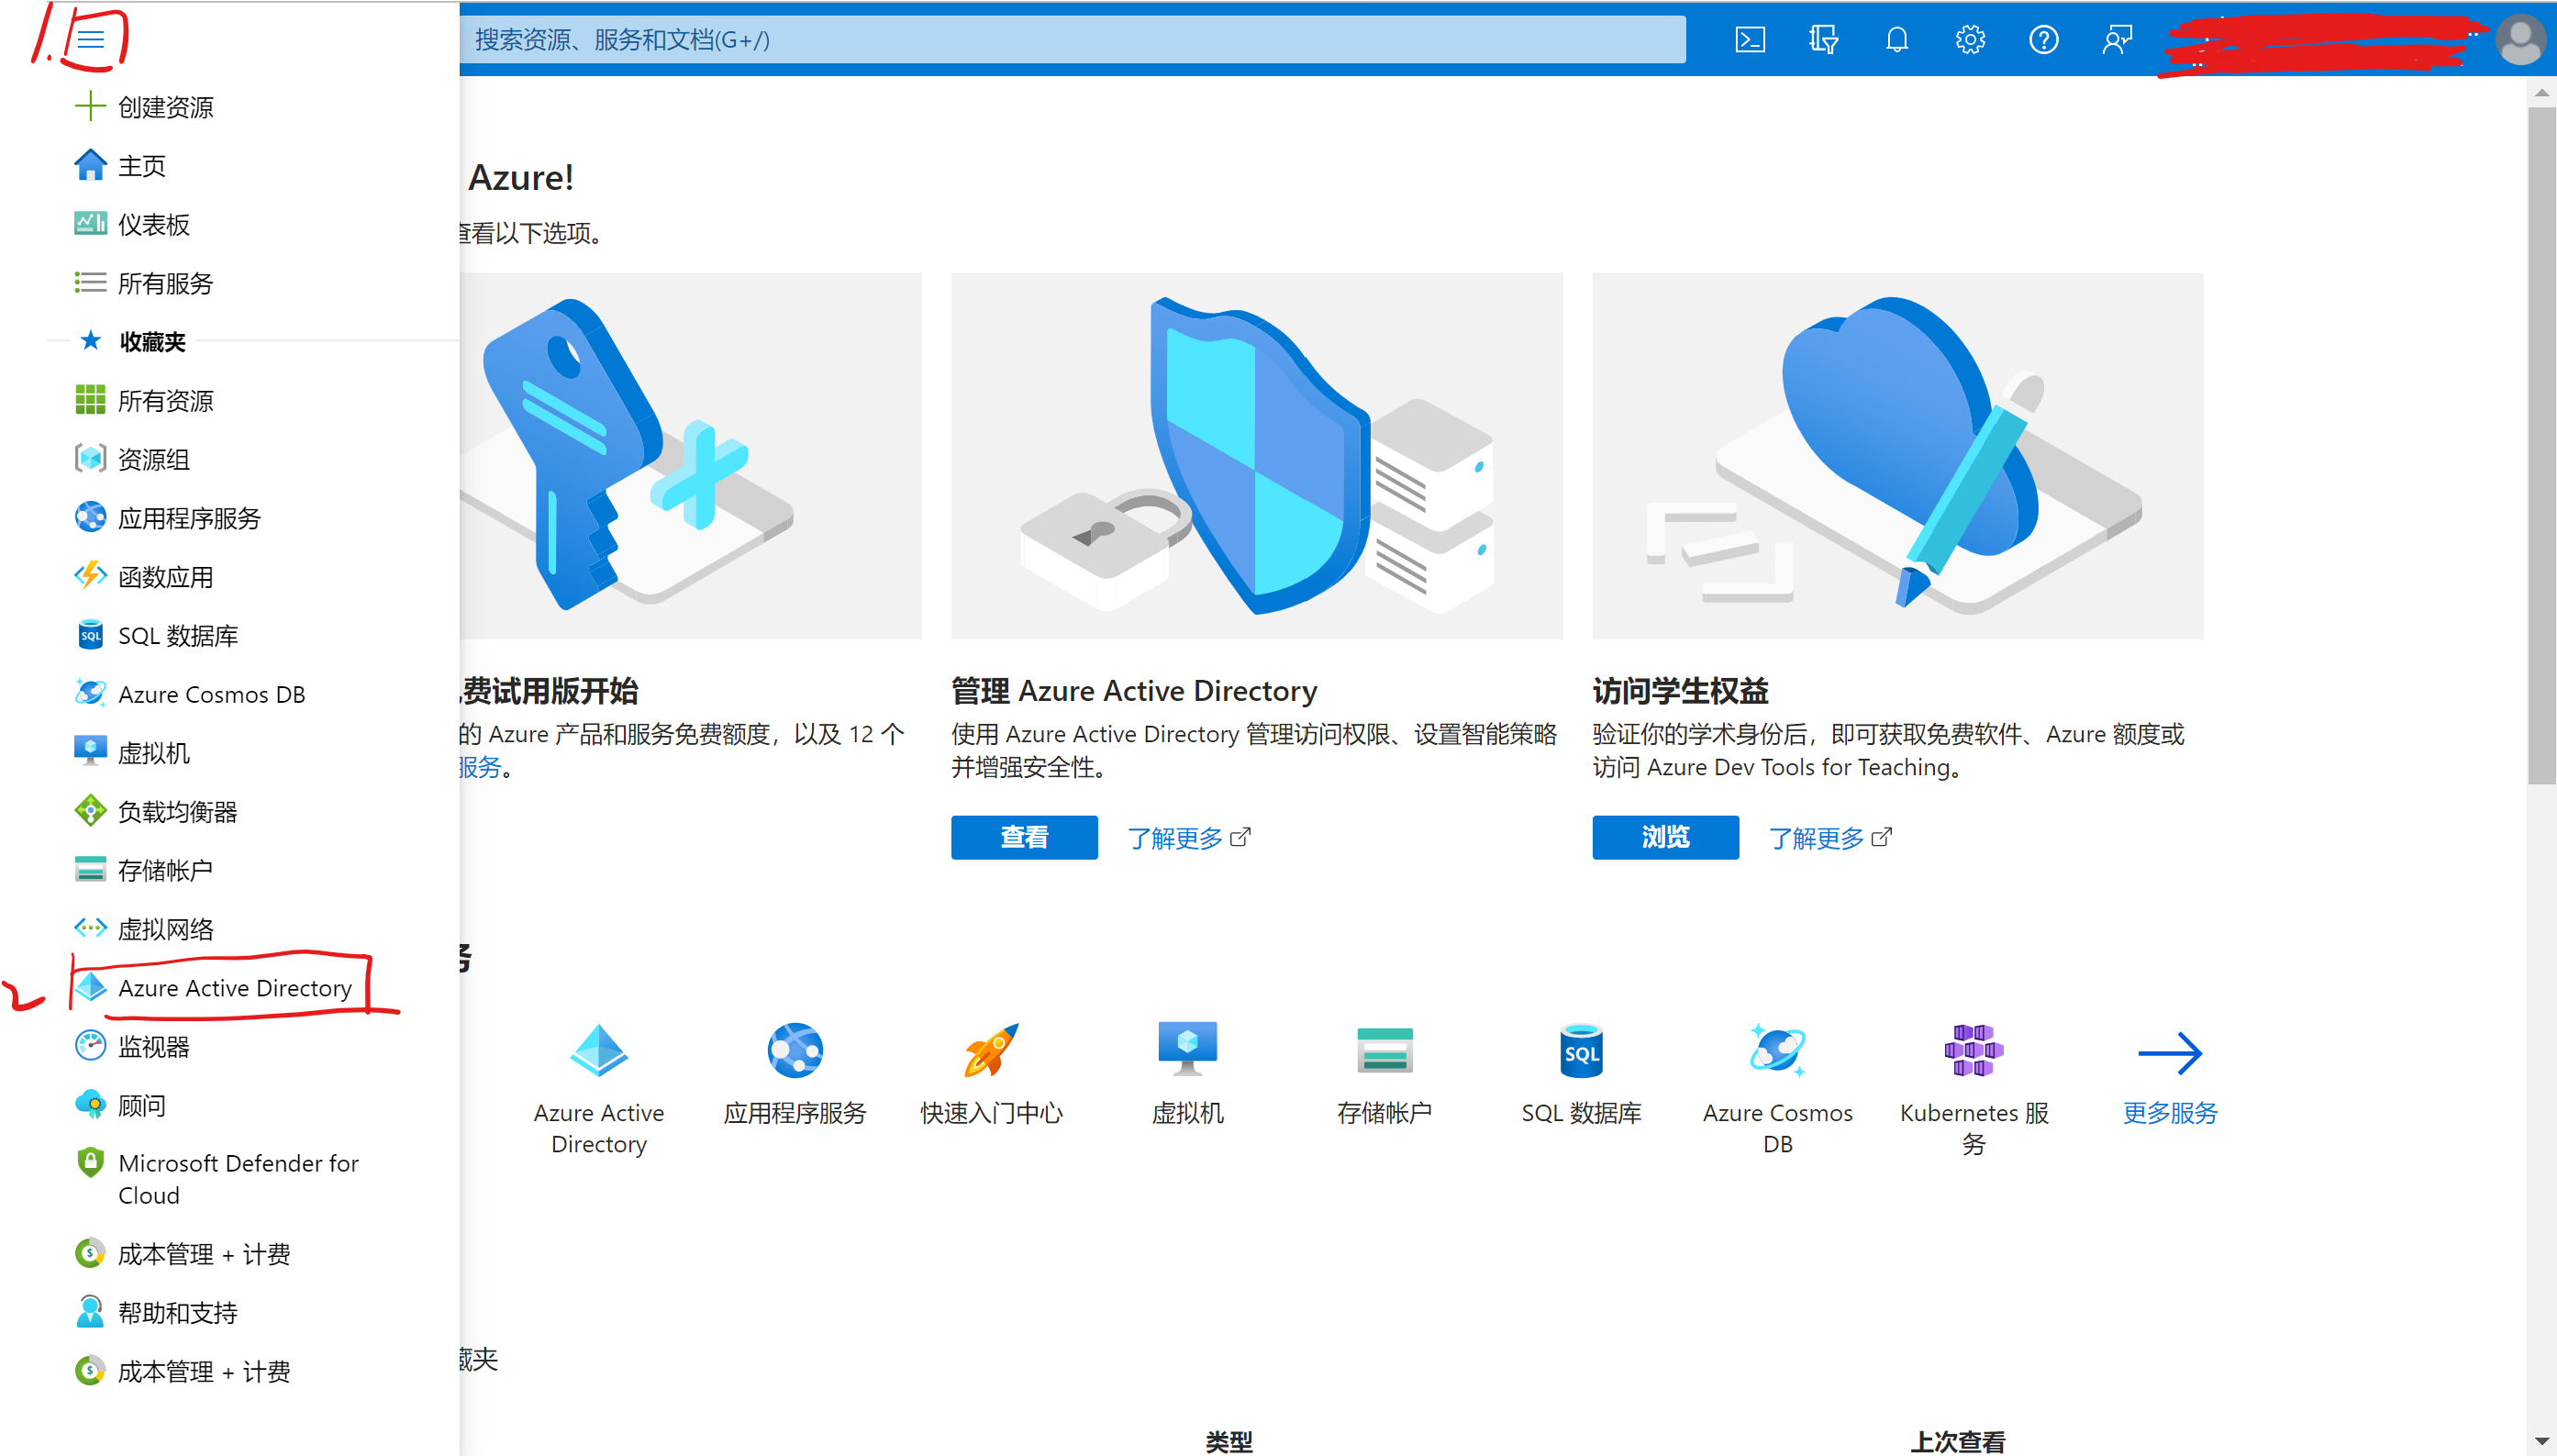
进入[Microsoft Azure主页](https://portal.azure.com/#home),点击左侧菜单栏,再点击 ~~``Azure Active Directory``~~,现在是 ``Microsoft Entra ID``。
|
|||
|
|
|
|||
|
|
|
|||
|
|
|
|||
|
|
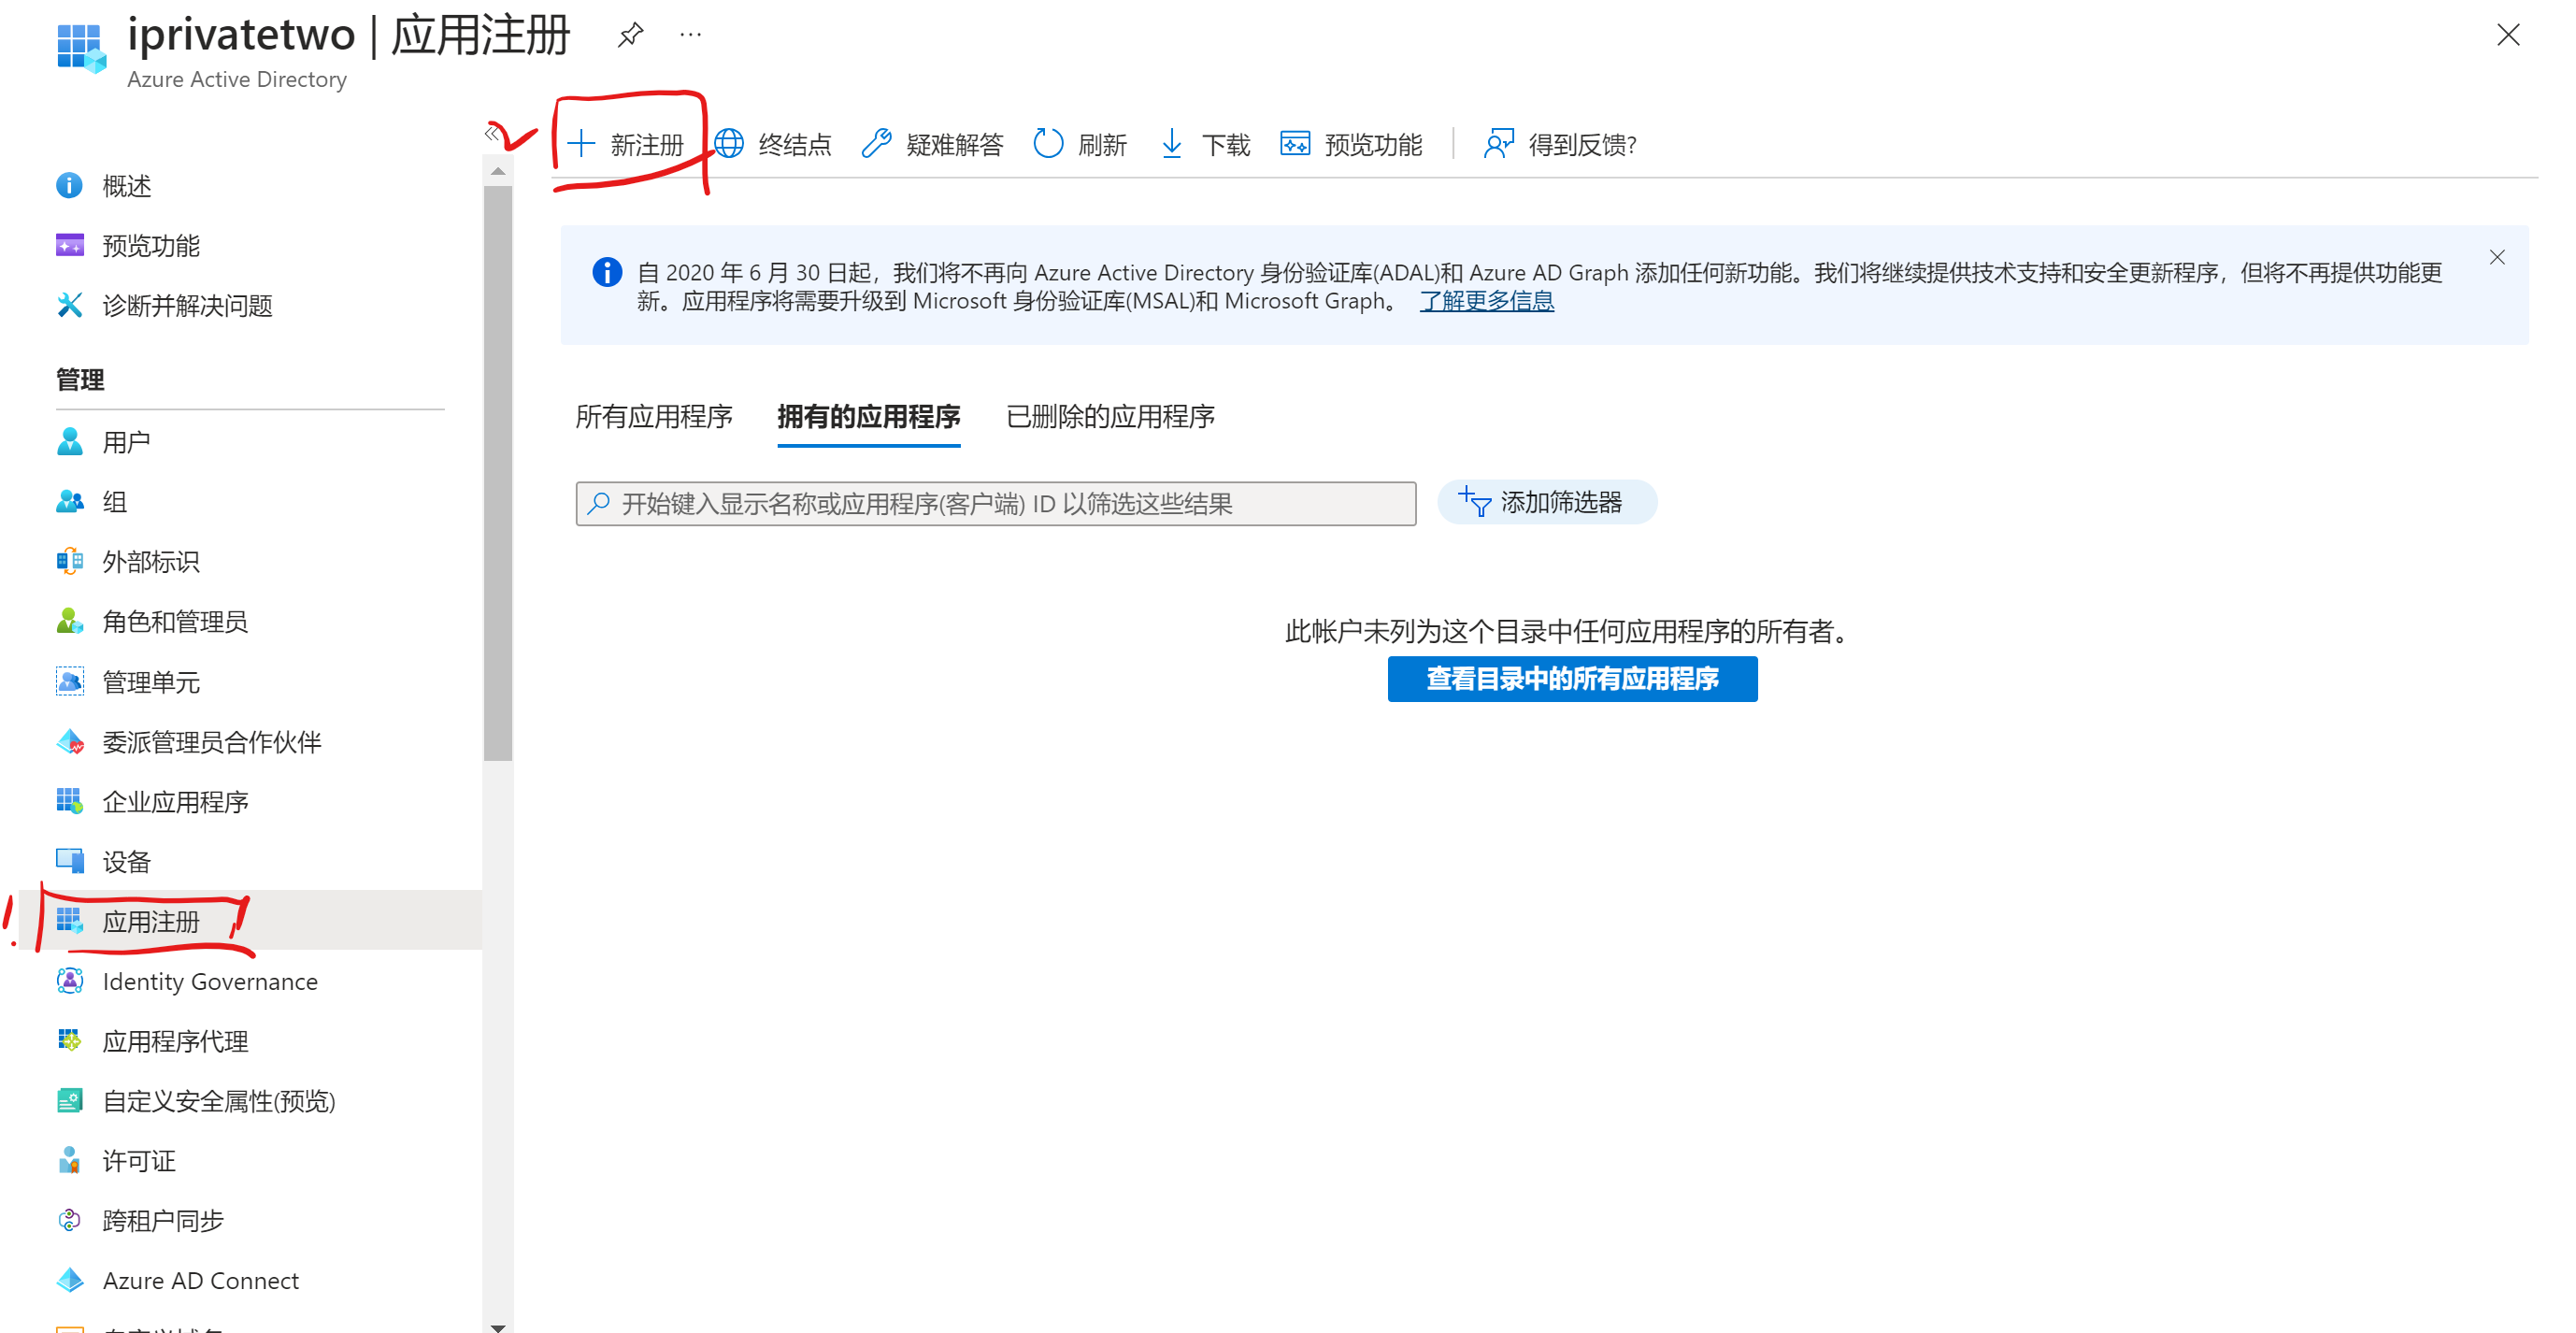
点击左侧``应用注册``,再点击``新注册``以注册新应用。
|
|||
|
|
|
|||
|
|
|
|||
|
|
|
|||
|
|
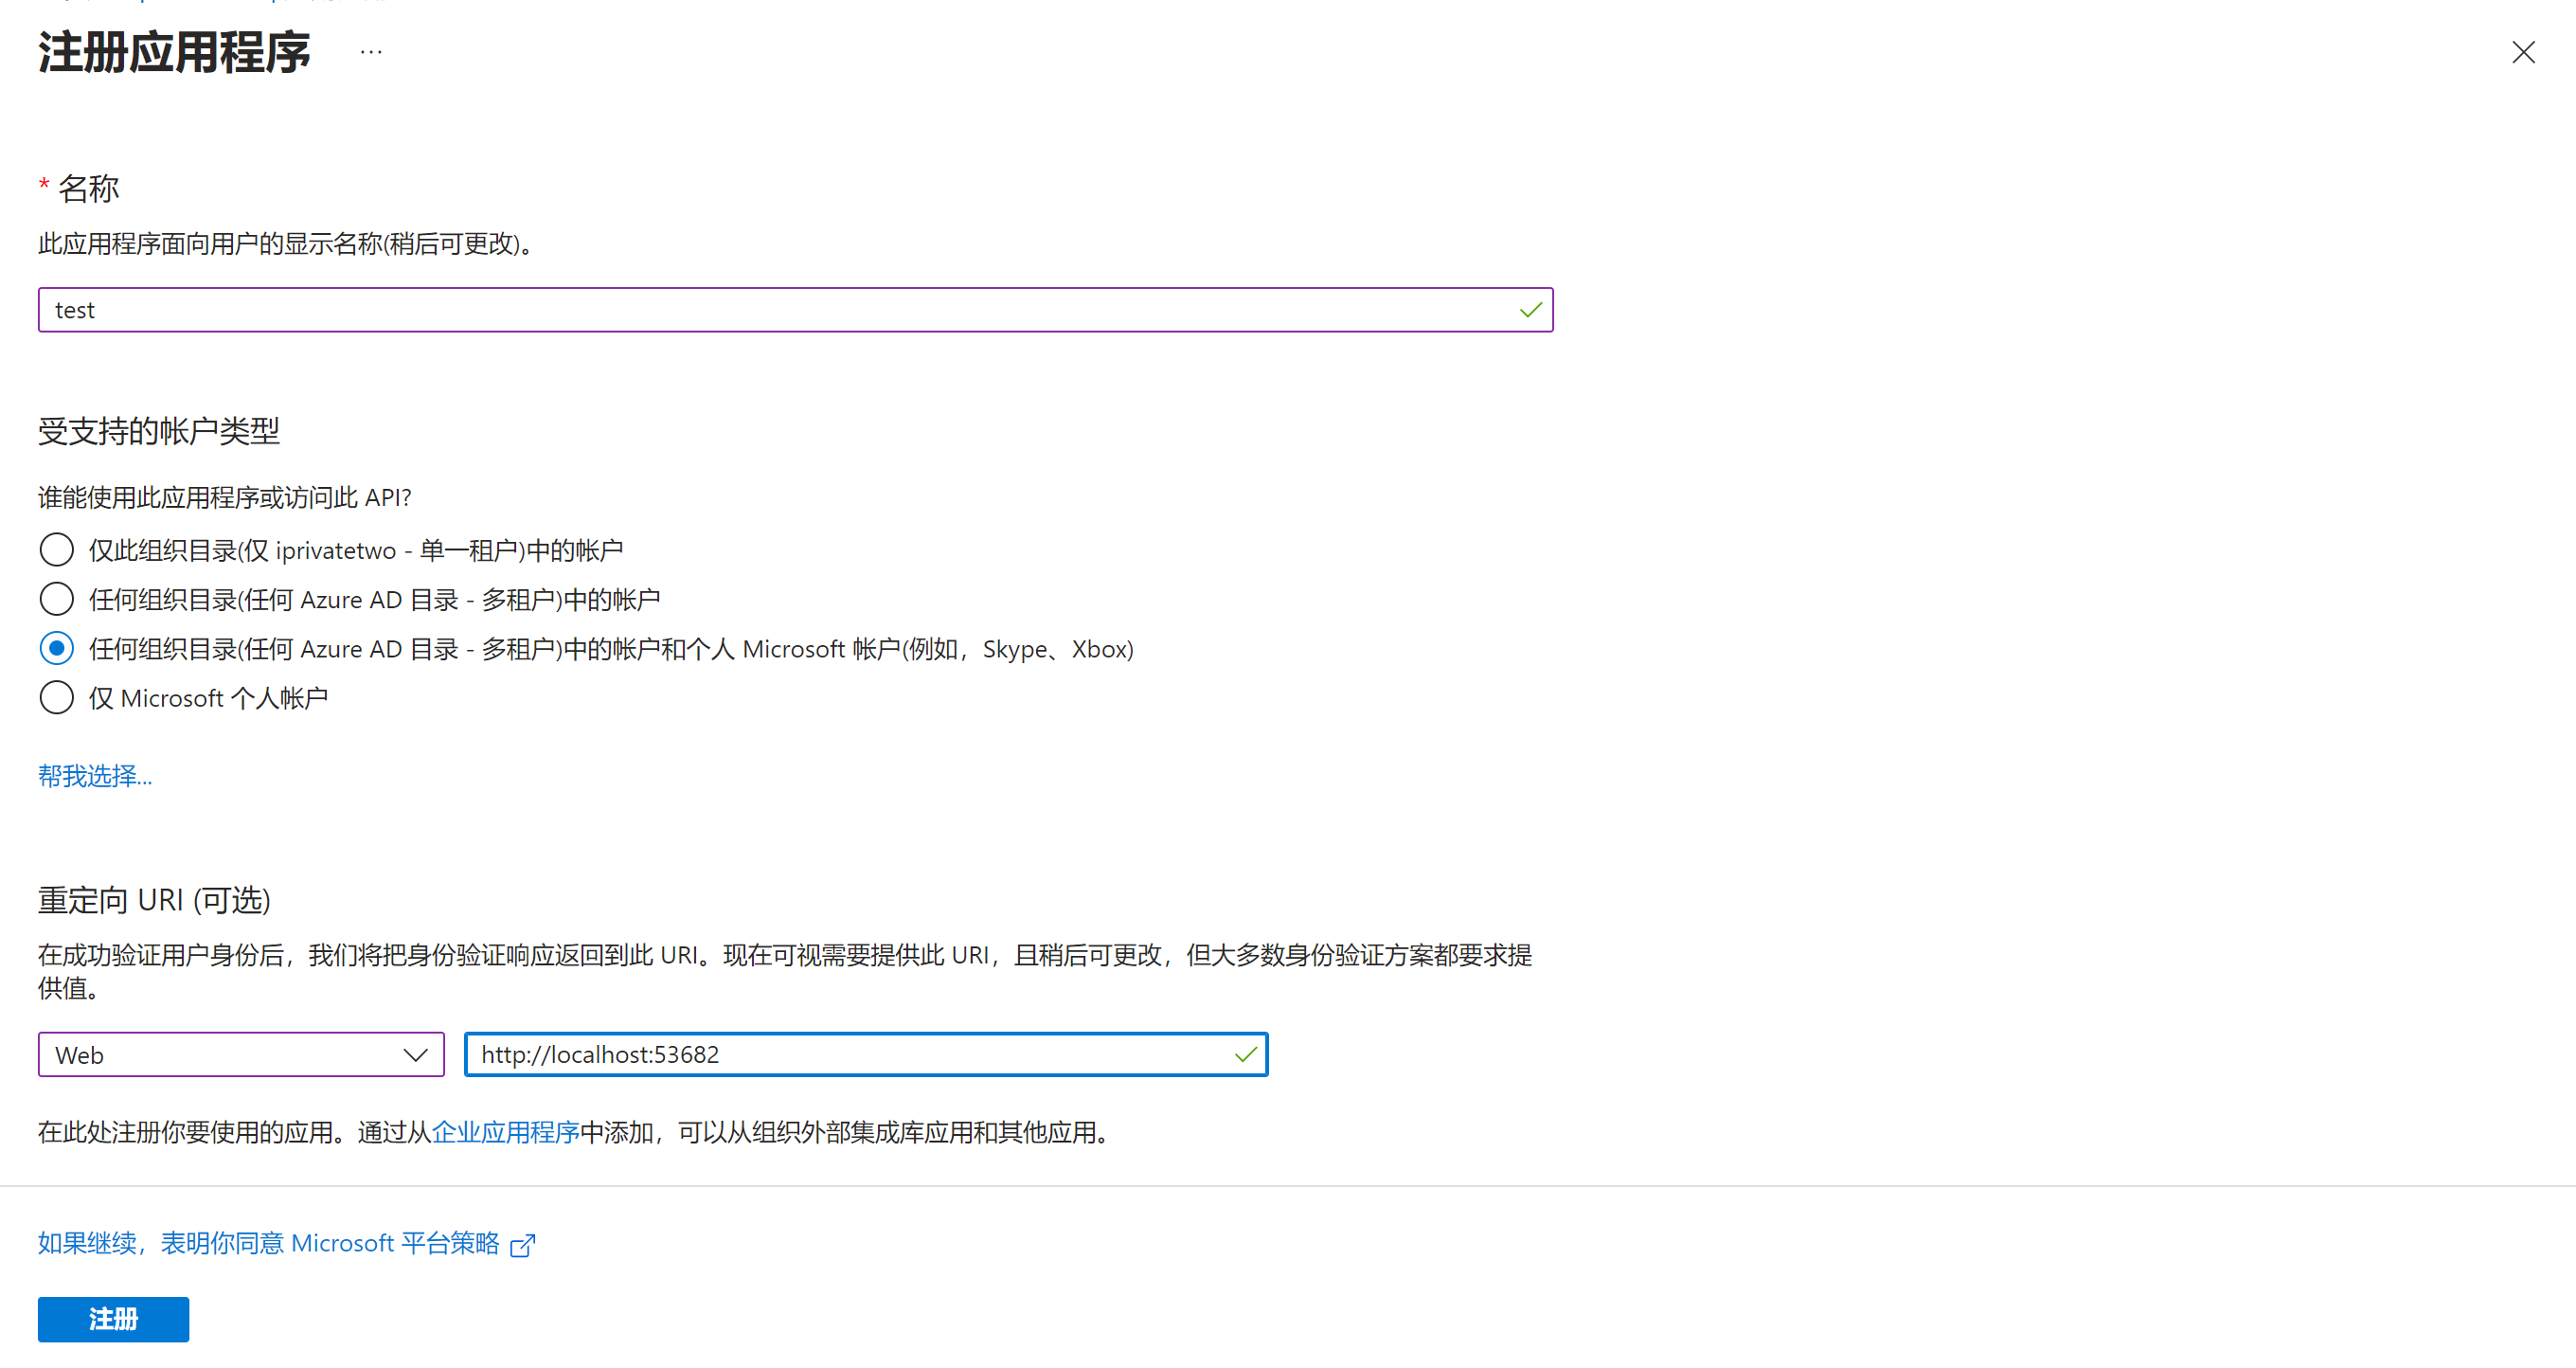
名称随意填写,受支持的账户类型选择第三项,重定向URI选择Web并填写``http://localhost:53682``。
|
|||
|
|
|
|||
|
|
|
|||
|
|
|
|||
|
|
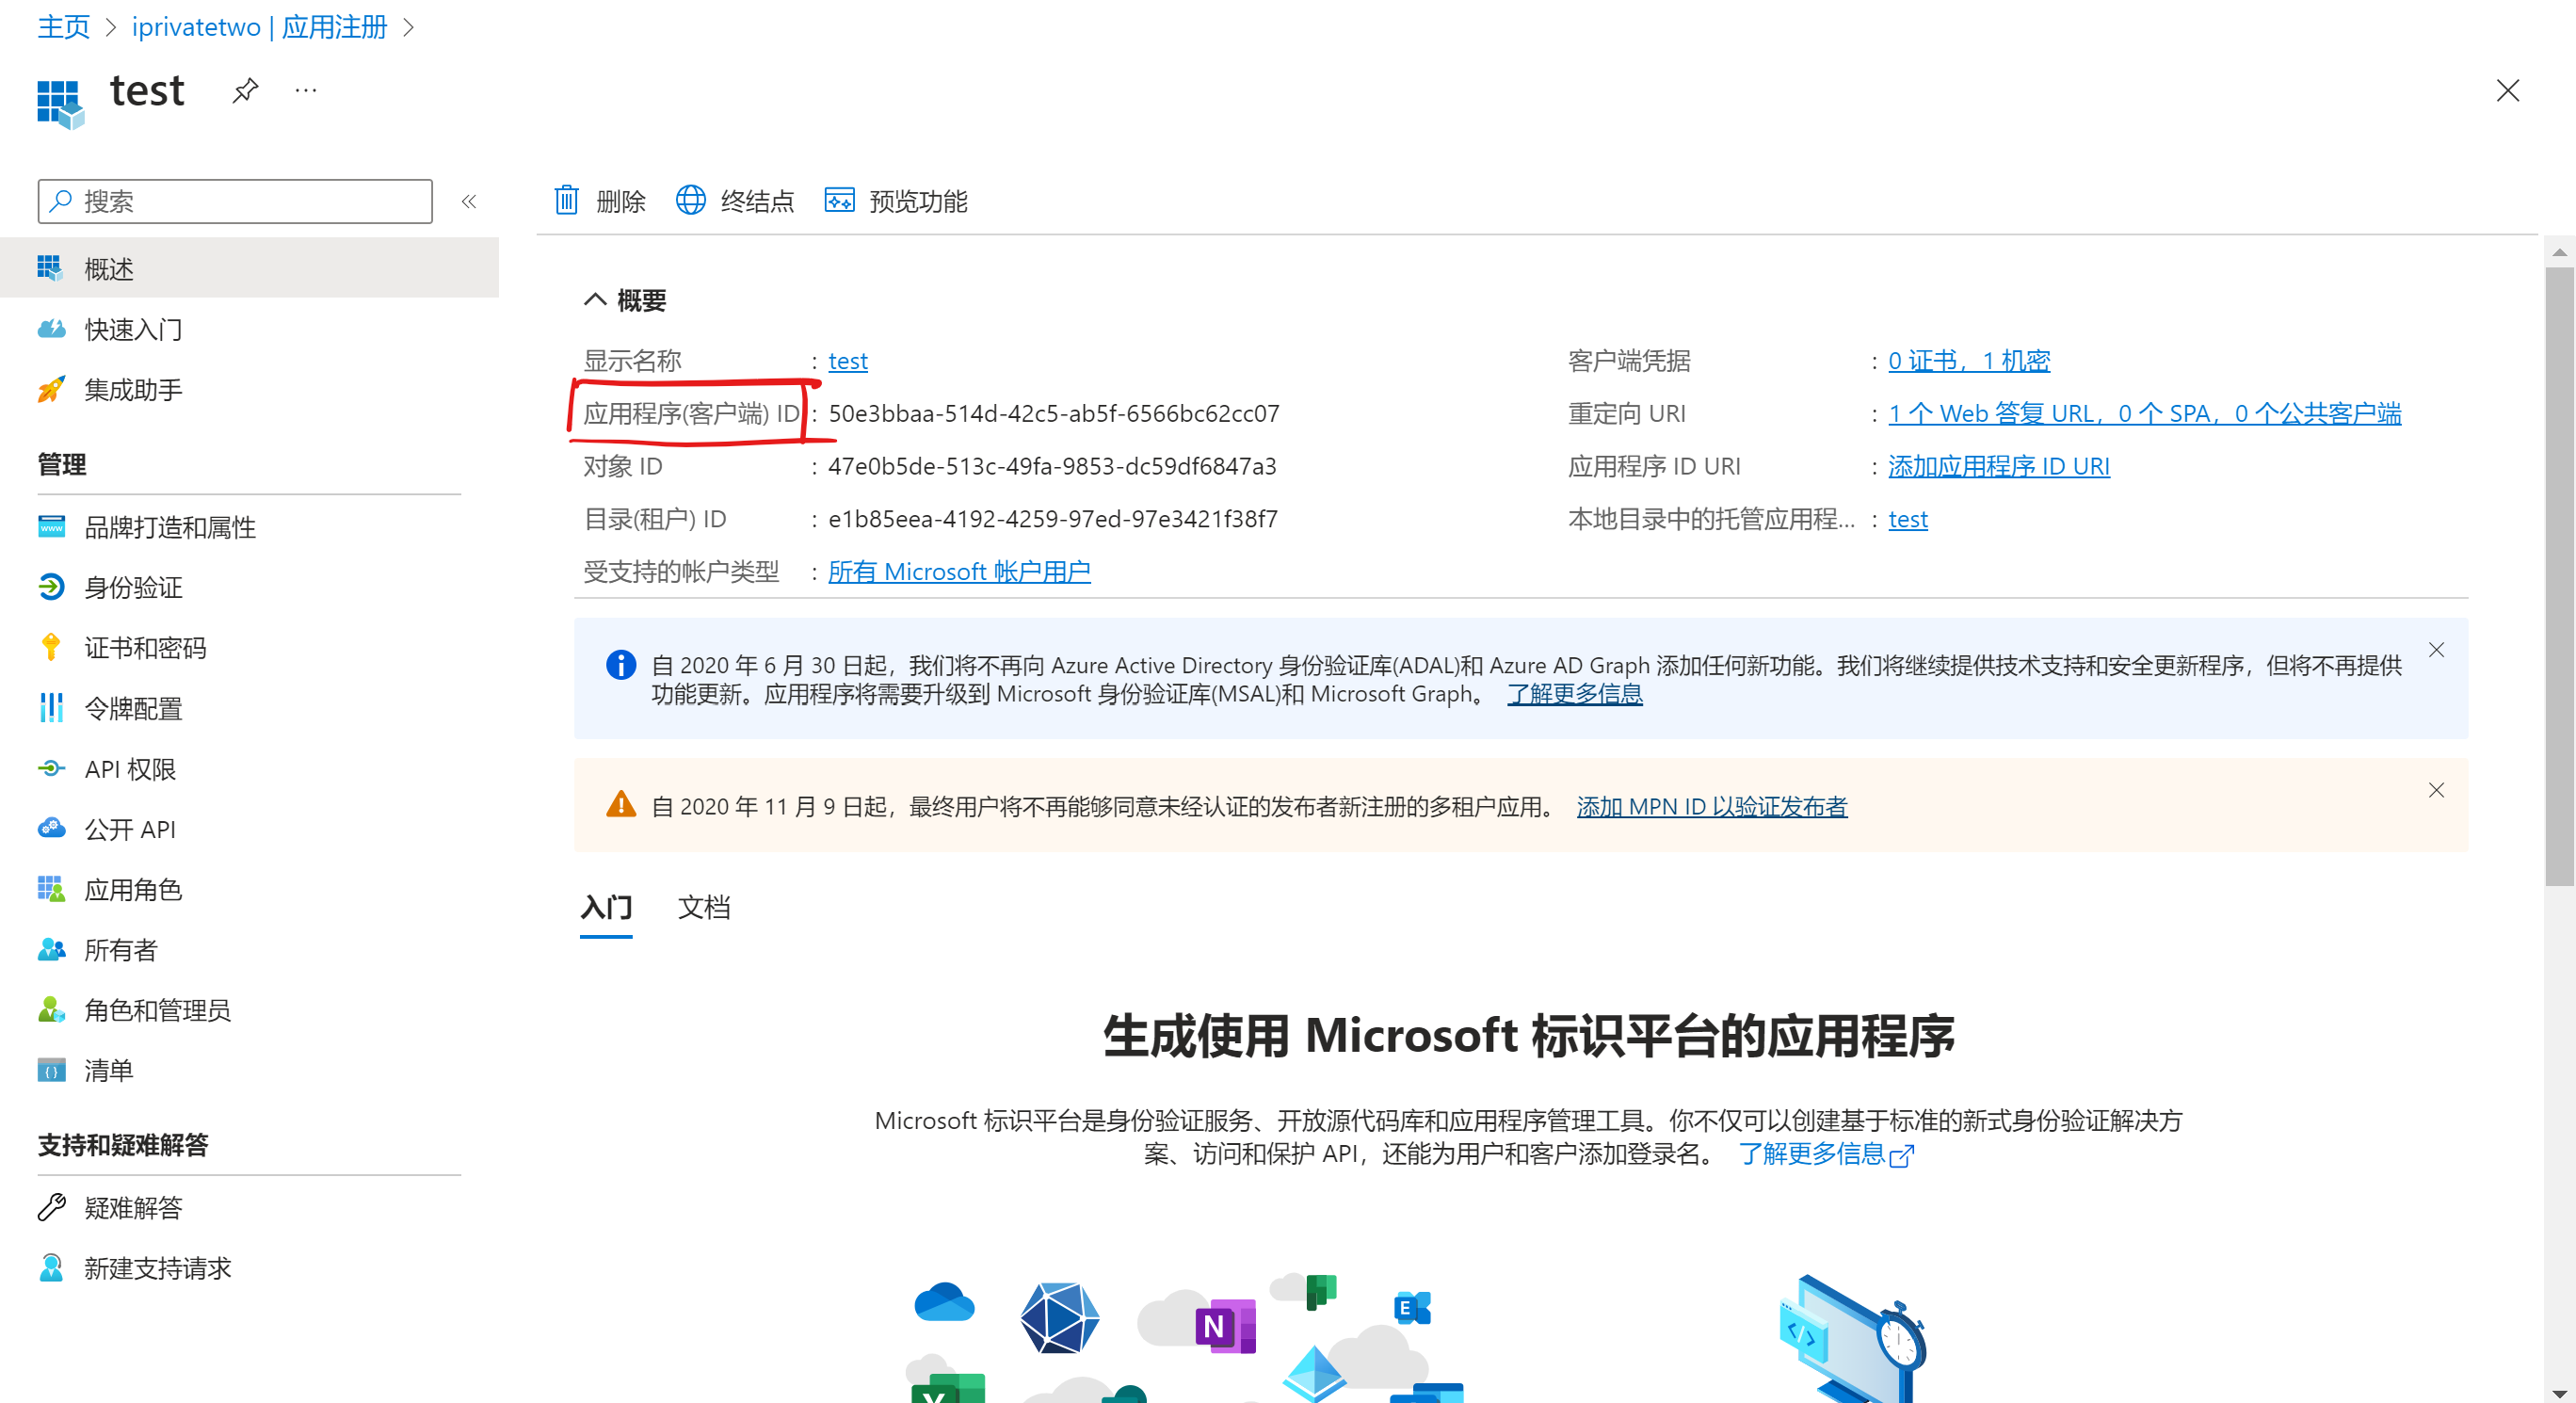
注册完成后保存``应用程序(客户端) ID``备用。
|
|||
|
|
|
|||
|
|
|
|||
|
|
|
|||
|
|
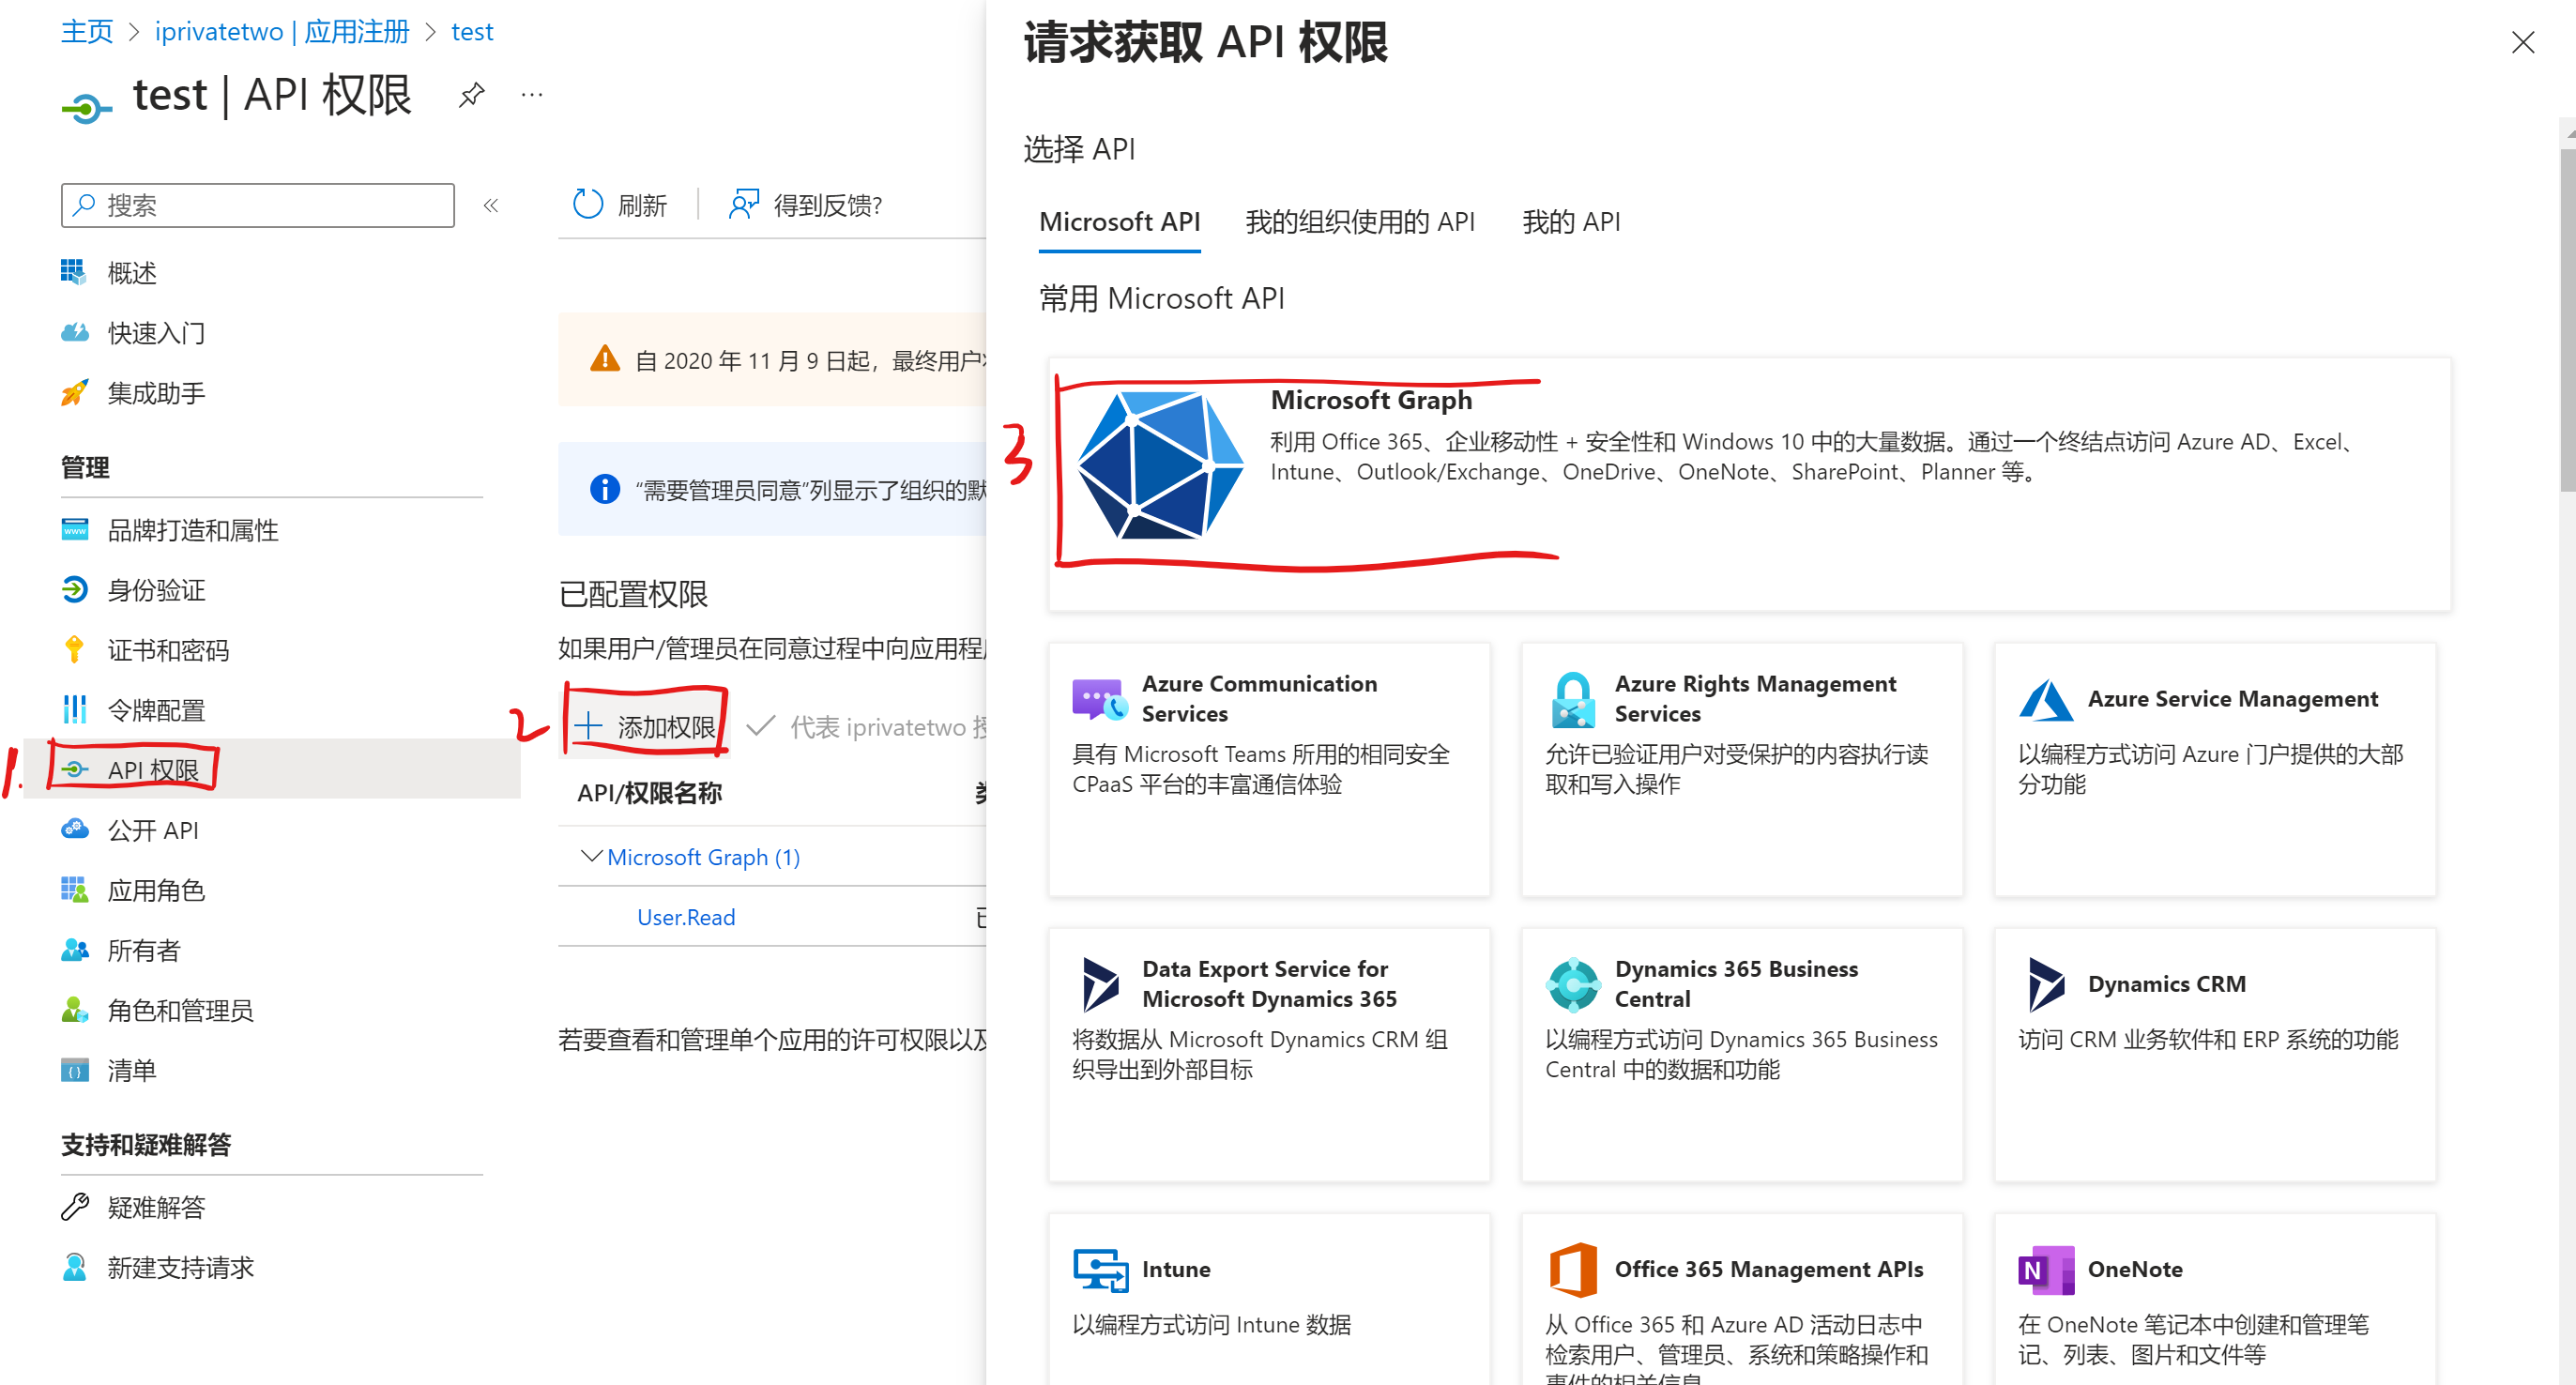
# 3. 授予api权限
|
|||
|
|
|
|||
|
|
在左侧导航栏选择``API权限``,再点击``添加权限``,再点击``Microsoft Graph``。
|
|||
|
|
|
|||
|
|
|
|||
|
|
|
|||
|
|
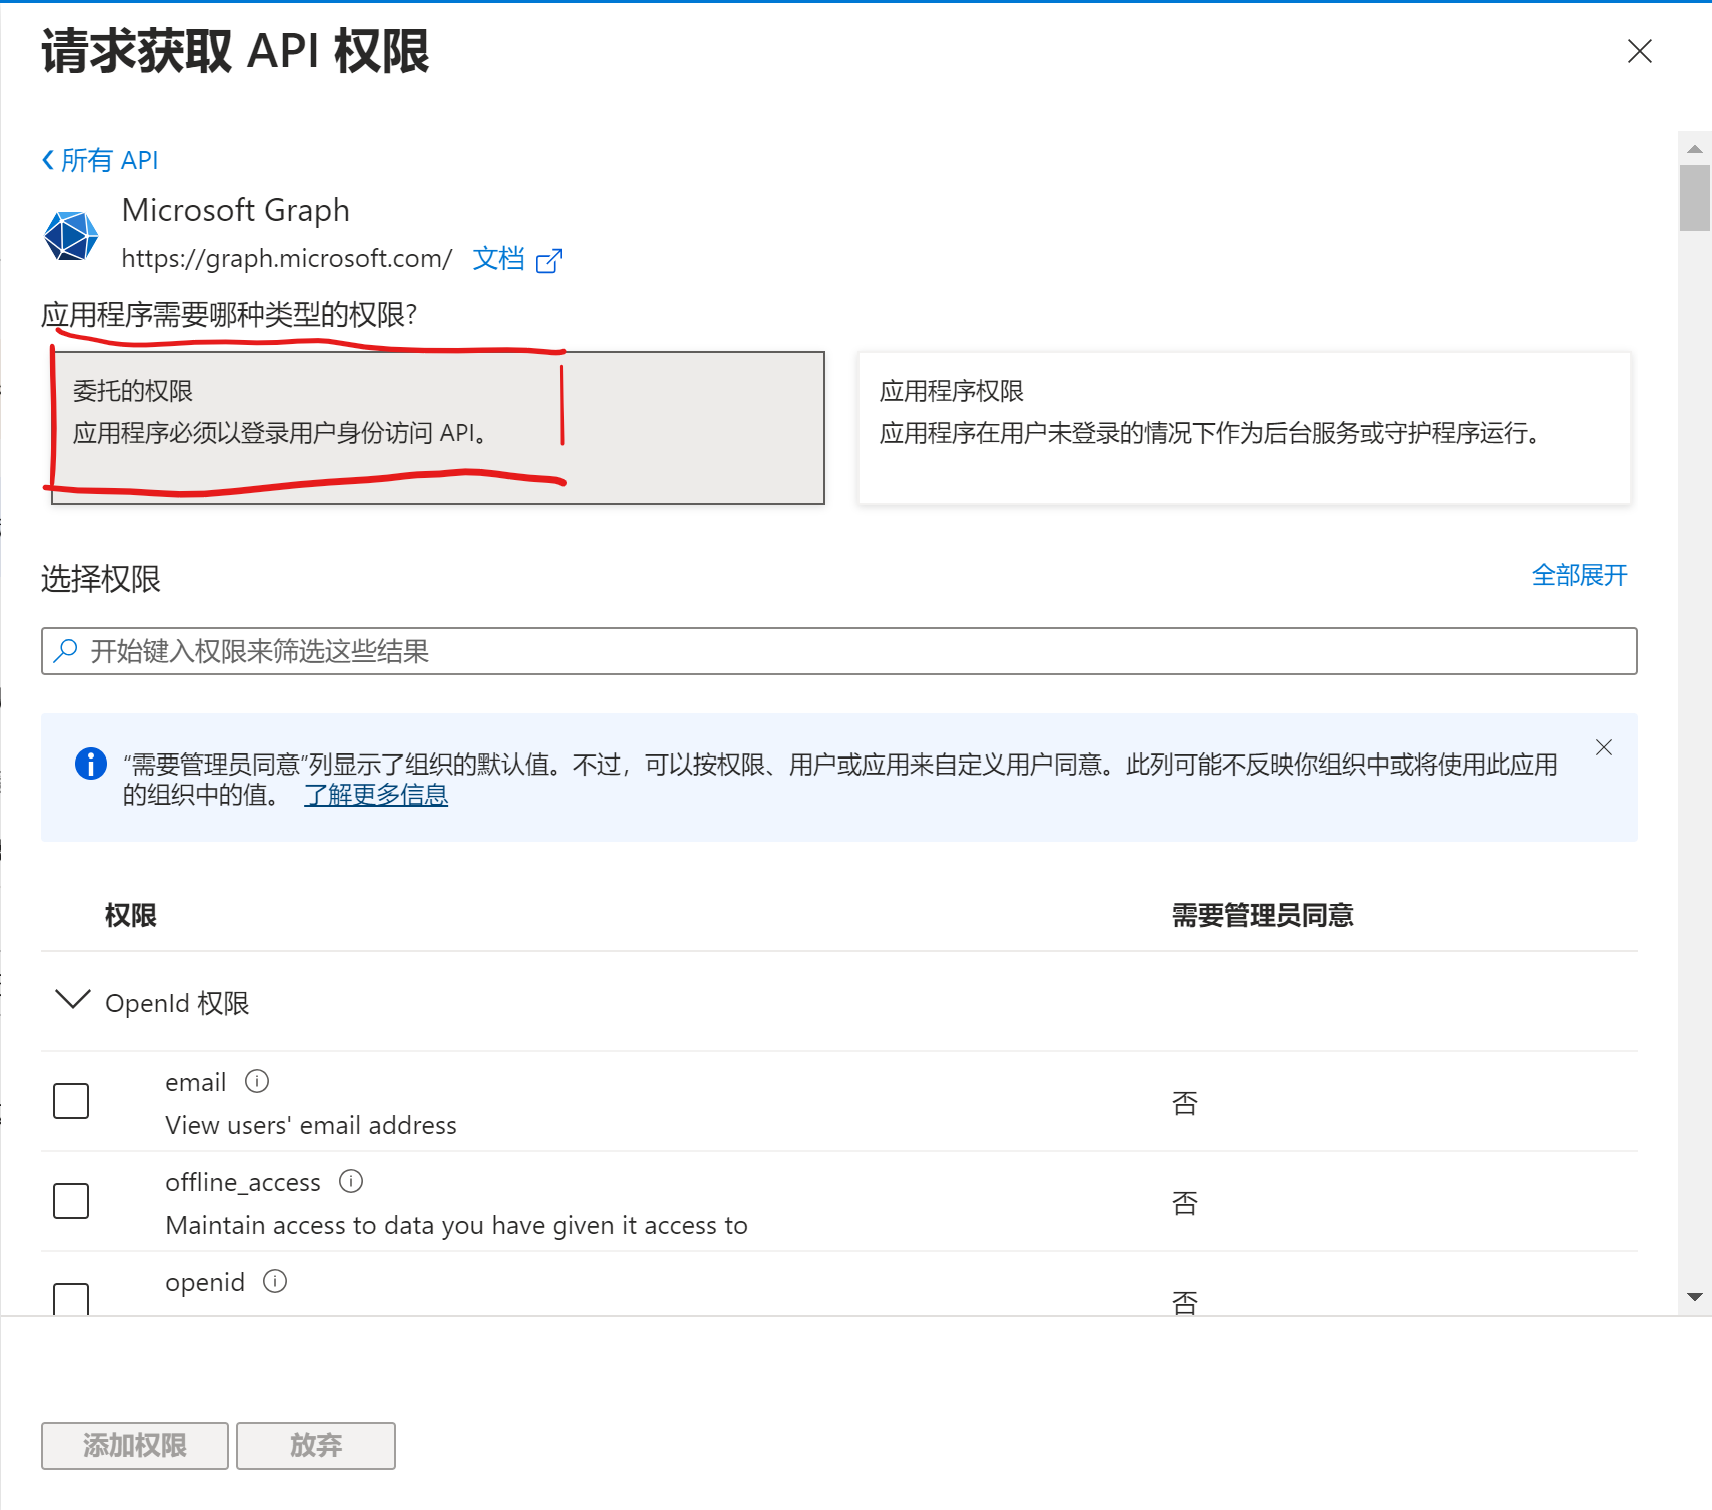
点击``委托的权限``。
|
|||
|
|
|
|||
|
|
|
|||
|
|
|
|||
|
|
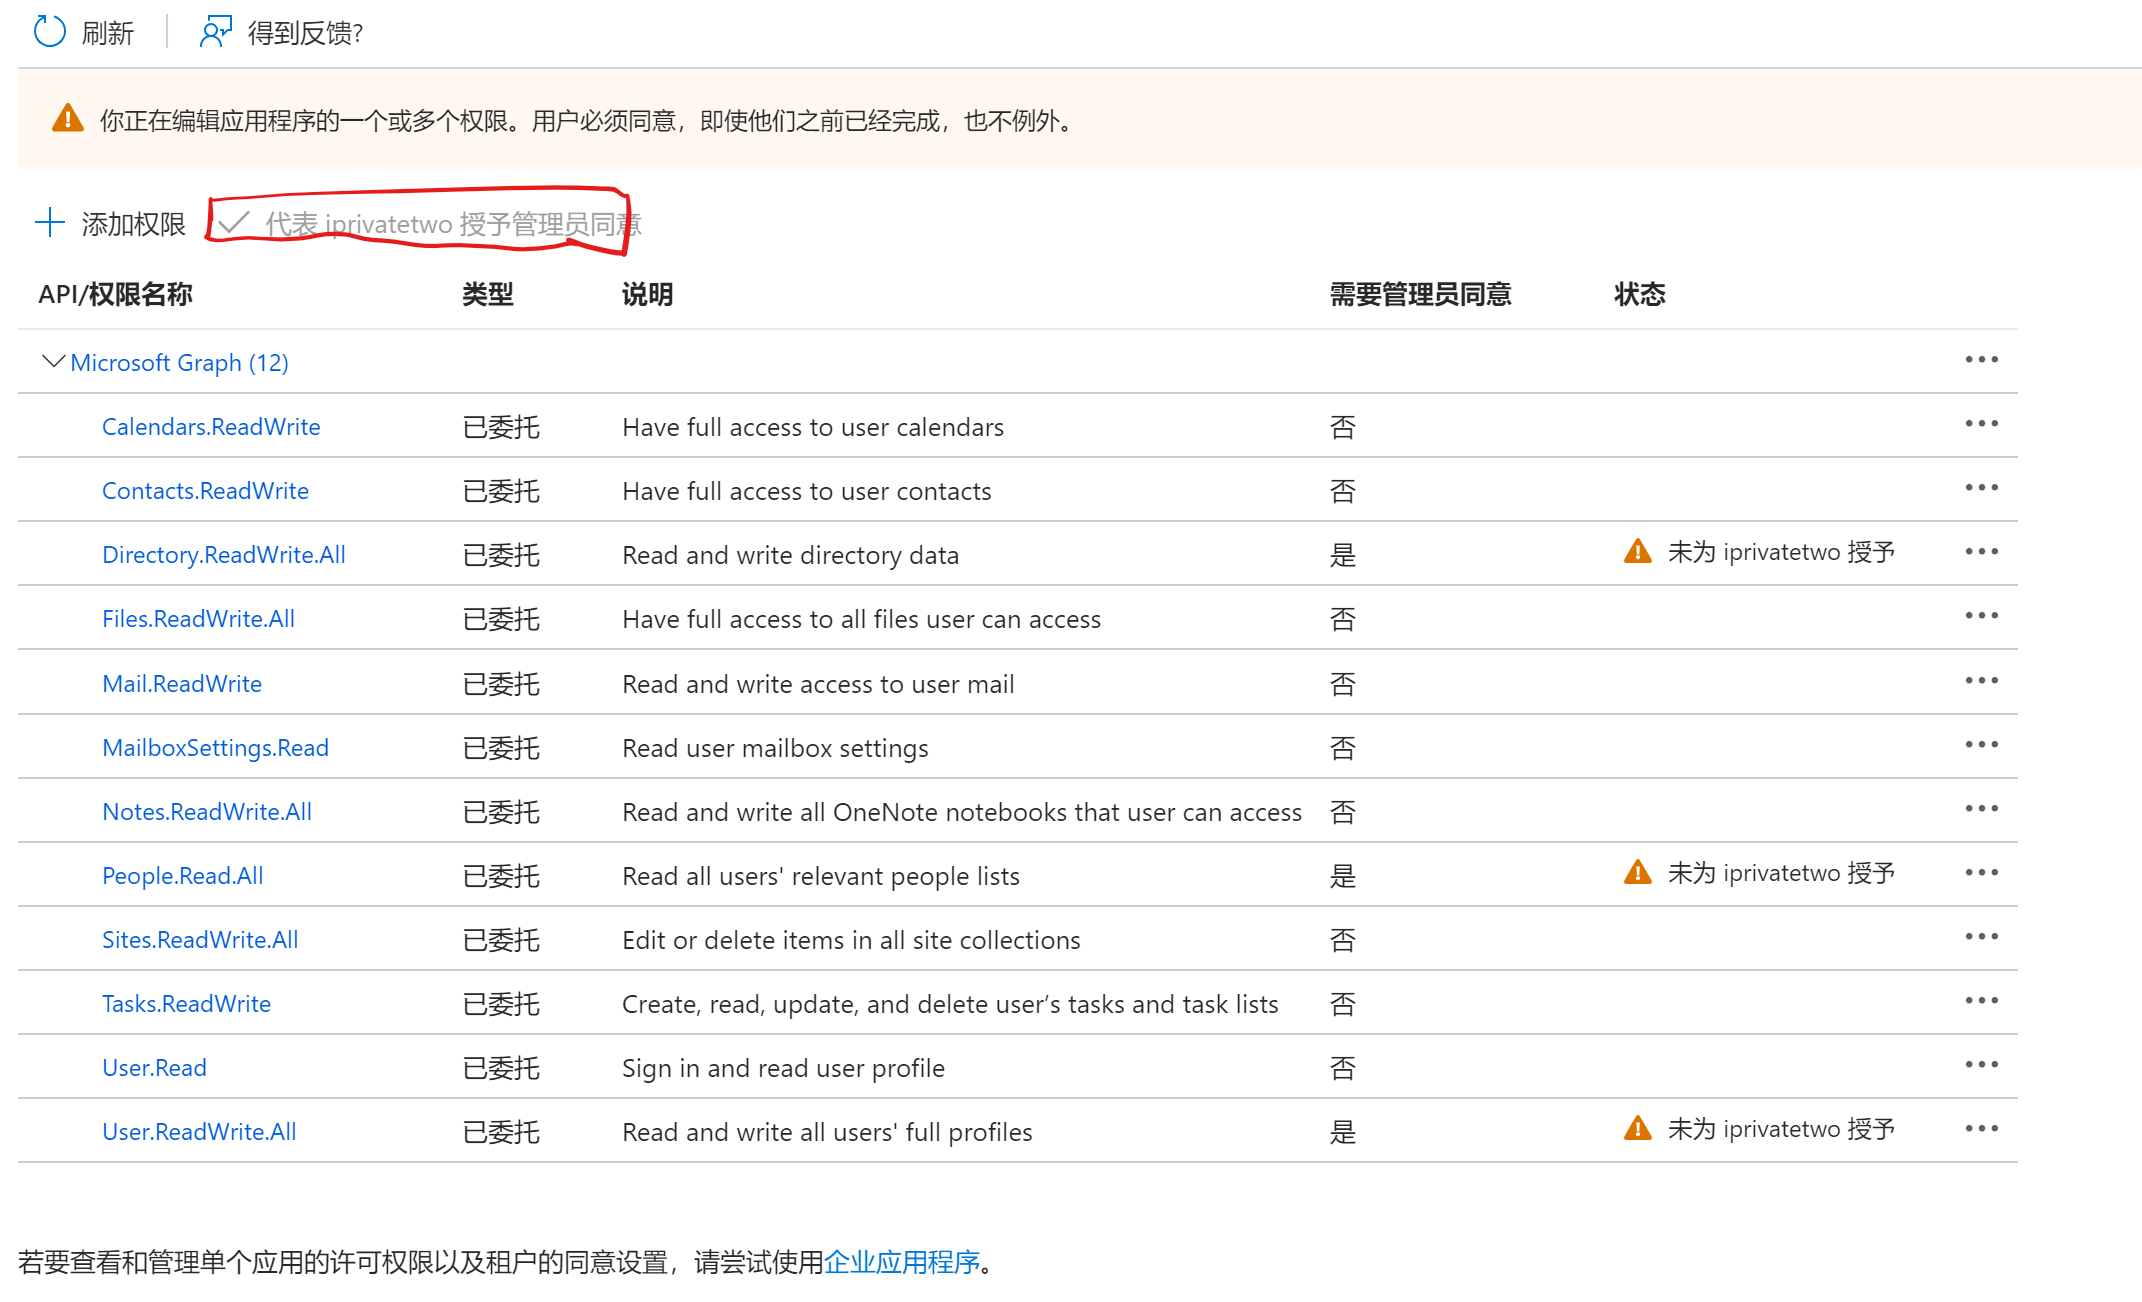
根据超级版要求添加以下权限。
|
|||
|
|
|
|||
|
|
```
|
|||
|
|
Calendars.ReadWrite, Contacts.ReadWrite, Directory.ReadWrite.All,
|
|||
|
|
|
|||
|
|
Files.ReadWrite.All, MailboxSettings.Read, Mail.ReadWrite,
|
|||
|
|
|
|||
|
|
Notes.ReadWrite.All, People.Read.All, Sites.ReadWrite.All,
|
|||
|
|
|
|||
|
|
Tasks.ReadWrite, User.ReadWrite.All
|
|||
|
|
```
|
|||
|
|
|
|||
|
|
若你是管理员账户,可以直接点击``代表***授予管理员同意``;否则请切换为管理员账户并点击以上按钮。
|
|||
|
|
|
|||
|
|
|
|||
|
|
|
|||
|
|
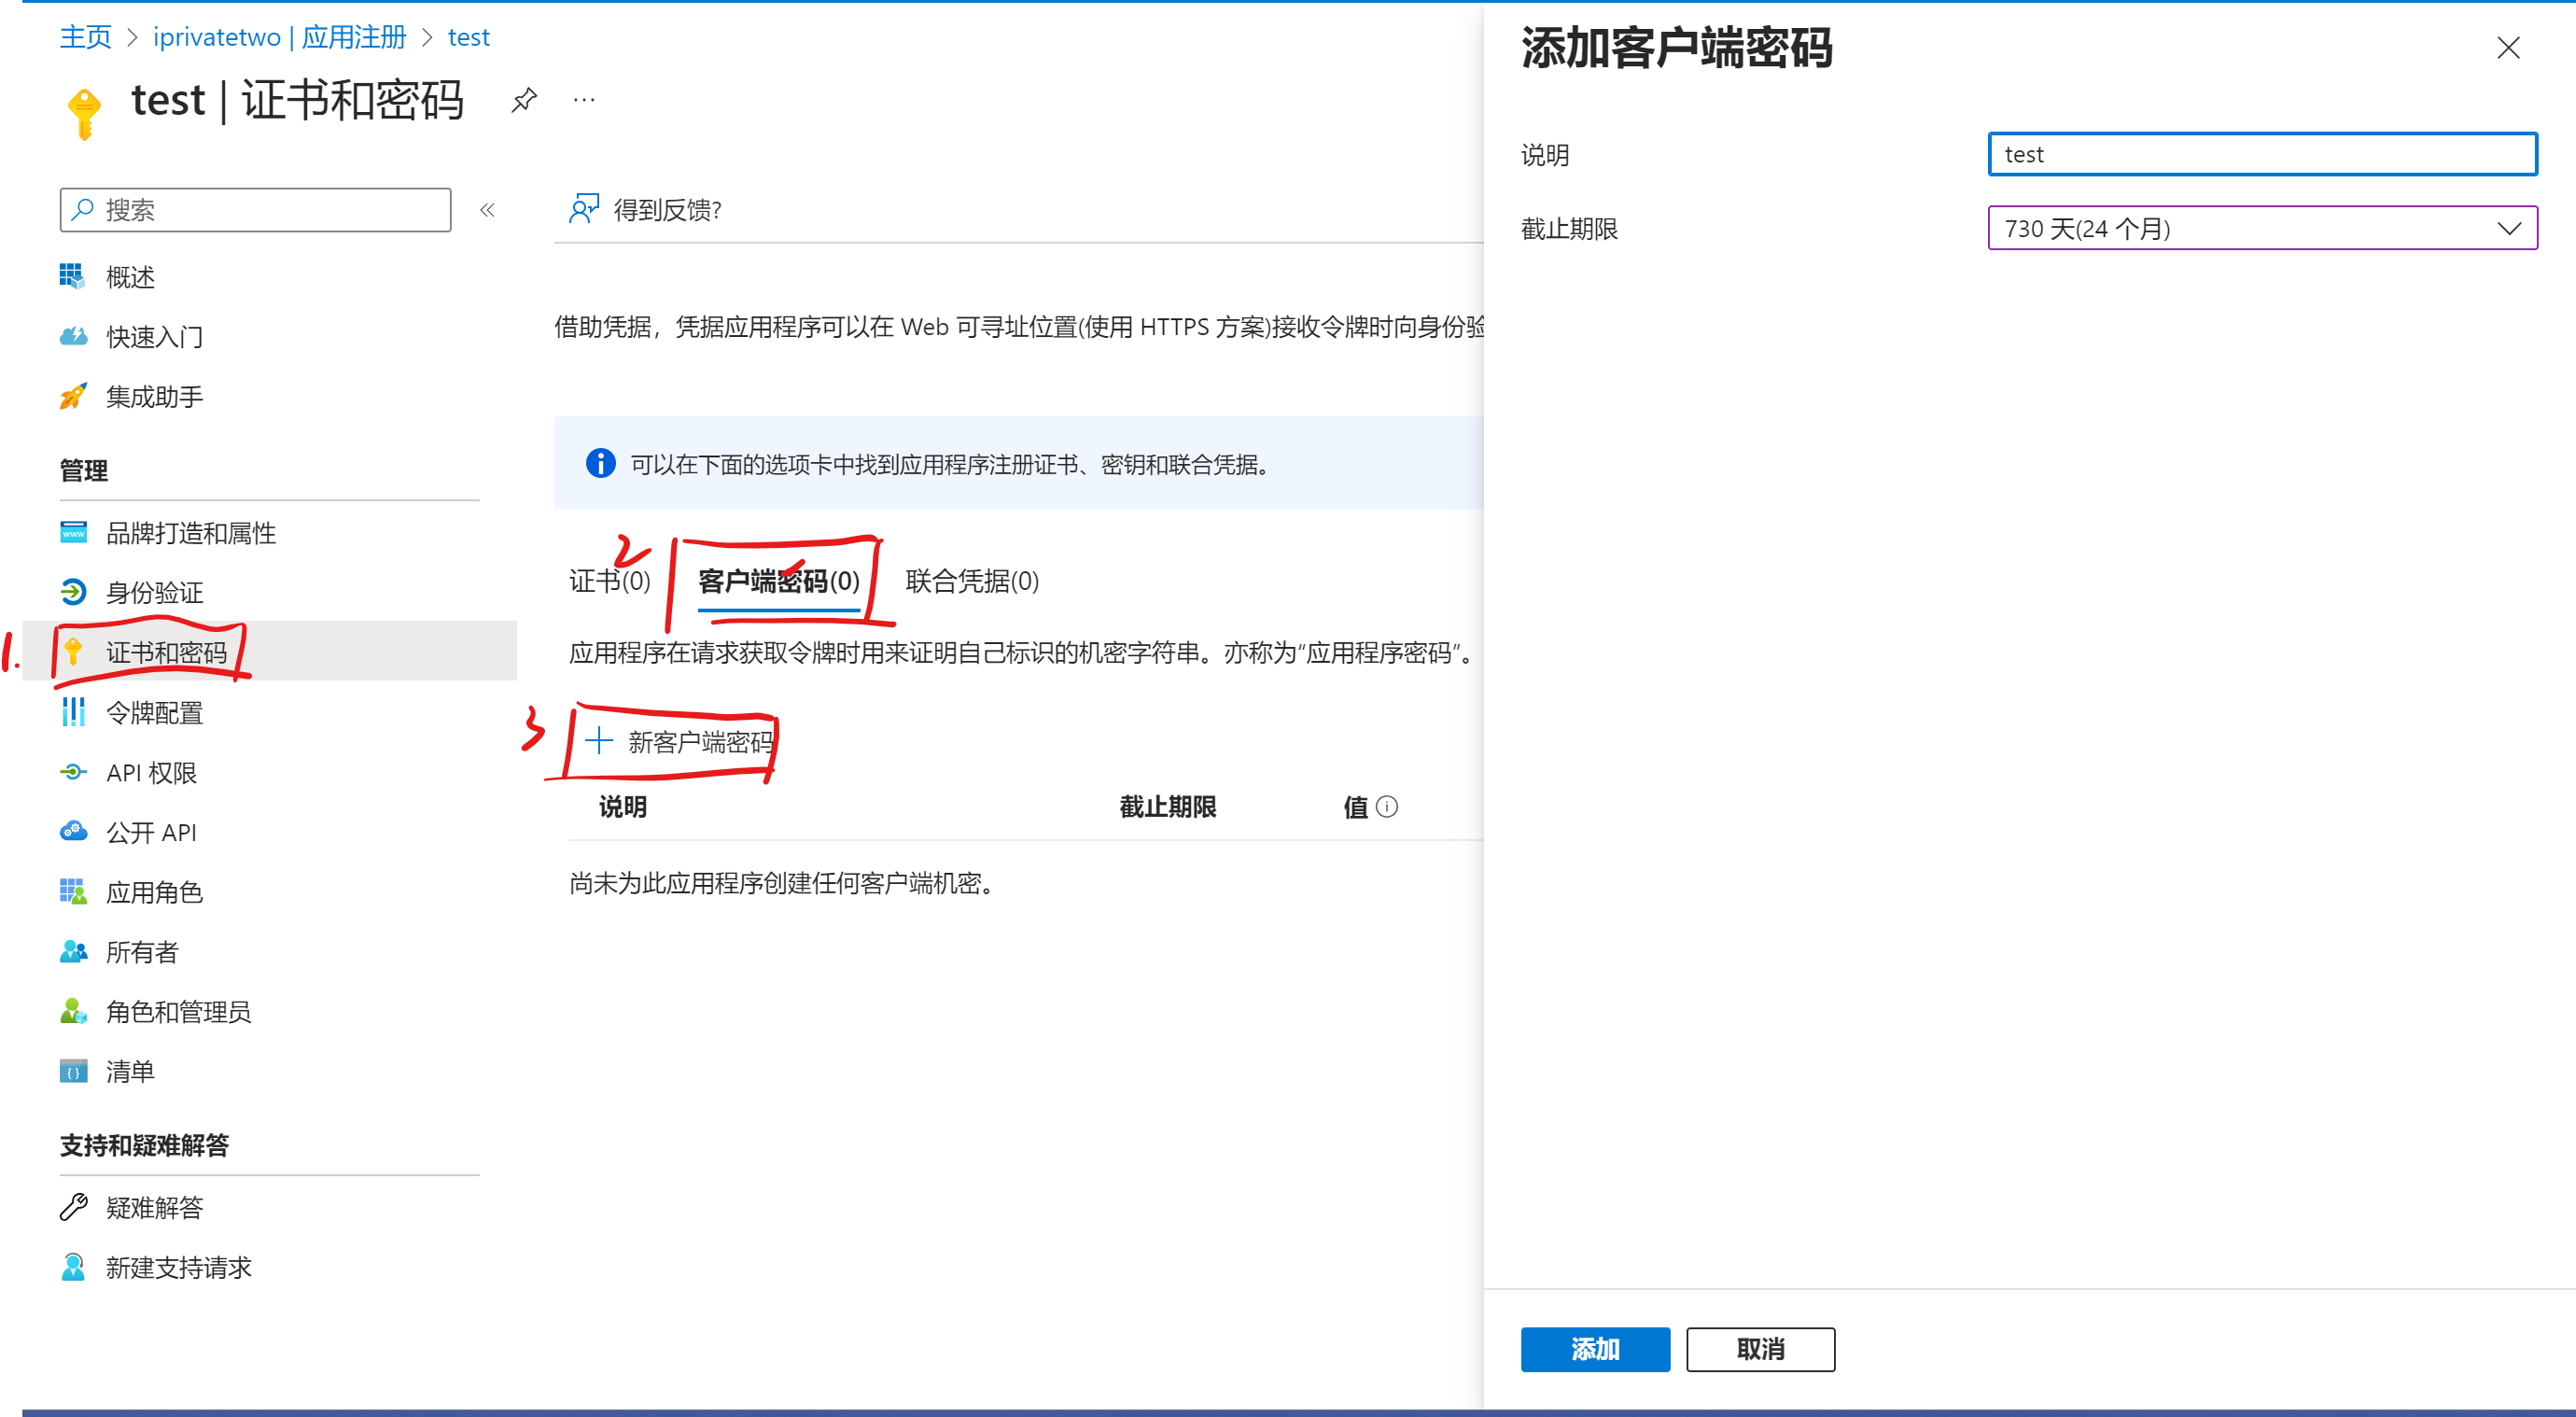
# 4. 创建密码
|
|||
|
|
|
|||
|
|
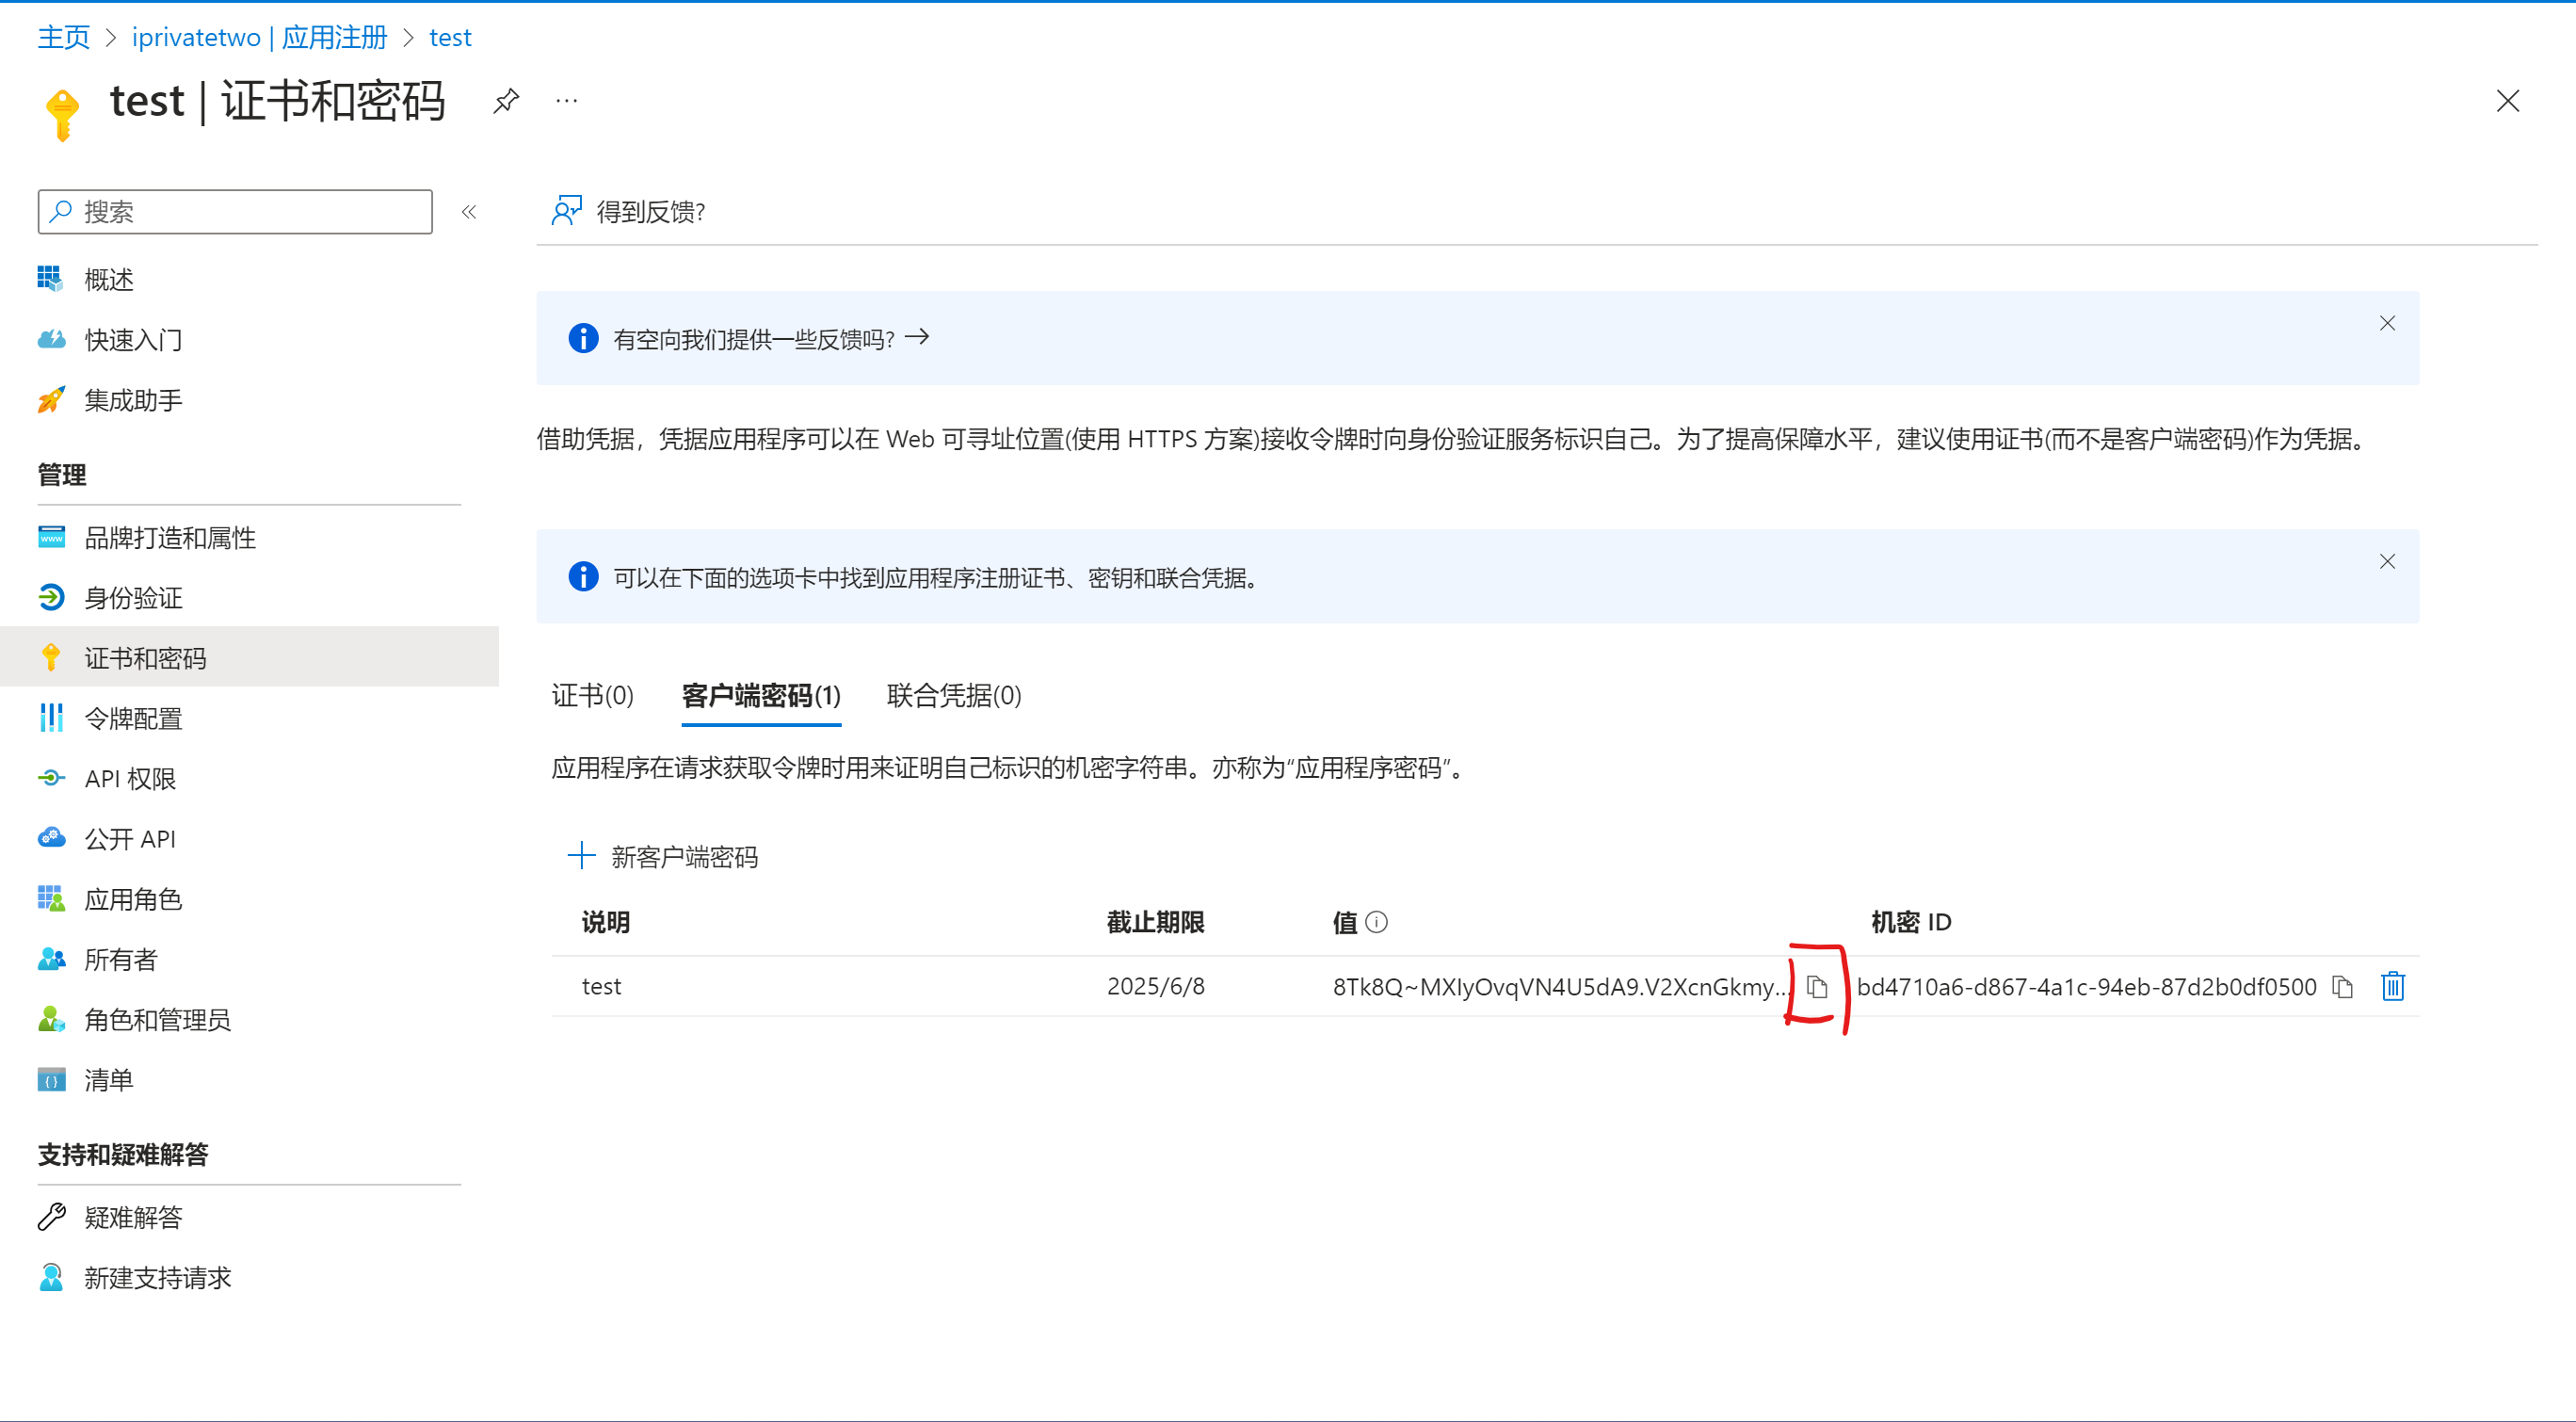
在左侧导航栏点击``证书与密码``,再点击``新客户端密码``,截止期限最长24个月。点击添加。
|
|||
|
|
|
|||
|
|
|
|||
|
|
|
|||
|
|
复制``值``,保存备用。密码只会出现这一次,若丢失请重新生成密码。
|
|||
|
|
|
|||
|
|
|
|||
|
|
|
|||
|
|
# 5. 获取refresh_token
|
|||
|
|
|
|||
|
|
[下载](https://rclone.org/downloads/)rclone客户端。之后在下载目录右键打开终端。输入以下命令。
|
|||
|
|
|
|||
|
|
```
|
|||
|
|
// powershell
|
|||
|
|
.\rclone.exe authorize "onedrive" "应用程序id" "密码"
|
|||
|
|
// cmd
|
|||
|
|
rclone.exe authorize "onedrive" "应用程序id" "密码"
|
|||
|
|
```
|
|||
|
|
|
|||
|
|
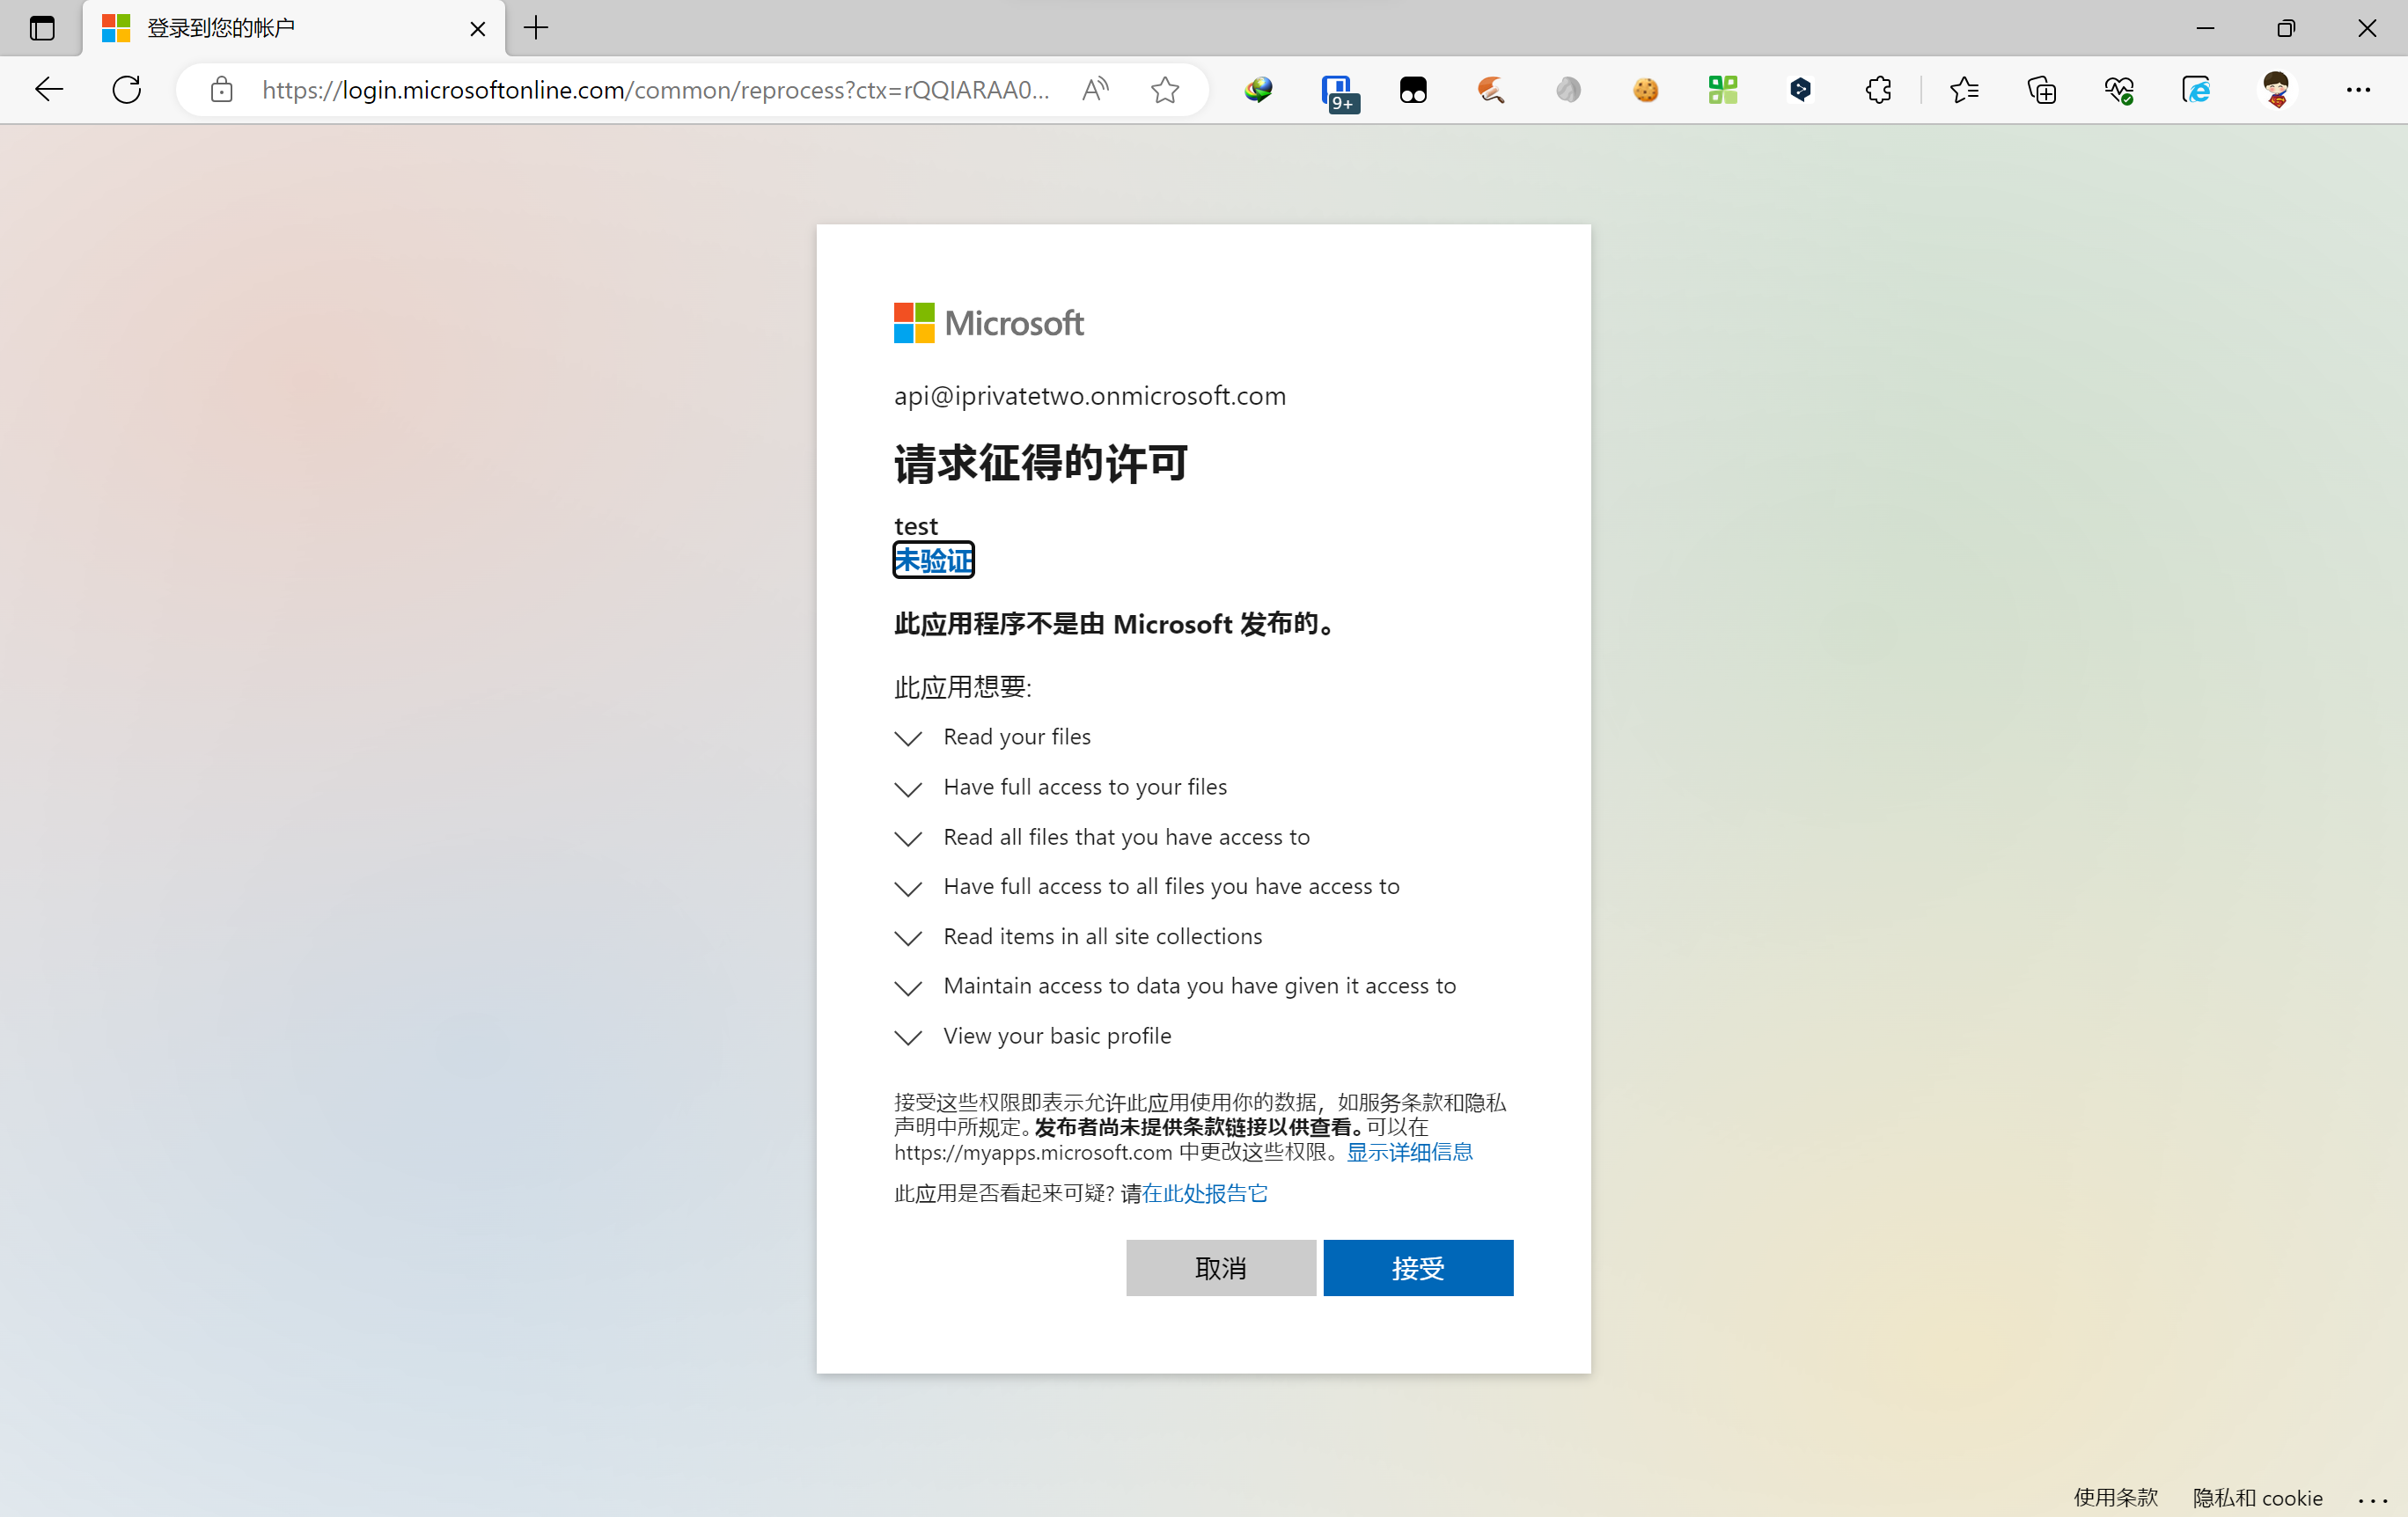
回车后会跳转到浏览器,登录刚刚的账号并点击``接受``。
|
|||
|
|
|
|||
|
|
|
|||
|
|
|
|||
|
|
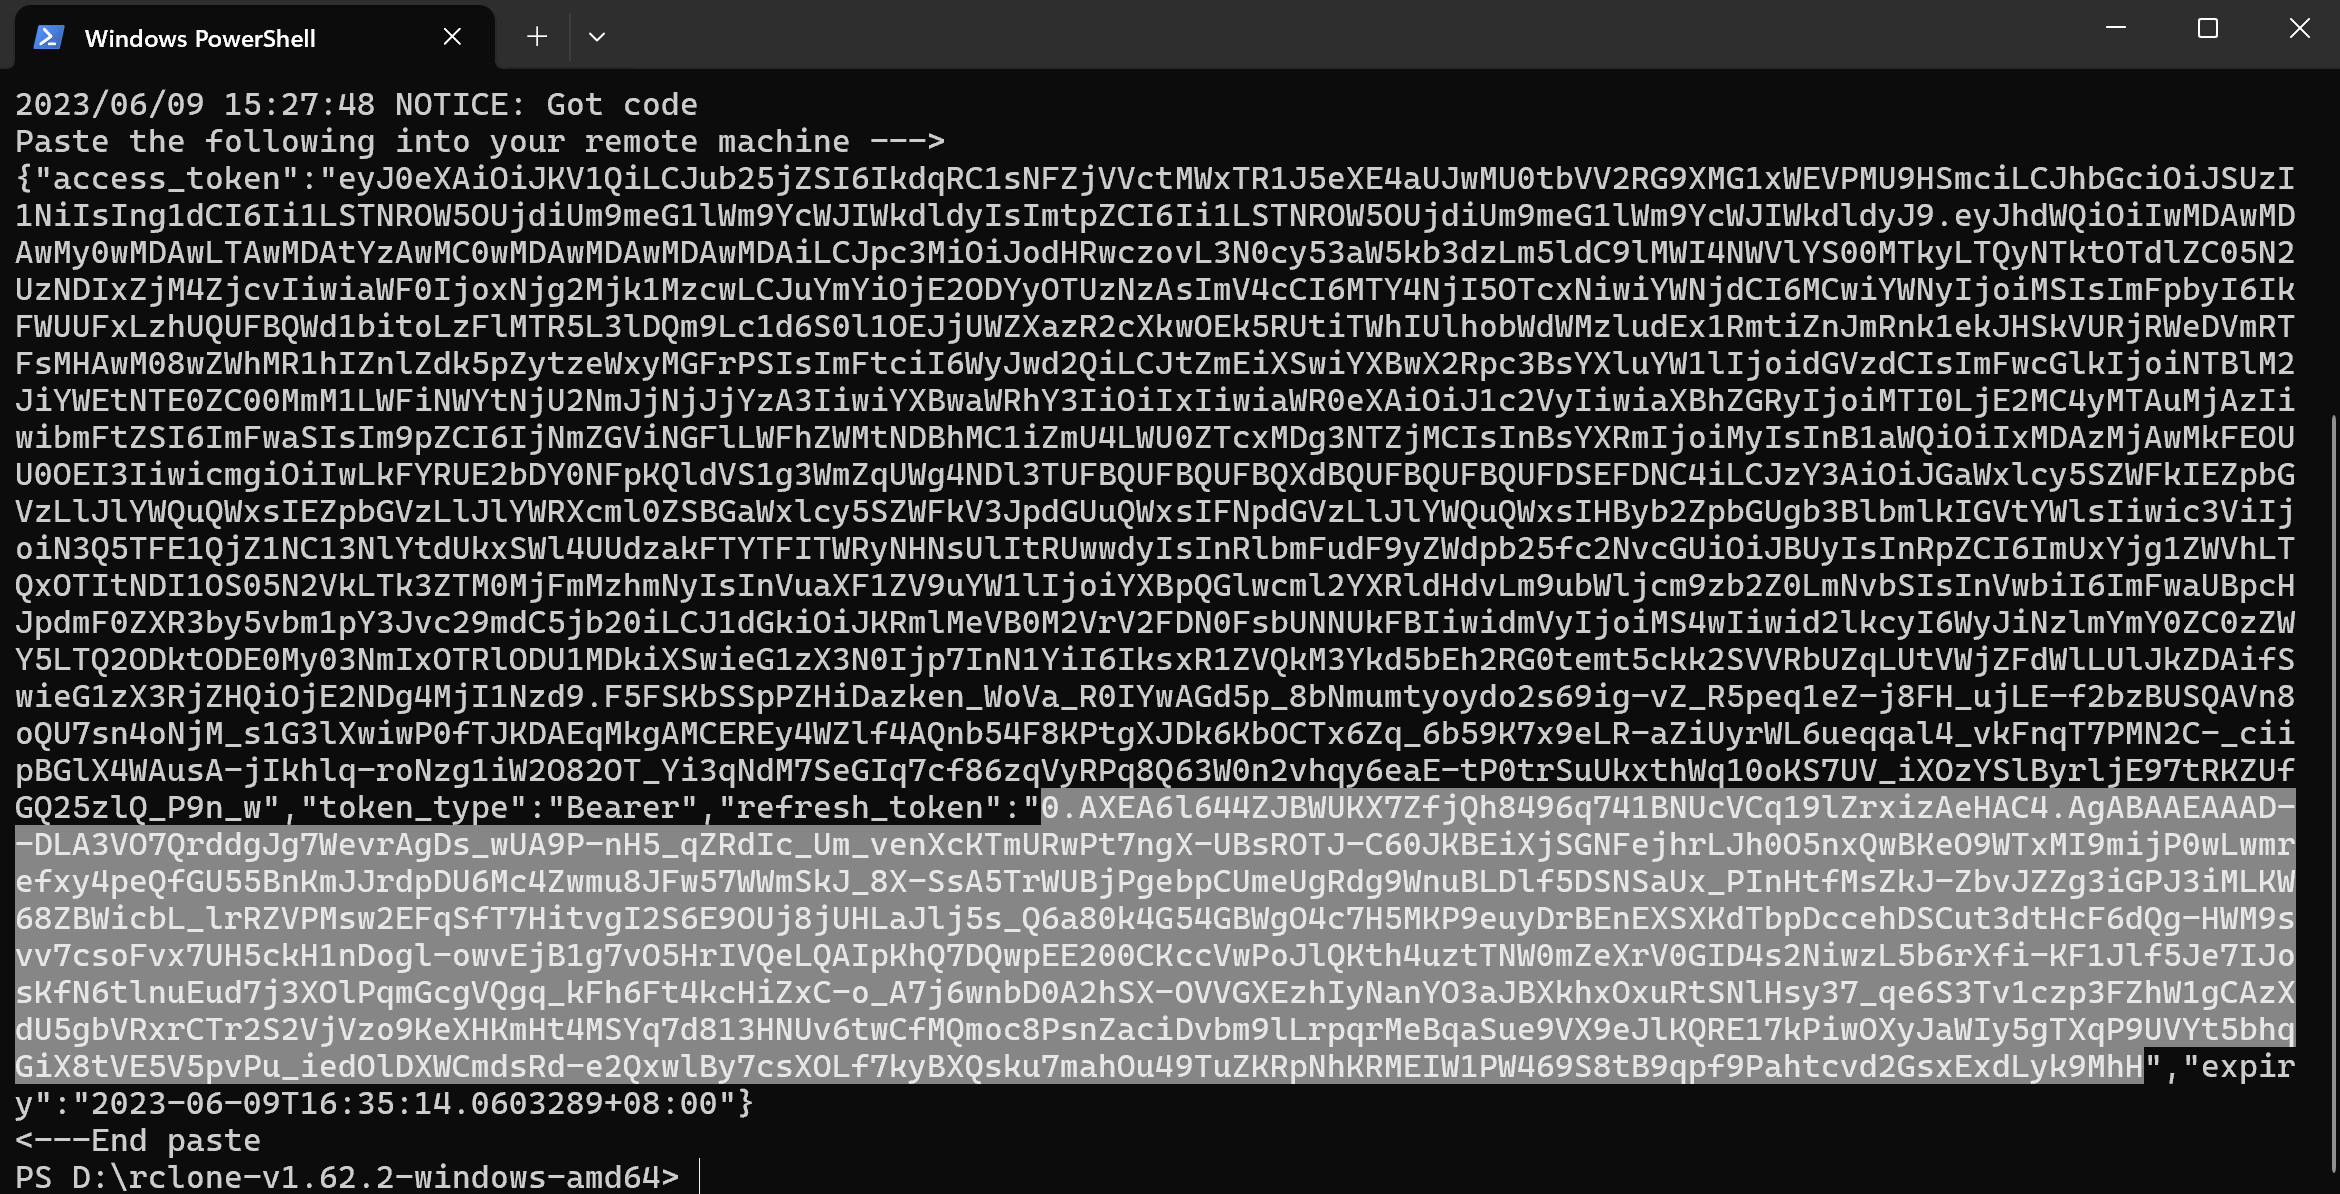
回到终端,即可复制``refresh_token``,保存备用。注意不要复制错了。
|
|||
|
|
|
|||
|
|
|
|||
|
|
|
|||
|
|
# 6. 脚本设置
|
|||
|
|
|
|||
|
|
在文末获取py脚本源代码,并修改。
|
|||
|
|
|
|||
|
|
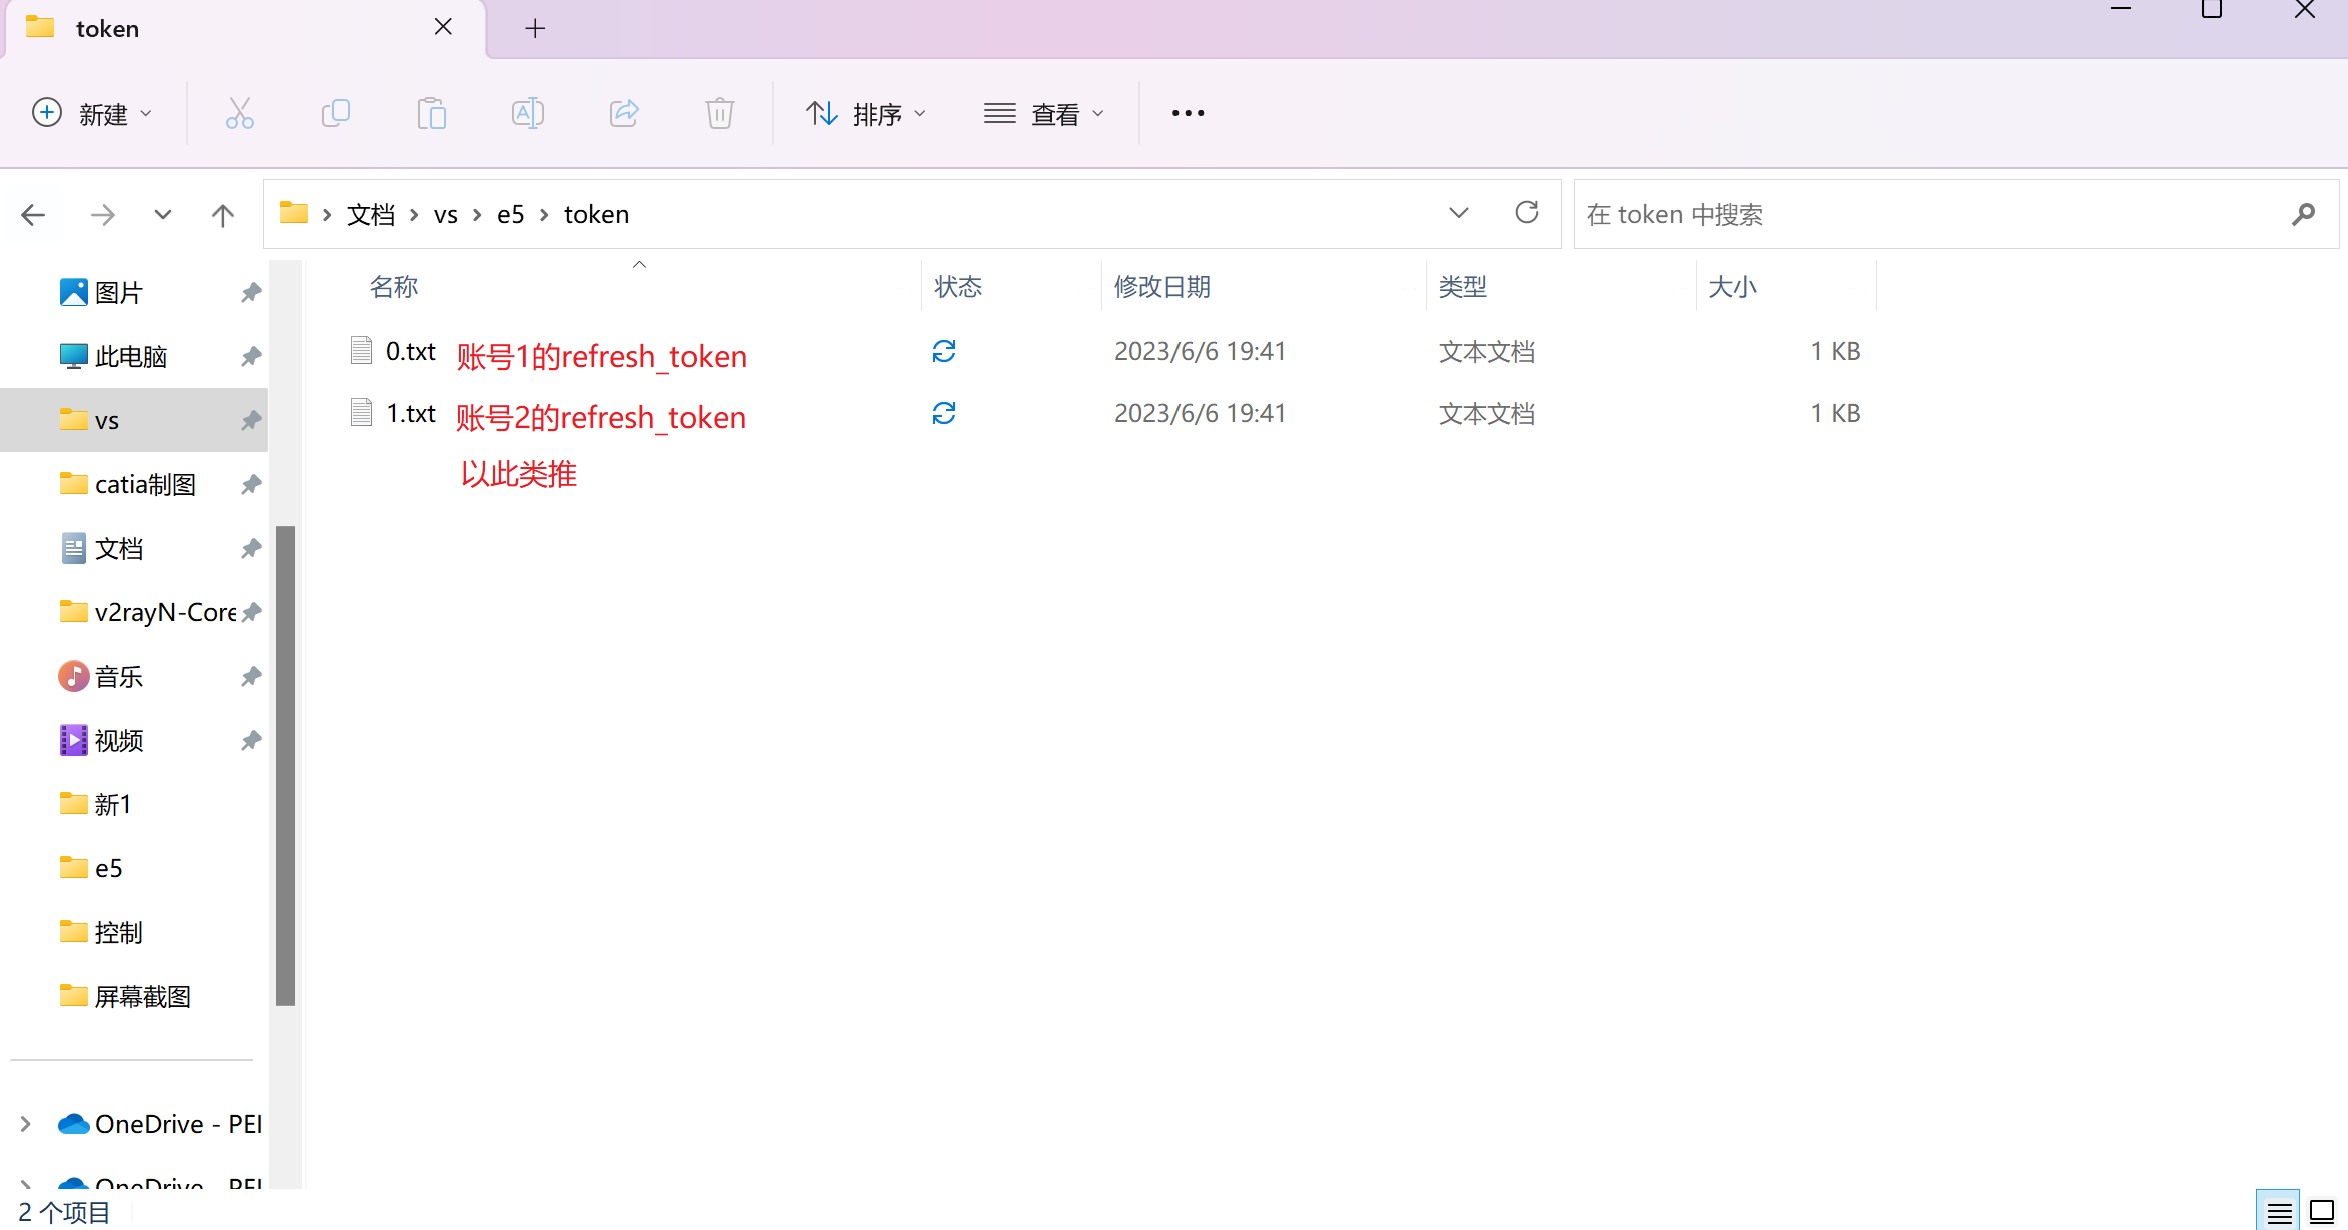
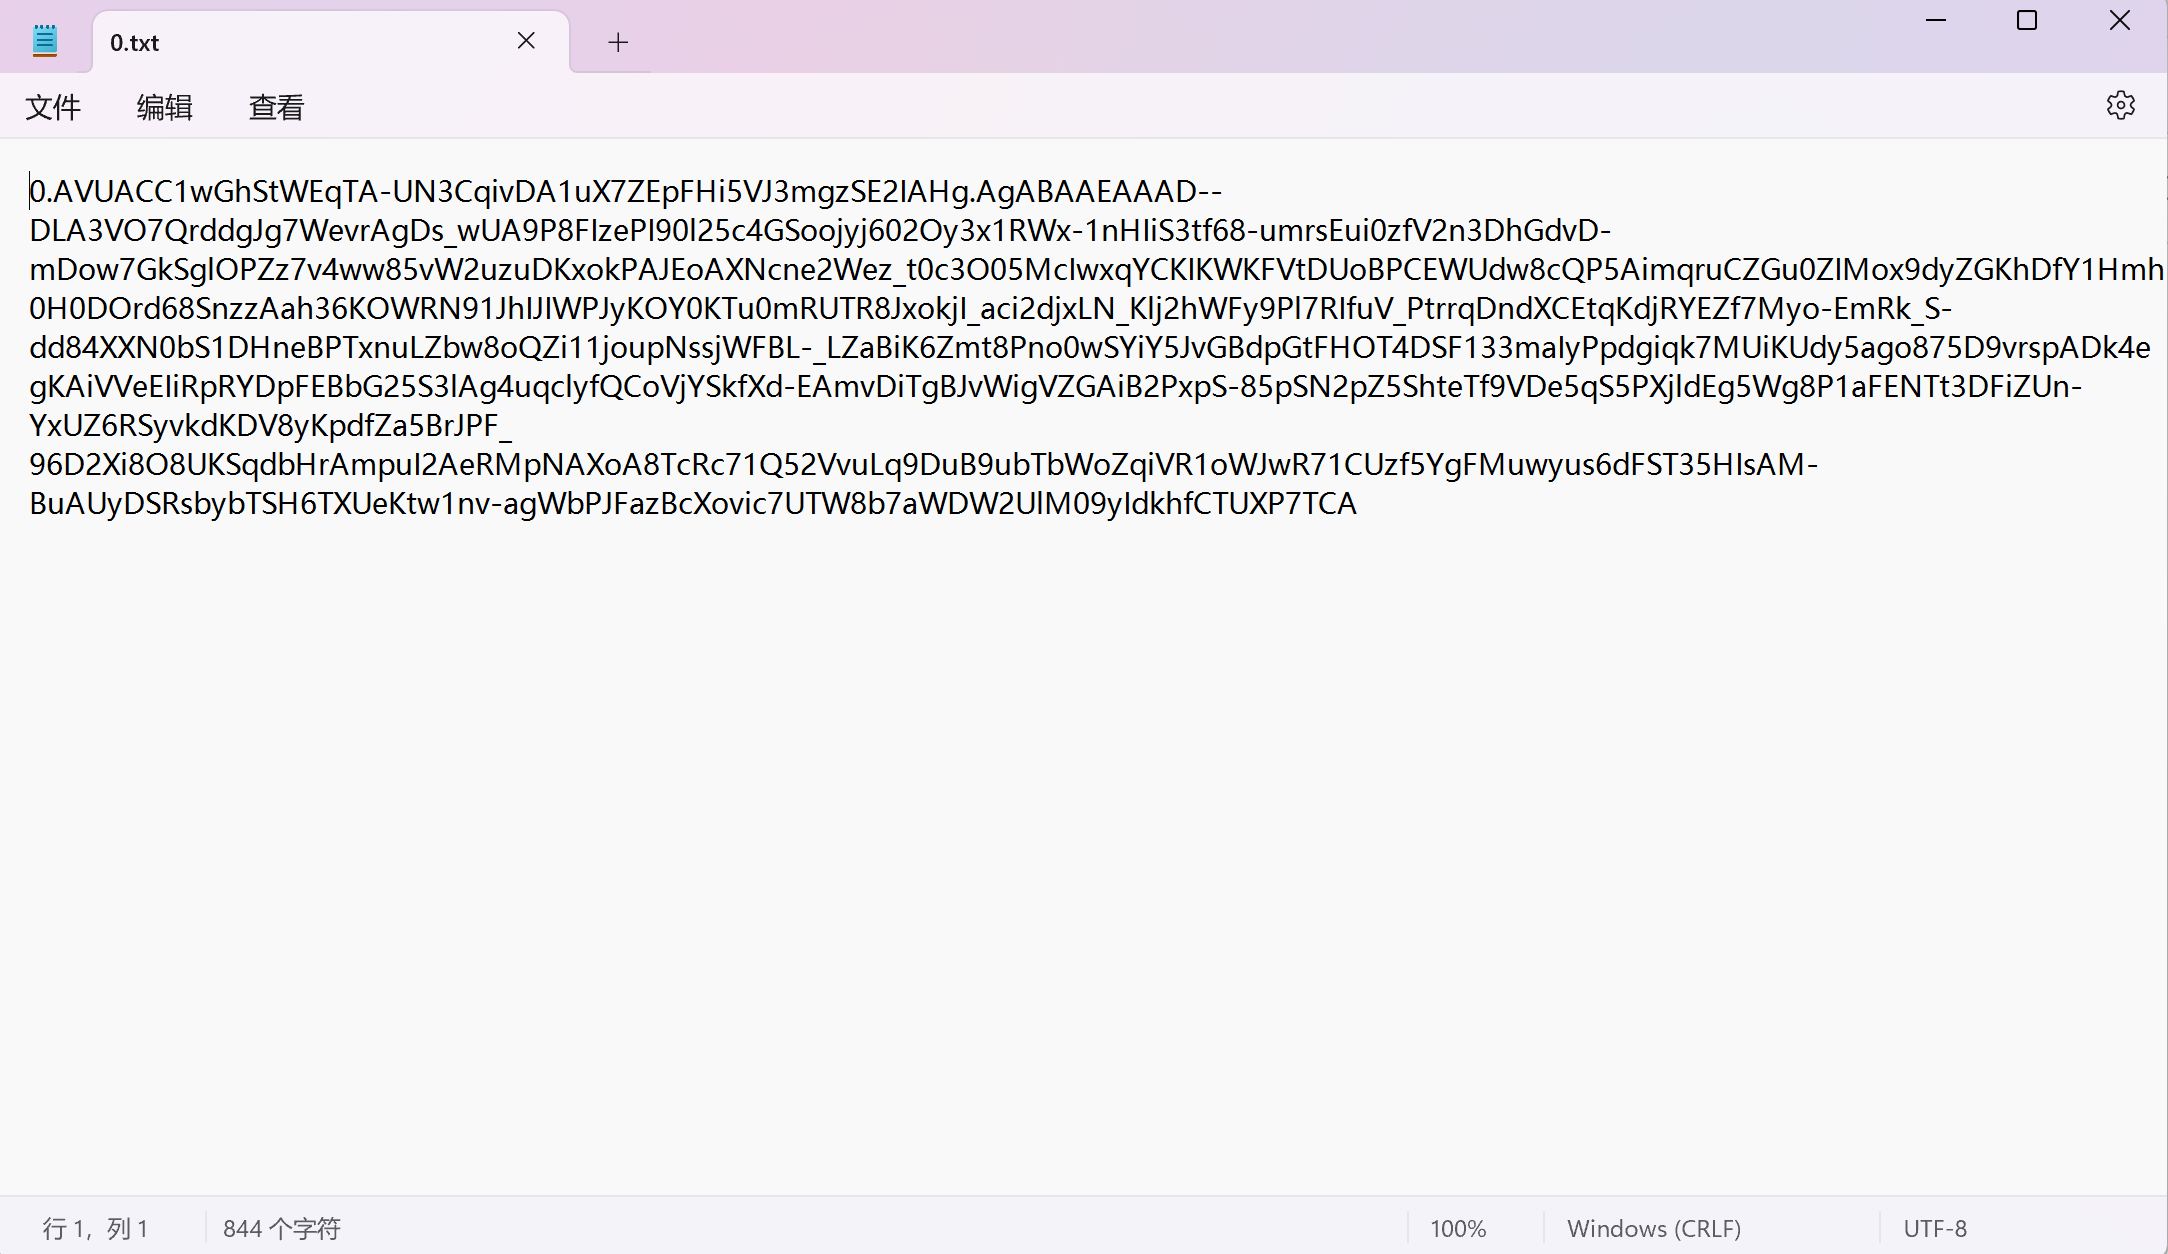
在``token``文件夹中,从``0.txt``开始新建文本文档。若有多个账号,则为``0.txt, 1.txt ··· ``以此类推。
|
|||
|
|
|
|||
|
|
文本文档内按顺序放入``refresh_token``,账号1的``refresh_token``放入``0.txt``;账号2的``refresh_token``放入``1.txt``,以此类推。
|
|||
|
|
|
|||
|
|
|
|||
|
|
|
|||
|
|
文档内容如下,无需其他内容
|
|||
|
|
|
|||
|
|
|
|||
|
|
|
|||
|
|
打开项目根目录的``testapi.py``文件,在第15行修改参数。
|
|||
|
|
|
|||
|
|
```
|
|||
|
|
各参数说明:
|
|||
|
|
* 每次轮数:每启动一次运行多少轮api调用,一轮调用10个api
|
|||
|
|
|
|||
|
|
* 是否启动随机时间:每一轮结束隔“多久”才开始下一轮调用,这个“多久”会根据后面的参数随机生成
|
|||
|
|
|
|||
|
|
* 延时范围起始,结束:例如设置600跟1200,则“多久”会在600到1200秒这个范围随机生成一个数,到时间开启下一轮调用
|
|||
|
|
|
|||
|
|
* 是否开启随机api顺序:根据一定规则从28个api抽13个随机排序,我设置的是30天换一次顺序。不开启则默认原教程10个api。
|
|||
|
|
|
|||
|
|
* 是否开启各api延时:就是每个api调用要不要停一下才开始下一个api调用。(个人建议不开)
|
|||
|
|
|
|||
|
|
同样有范围,例如:api延时范围开始跟api延时结束分别设置为10,20.则会在10到20秒这个范围随机生成一个数,然后调用下一个api
|
|||
|
|
|
|||
|
|
* 是否开启各账号延时:就是每个账号调用要不要停一下才开始下一个账号调用。
|
|||
|
|
|
|||
|
|
同样有范围,例如:账号延时范围开始跟分结束分别设置为60,120.则会在60到120秒这个范围随机生成一个数,然后调用下一个账号
|
|||
|
|
|
|||
|
|
* 是否开启备用应用:更换应用id调用api。同样每30天更换一次应用id。(目前每个账号只至支持1个副应用)
|
|||
|
|
|
|||
|
|
开启后,需分别为各账号再注册一个应用,然后在设置的secret再增加两条:(若开启,则需要从第二章开始再来一遍。Secret为Github Action的设置,在下一章会讲到。)
|
|||
|
|
ID_LIST2
|
|||
|
|
内容为: id_list2=[r'帐号1副应用id',r'帐号n副应用id']
|
|||
|
|
|
|||
|
|
KEY_LIST2
|
|||
|
|
内容为: secret_list2=[r'帐号1副应用机密',r'帐号n副应用机密']
|
|||
|
|
|
|||
|
|
然后类似的在backuptoken文件夹里放入对应的副应用的0.txt....n.txt。
|
|||
|
|
(这里看不懂的话,直接选N吧)
|
|||
|
|
|
|||
|
|
* 是否开启测试:瞬间完成运行,以便查看id、机密、token等是否填写错误,能否正确运行。
|
|||
|
|
(若配合备用应用模式使用,则会同时测试各账号的主副应用,看看主副应用是否都能成功调用api)
|
|||
|
|
测试完务必改回N
|
|||
|
|
```
|
|||
|
|
|
|||
|
|
修改完保存即可。
|
|||
|
|
|
|||
|
|
# 7. Github设置
|
|||
|
|
|
|||
|
|
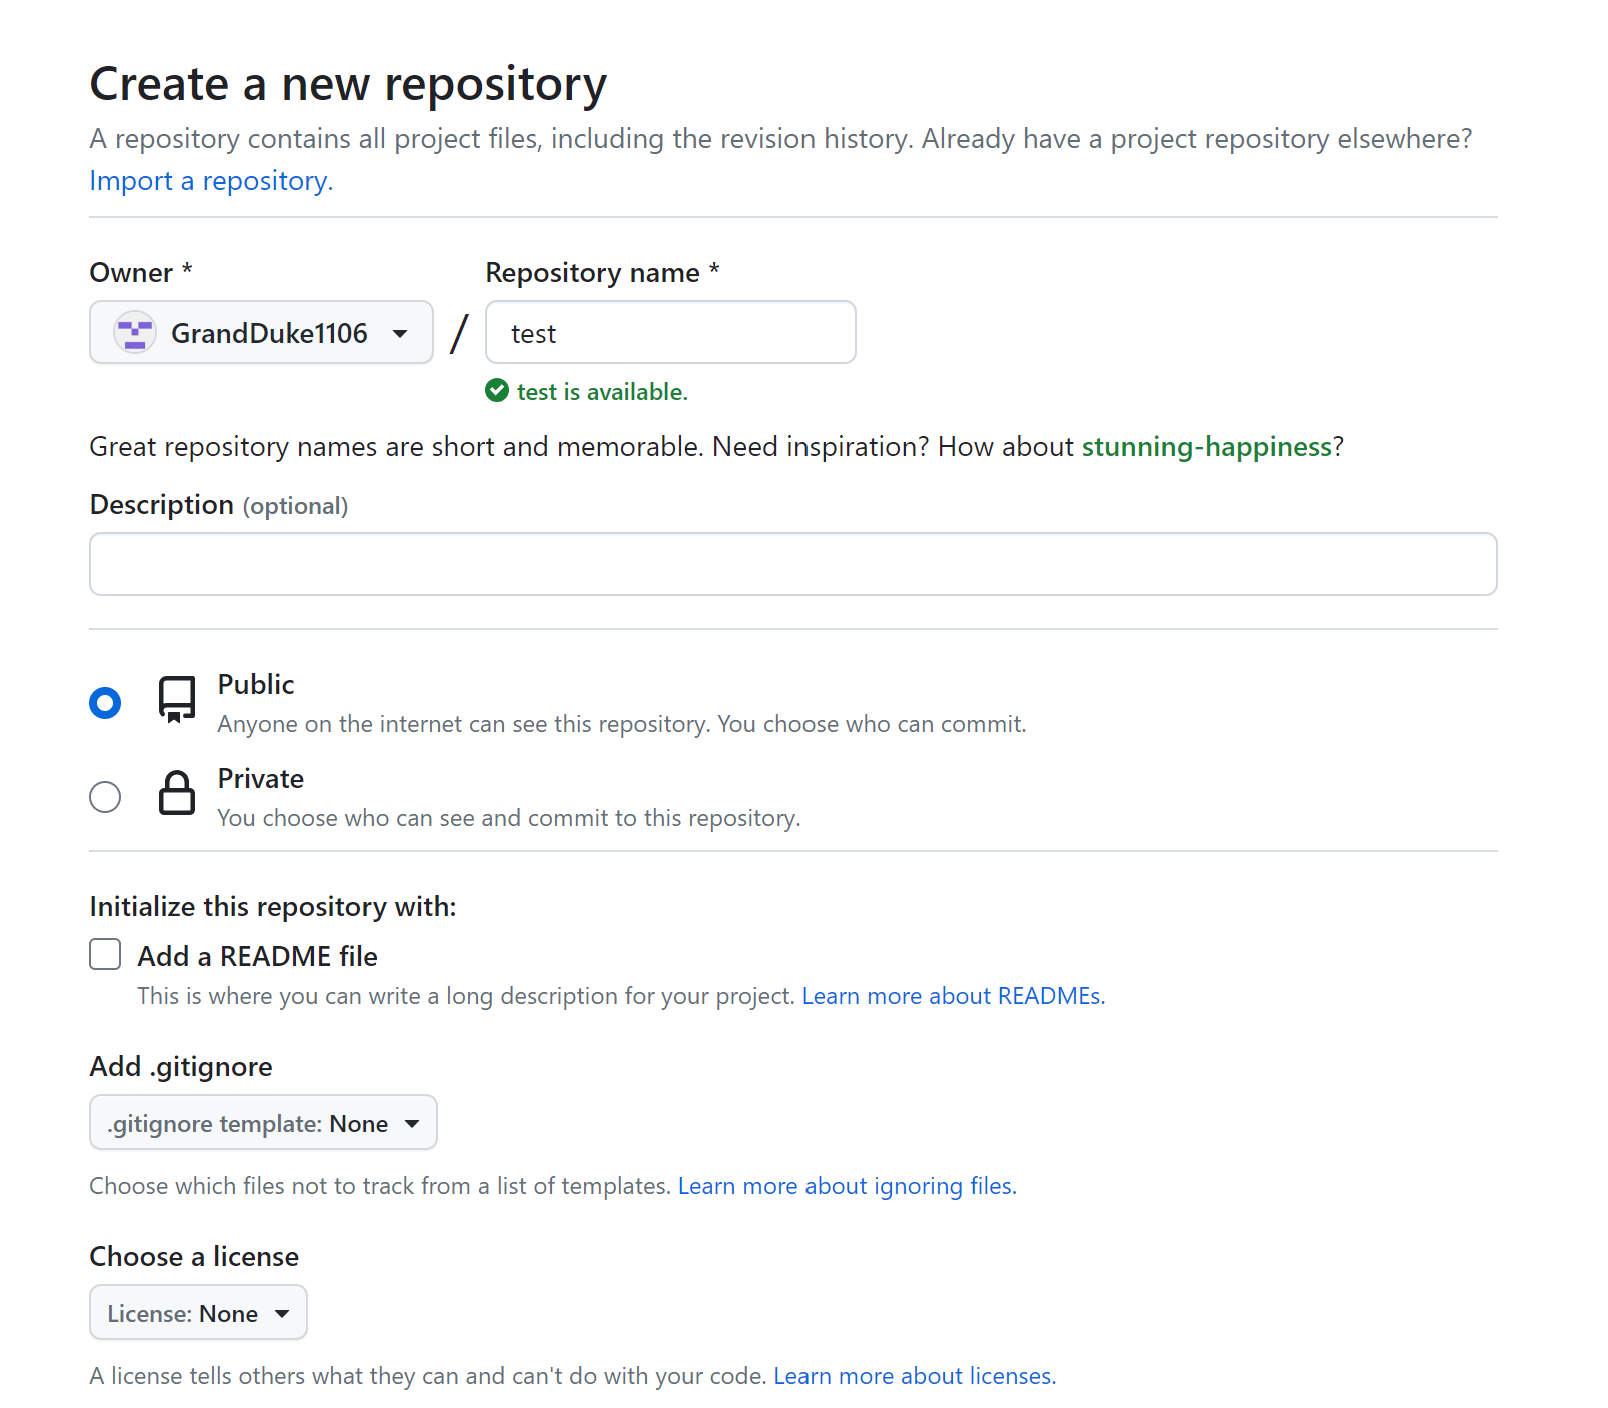
登录你的账号,在你Github主页[新建](https://github.com/new)仓库。公有或者私有仓库对Github Action的支持是不一样的,参考以下内容。
|
|||
|
|
|
|||
|
|
> GithubAction介绍
|
|||
|
|
> 提供的虚拟环境:
|
|||
|
|
>
|
|||
|
|
> · 2-core CPU · 7 GB RAM 内存 · 14 GB SSD 硬盘空间
|
|||
|
|
>
|
|||
|
|
> 使用限制:
|
|||
|
|
>
|
|||
|
|
> 每个仓库只能同时支持20个 workflow 并行。
|
|||
|
|
> 每小时可以调用1000次 GitHub API 。
|
|||
|
|
> 每个 job 最多可以执行6个小时。
|
|||
|
|
> 免费版的用户最大支持20个 job 并发执行,macOS 最大只支持5个。
|
|||
|
|
> 私有仓库每月累计使用时间为2000分钟,超过后$ 0.008/分钟,..公共仓库则无限制。
|
|||
|
|
> (我们这里用的公共仓库,按理,你们可以设定无限循环调用,然后6小时启动一次,保证24小时全天候调用)
|
|||
|
|
|
|||
|
|
|
|||
|
|
|
|||
|
|
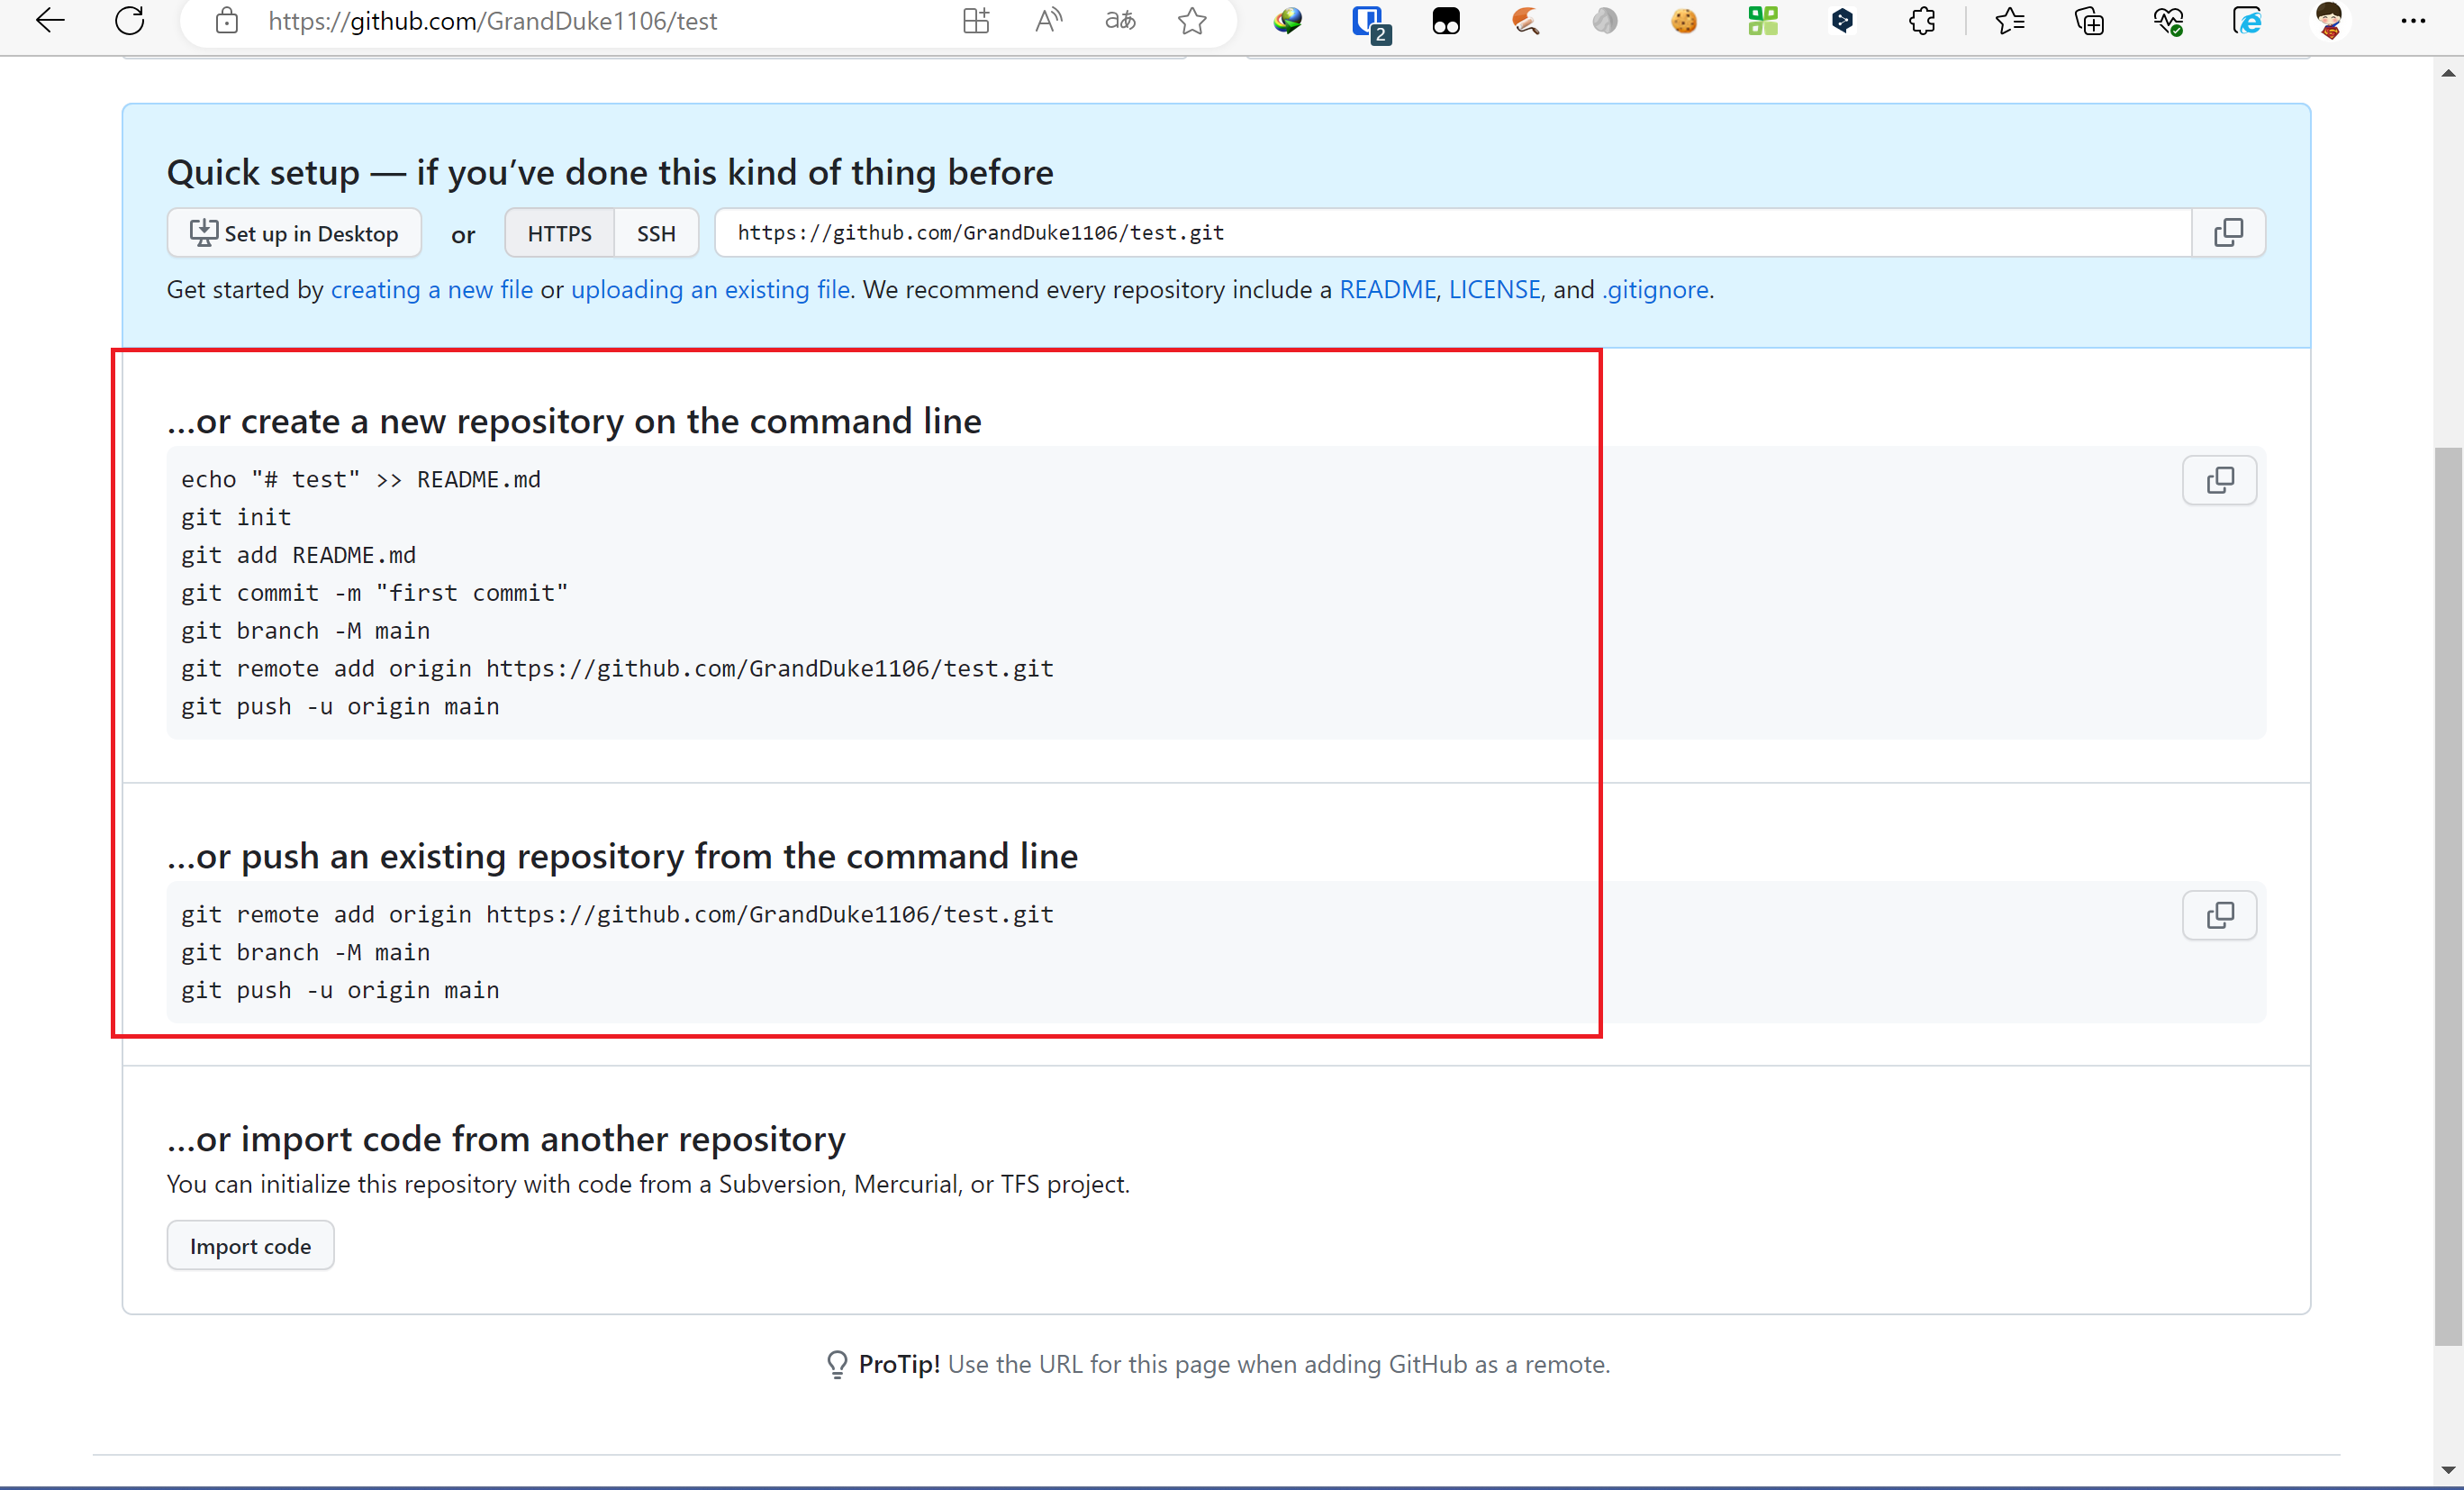
在源码根目录中打开终端,按照Github的提示将文件push到仓库中。
|
|||
|
|
|
|||
|
|
|
|||
|
|
|
|||
|
|
```
|
|||
|
|
git init //把这个目录变成Git可以管理的仓库
|
|||
|
|
git add README.md //文件添加到仓库
|
|||
|
|
git add . //不但可以跟单一文件,还可以跟通配符,更可以跟目录。一个点就把当前目录下所有未追踪的文件全部add了
|
|||
|
|
git commit -m "first commit" //把文件提交到仓库
|
|||
|
|
git branch -M main //创建main分支
|
|||
|
|
git remote add origin "https://github.com/GrandDuke1106/test.git" //关联远程仓库
|
|||
|
|
git push -u origin main //把本地库的所有内容推送到远程库上
|
|||
|
|
```
|
|||
|
|
|
|||
|
|
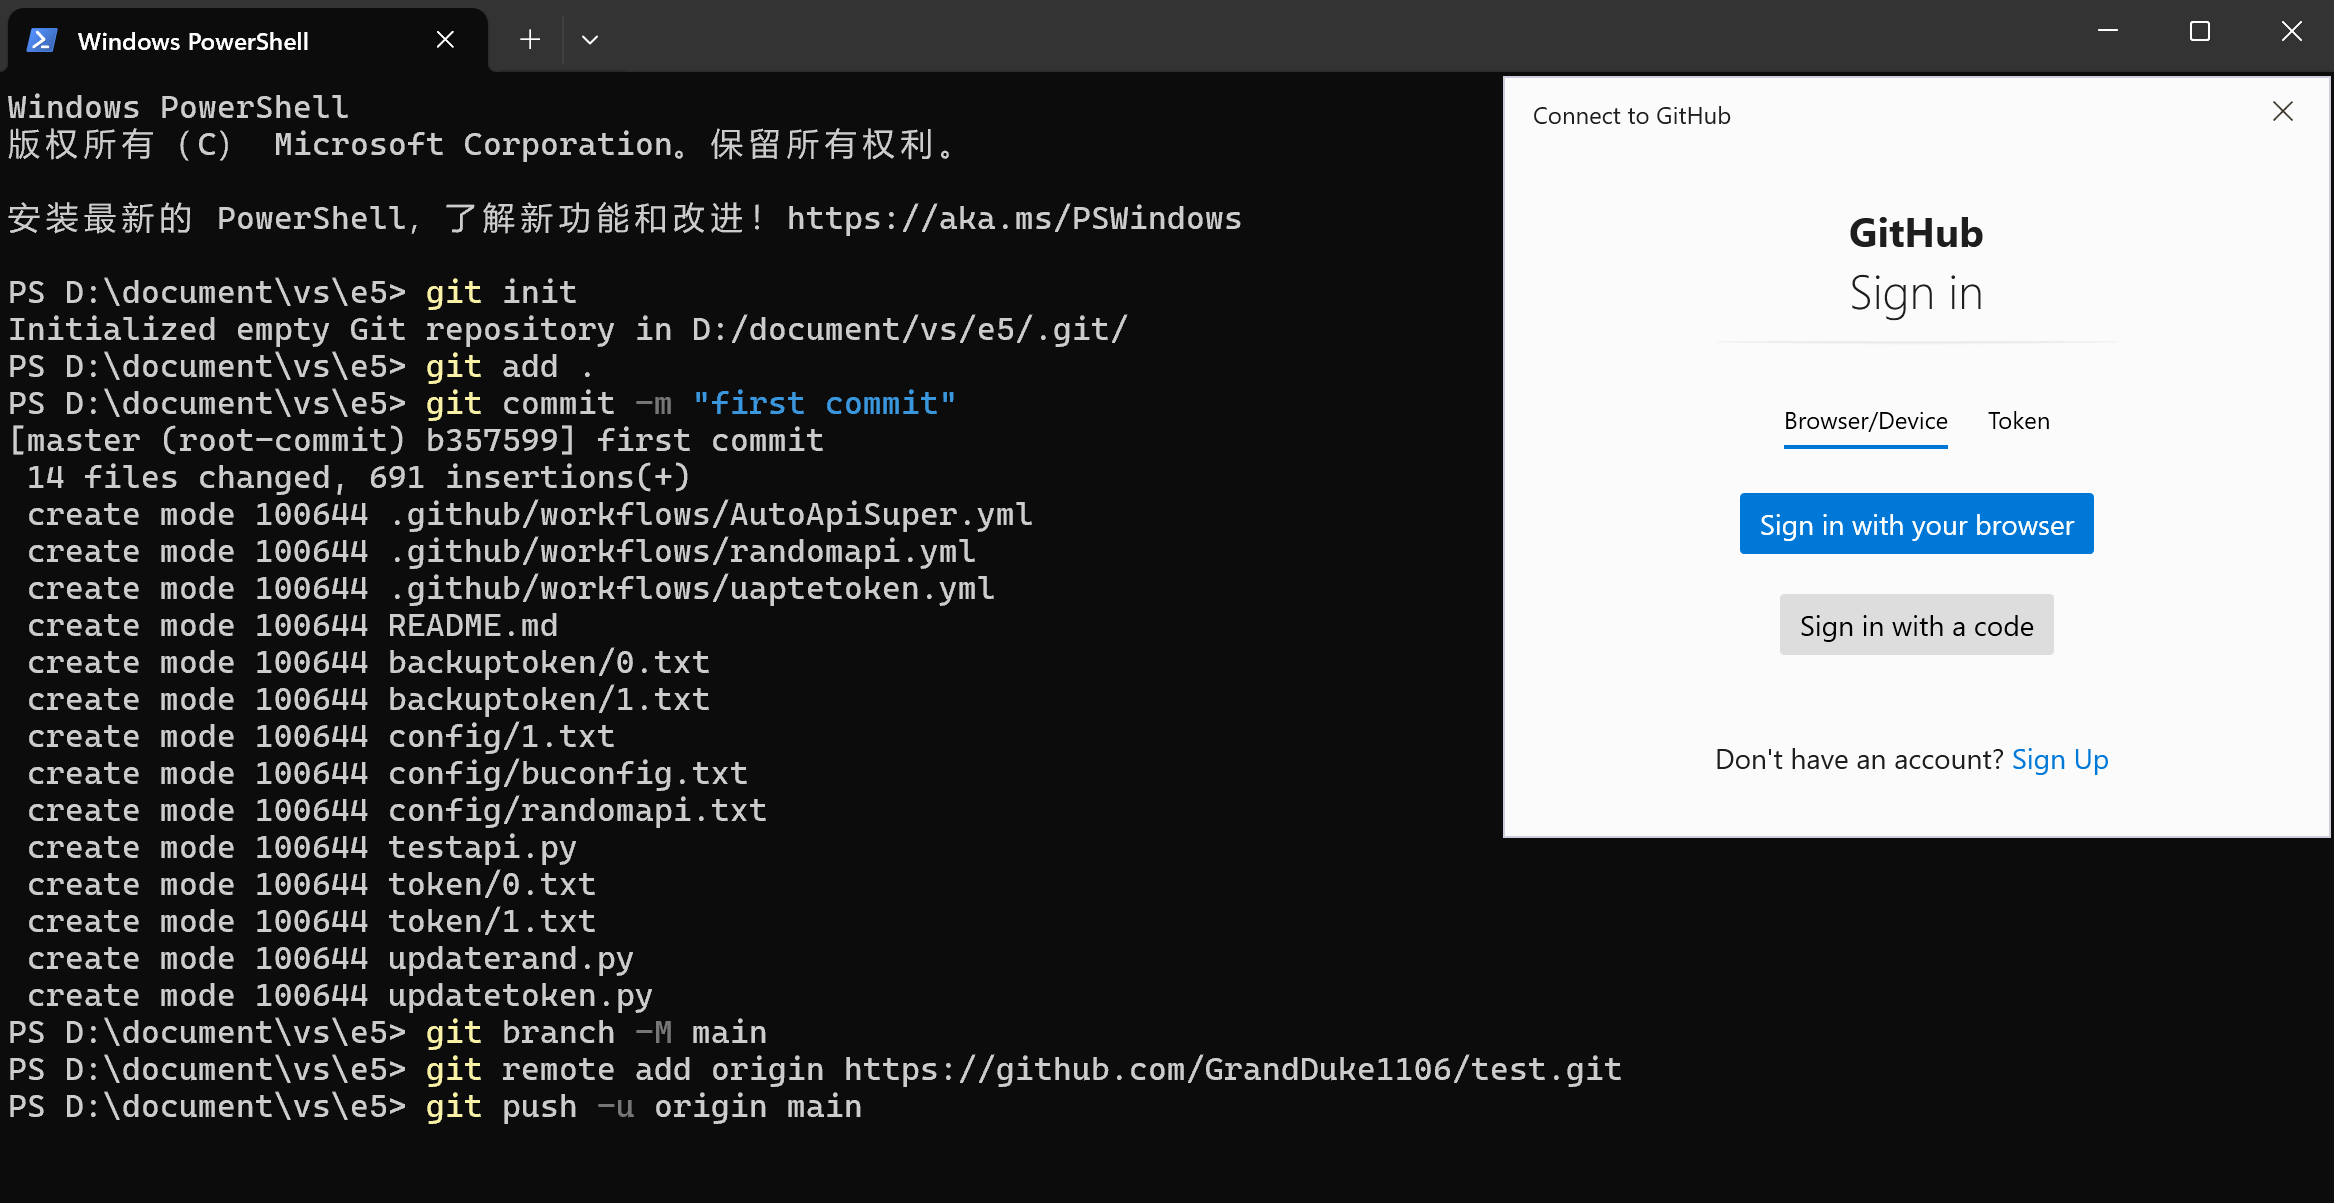
在push过程中会要你登录Github,登录你自己的账号即可。
|
|||
|
|
|
|||
|
|
|
|||
|
|
|
|||
|
|
以下是完整命令。
|
|||
|
|
|
|||
|
|
```
|
|||
|
|
PS D:\document\vs\e5> git init
|
|||
|
|
Initialized empty Git repository in D:/document/vs/e5/.git/
|
|||
|
|
PS D:\document\vs\e5> git add .
|
|||
|
|
PS D:\document\vs\e5> git commit -m "first commit"
|
|||
|
|
[master (root-commit) b357599] first commit
|
|||
|
|
14 files changed, 691 insertions(+)
|
|||
|
|
create mode 100644 .github/workflows/AutoApiSuper.yml
|
|||
|
|
create mode 100644 .github/workflows/randomapi.yml
|
|||
|
|
create mode 100644 .github/workflows/uaptetoken.yml
|
|||
|
|
create mode 100644 README.md
|
|||
|
|
create mode 100644 backuptoken/0.txt
|
|||
|
|
create mode 100644 backuptoken/1.txt
|
|||
|
|
create mode 100644 config/1.txt
|
|||
|
|
create mode 100644 config/buconfig.txt
|
|||
|
|
create mode 100644 config/randomapi.txt
|
|||
|
|
create mode 100644 testapi.py
|
|||
|
|
create mode 100644 token/0.txt
|
|||
|
|
create mode 100644 token/1.txt
|
|||
|
|
create mode 100644 updaterand.py
|
|||
|
|
create mode 100644 updatetoken.py
|
|||
|
|
PS D:\document\vs\e5> git branch -M main
|
|||
|
|
PS D:\document\vs\e5> git remote add origin https://github.com/GrandDuke1106/test.git
|
|||
|
|
PS D:\document\vs\e5> git push -u origin main
|
|||
|
|
info: please complete authentication in your browser...
|
|||
|
|
Enumerating objects: 21, done.
|
|||
|
|
Counting objects: 100% (21/21), done.
|
|||
|
|
Delta compression using up to 8 threads
|
|||
|
|
Compressing objects: 100% (17/17), done.
|
|||
|
|
Writing objects: 100% (21/21), 13.31 KiB | 4.44 MiB/s, done.
|
|||
|
|
Total 21 (delta 2), reused 0 (delta 0), pack-reused 0
|
|||
|
|
remote: Resolving deltas: 100% (2/2), done.
|
|||
|
|
To https://github.com/GrandDuke1106/test.git
|
|||
|
|
* [new branch] main -> main
|
|||
|
|
Branch 'main' set up to track remote branch 'main' from 'origin'.
|
|||
|
|
PS D:\document\vs\e5>
|
|||
|
|
```
|
|||
|
|
|
|||
|
|
# 8. 机密设置
|
|||
|
|
|
|||
|
|
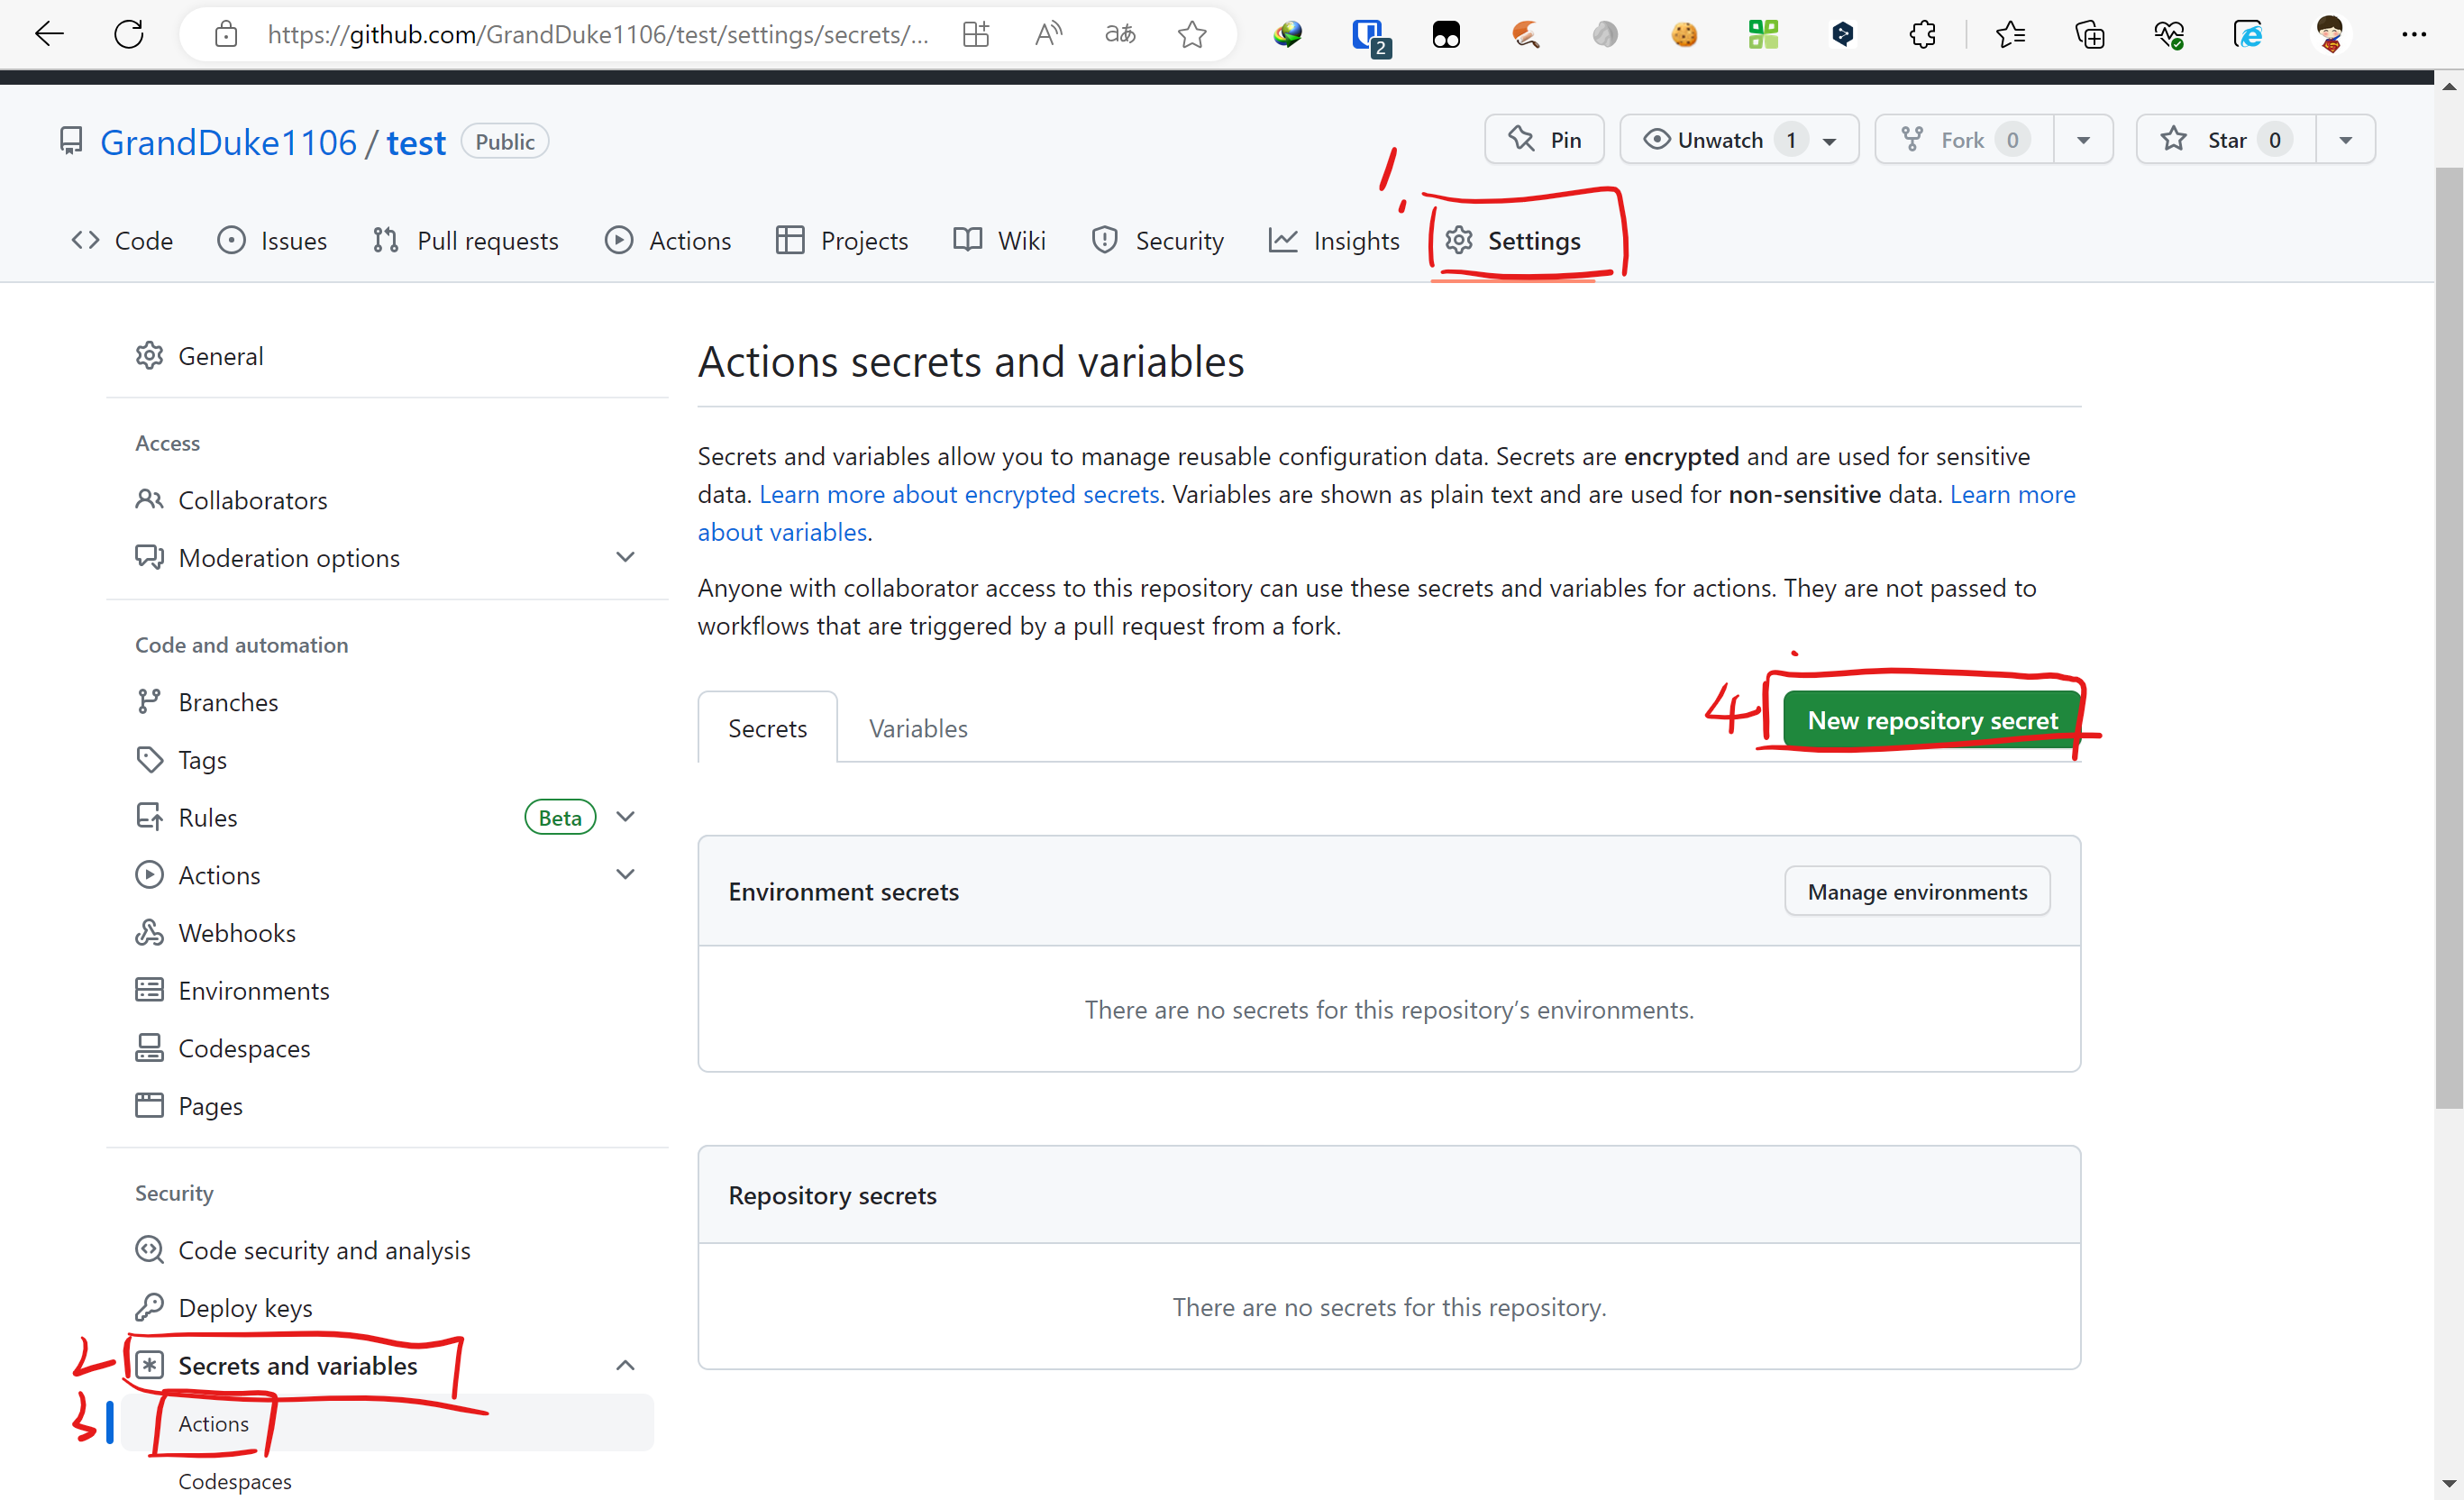
在仓库页面点击``Settings``,点击``Secrets and variables``,点击``Actions``,再点击``New repository secret``,以添加机密。
|
|||
|
|
|
|||
|
|
|
|||
|
|
|
|||
|
|
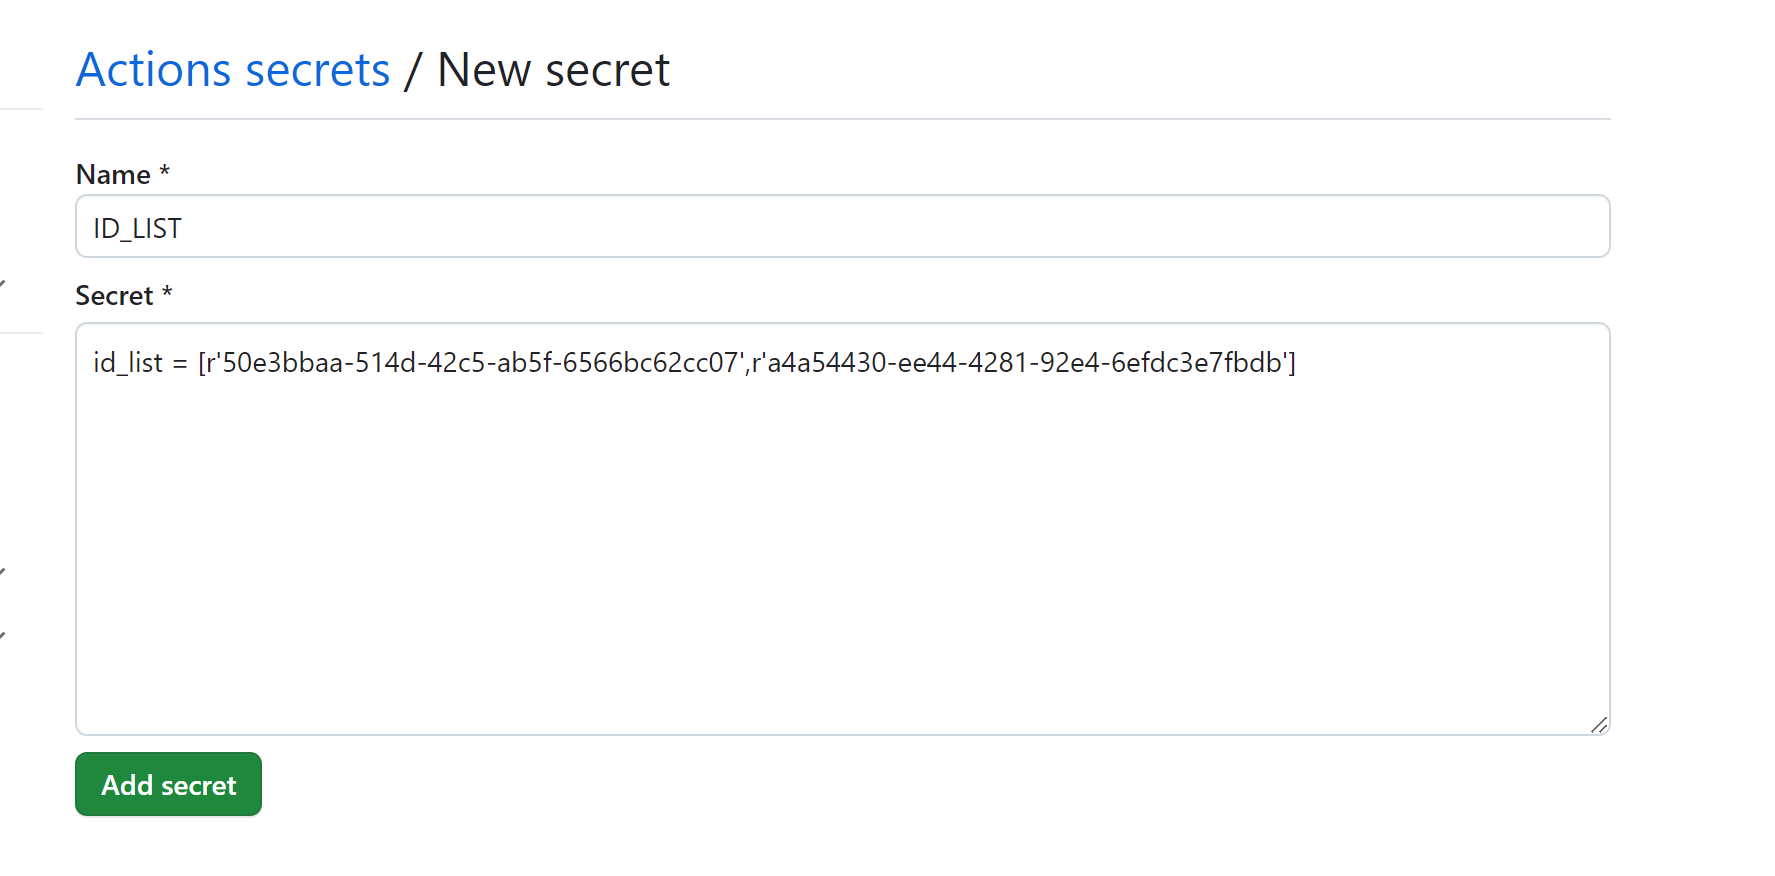
第一个机密的标题为``ID_LIST``(必须要大写),内容如下所示。
|
|||
|
|
|
|||
|
|
```
|
|||
|
|
//只有一个账户时
|
|||
|
|
id_list = [r'应用id']
|
|||
|
|
//多个账户时,按照之前refresh_token的顺序填写
|
|||
|
|
id_list = [r'账号0应用id',r'账号n应用id']
|
|||
|
|
```
|
|||
|
|
|
|||
|
|
|
|||
|
|
|
|||
|
|
点击``Add secret``即可。
|
|||
|
|
|
|||
|
|
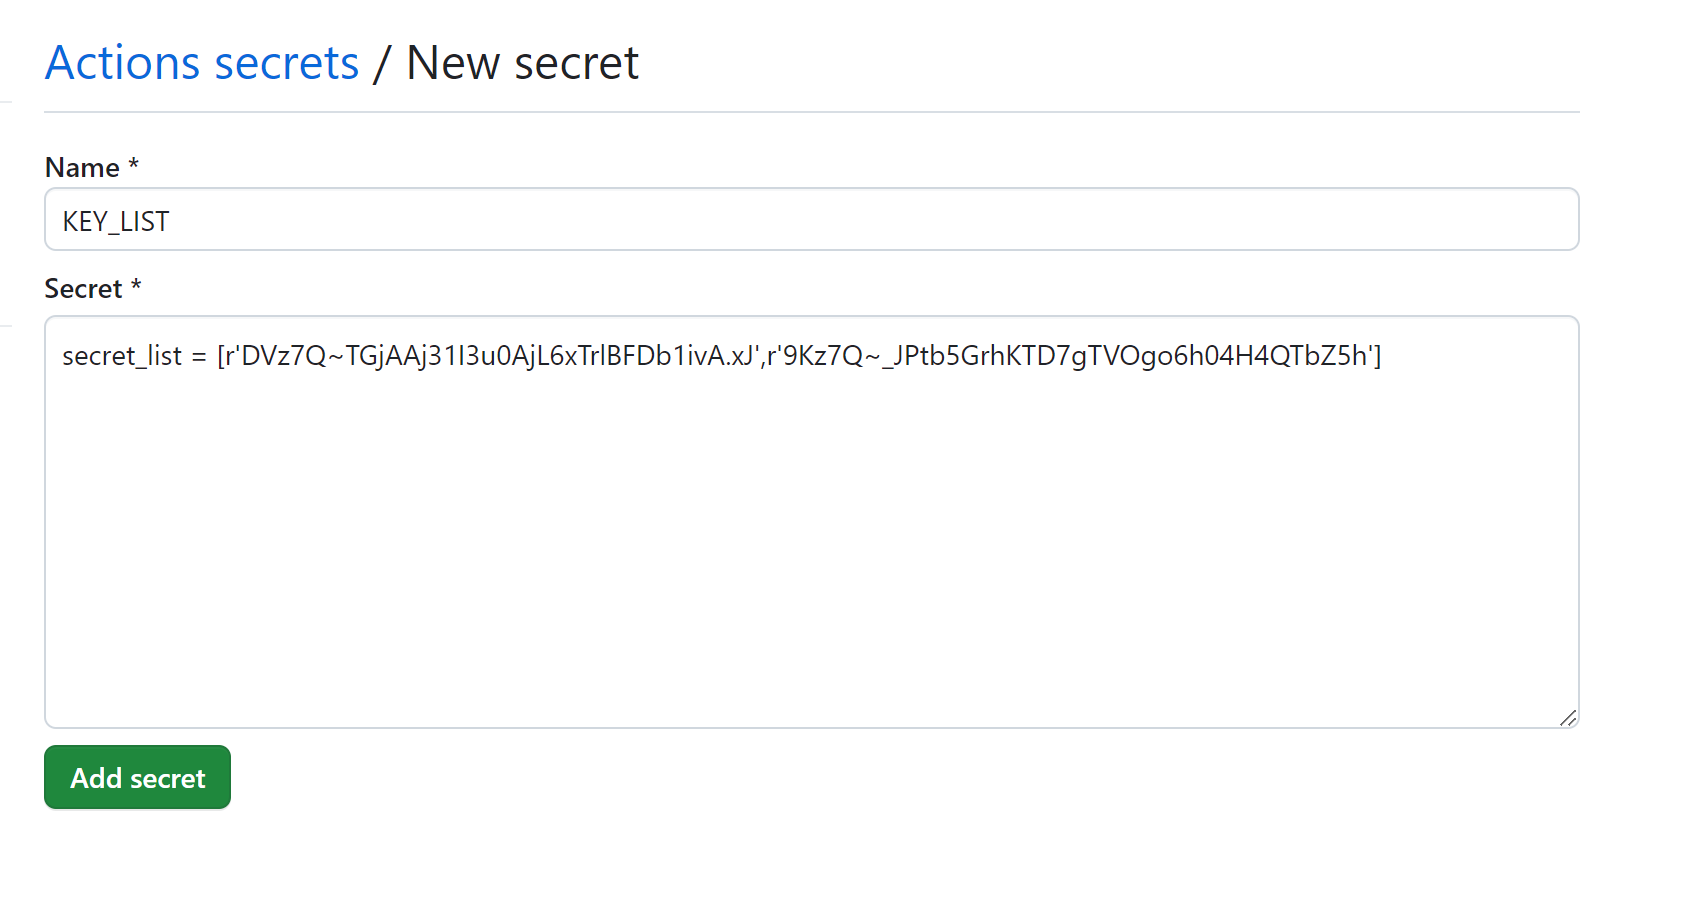
第二个机密的标题为``KEY_LIST``(必须大写),内容如下所示。
|
|||
|
|
|
|||
|
|
```
|
|||
|
|
//只有一个账户时
|
|||
|
|
secret_list = [r'应用机密']
|
|||
|
|
//多个账户时,按照之前refresh_token的顺序填写
|
|||
|
|
secret_list = [r'账号0应用机密',r'账号n应用机密']
|
|||
|
|
```
|
|||
|
|
|
|||
|
|
|
|||
|
|
|
|||
|
|
点击``Add secret``即可。
|
|||
|
|
|
|||
|
|
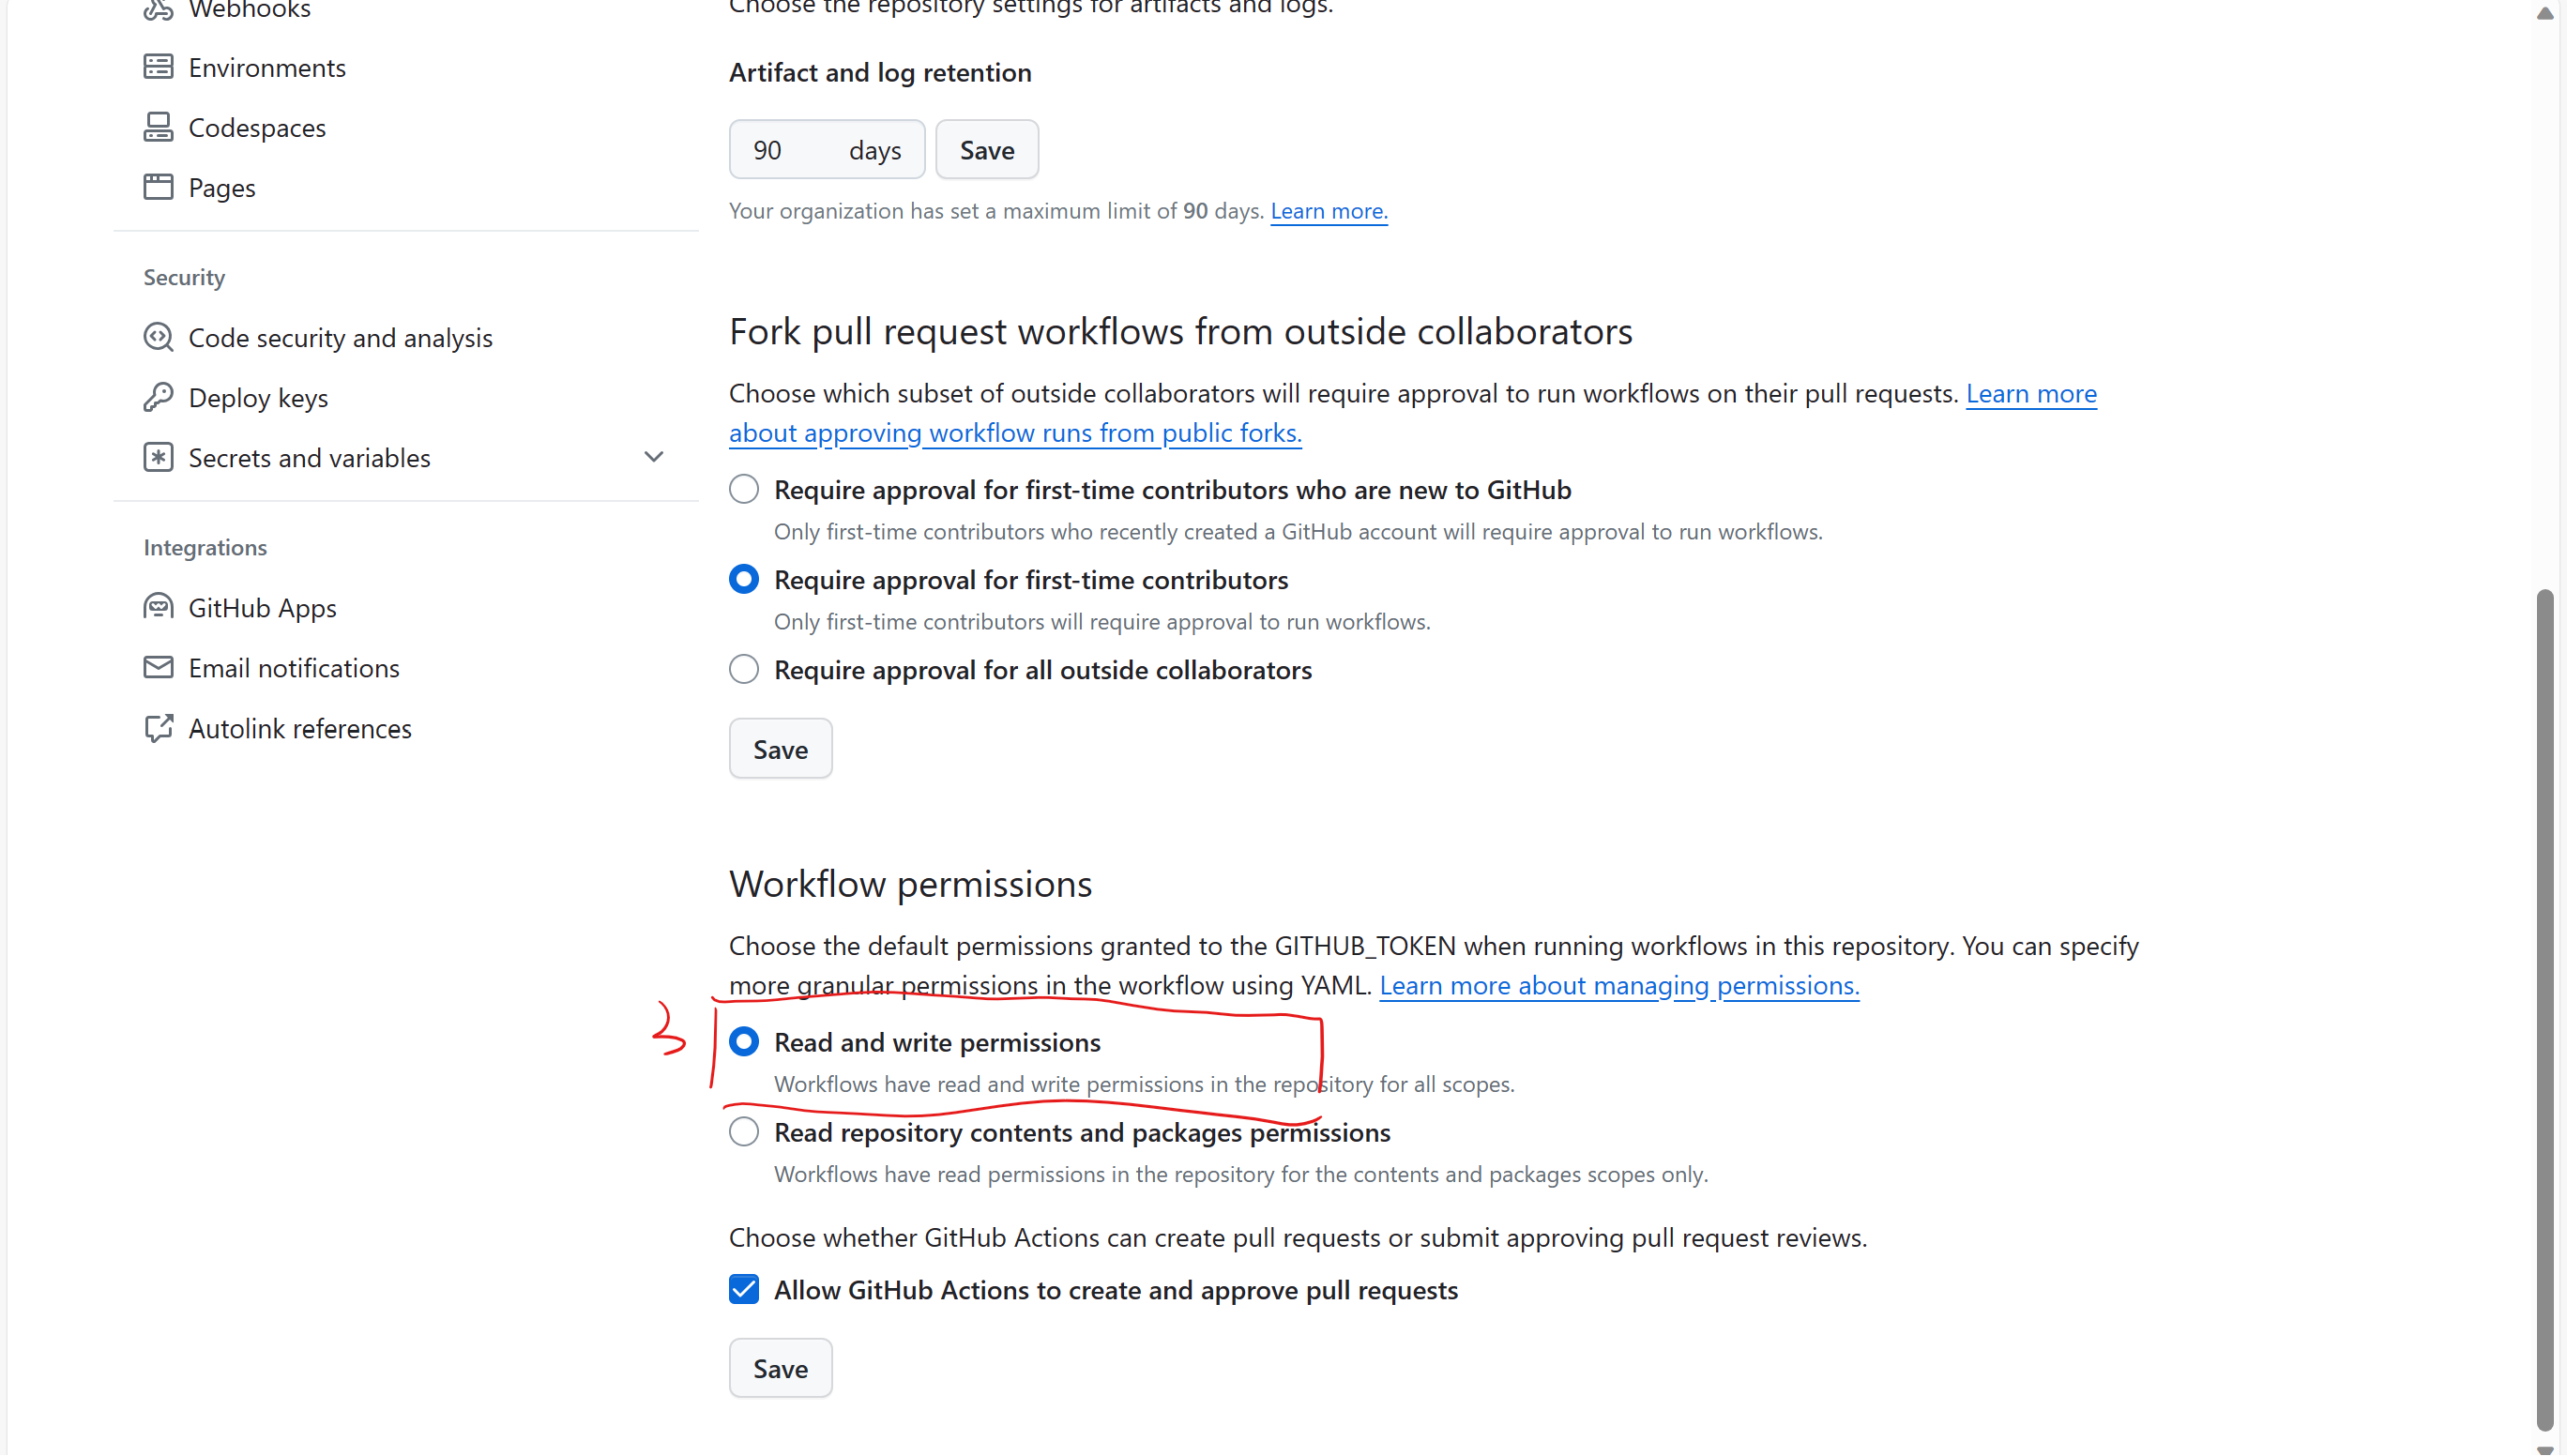
# 9. 授予Github Action读写仓库的权限
|
|||
|
|
|
|||
|
|
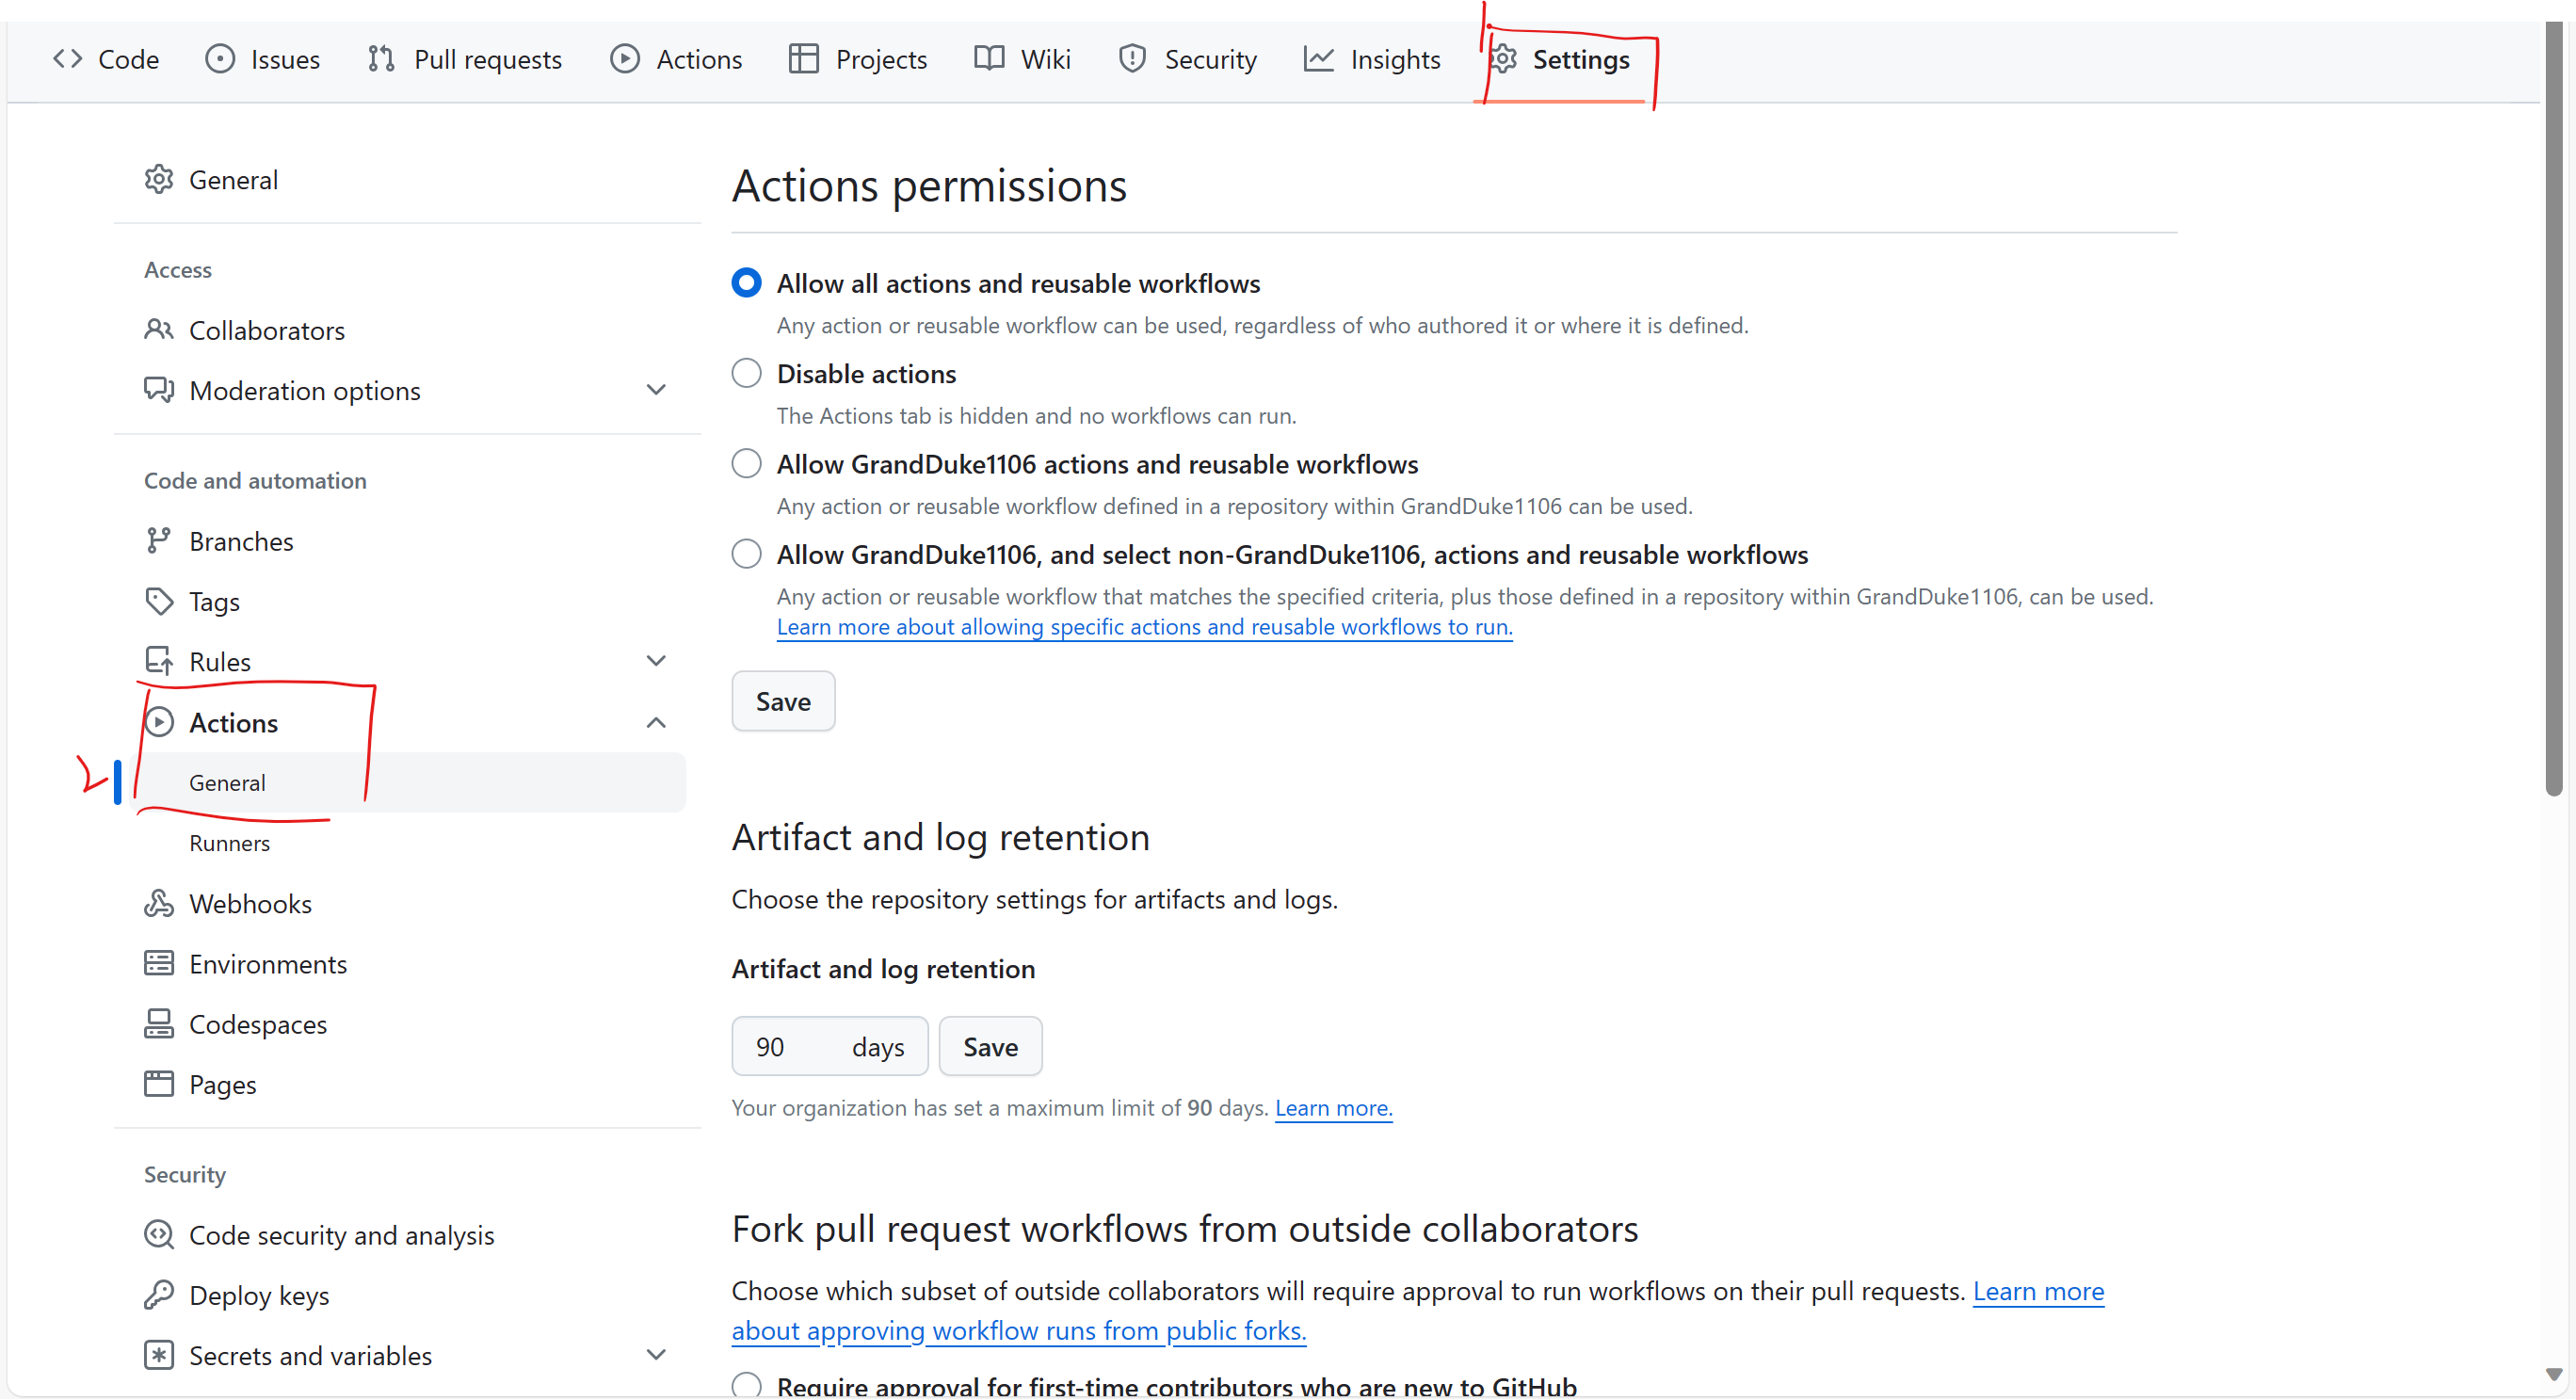
由于需要随机排列api顺序以及刷新refresh_token,因此需要允许工作流能够写入仓库。
|
|||
|
|
|
|||
|
|
打开仓库中``Settings``->``Actions``->``General``->``Workflow permissions``,选择``Read and write permissions``。
|
|||
|
|
|
|||
|
|
|
|||
|
|
|
|||
|
|
|
|||
|
|
|
|||
|
|
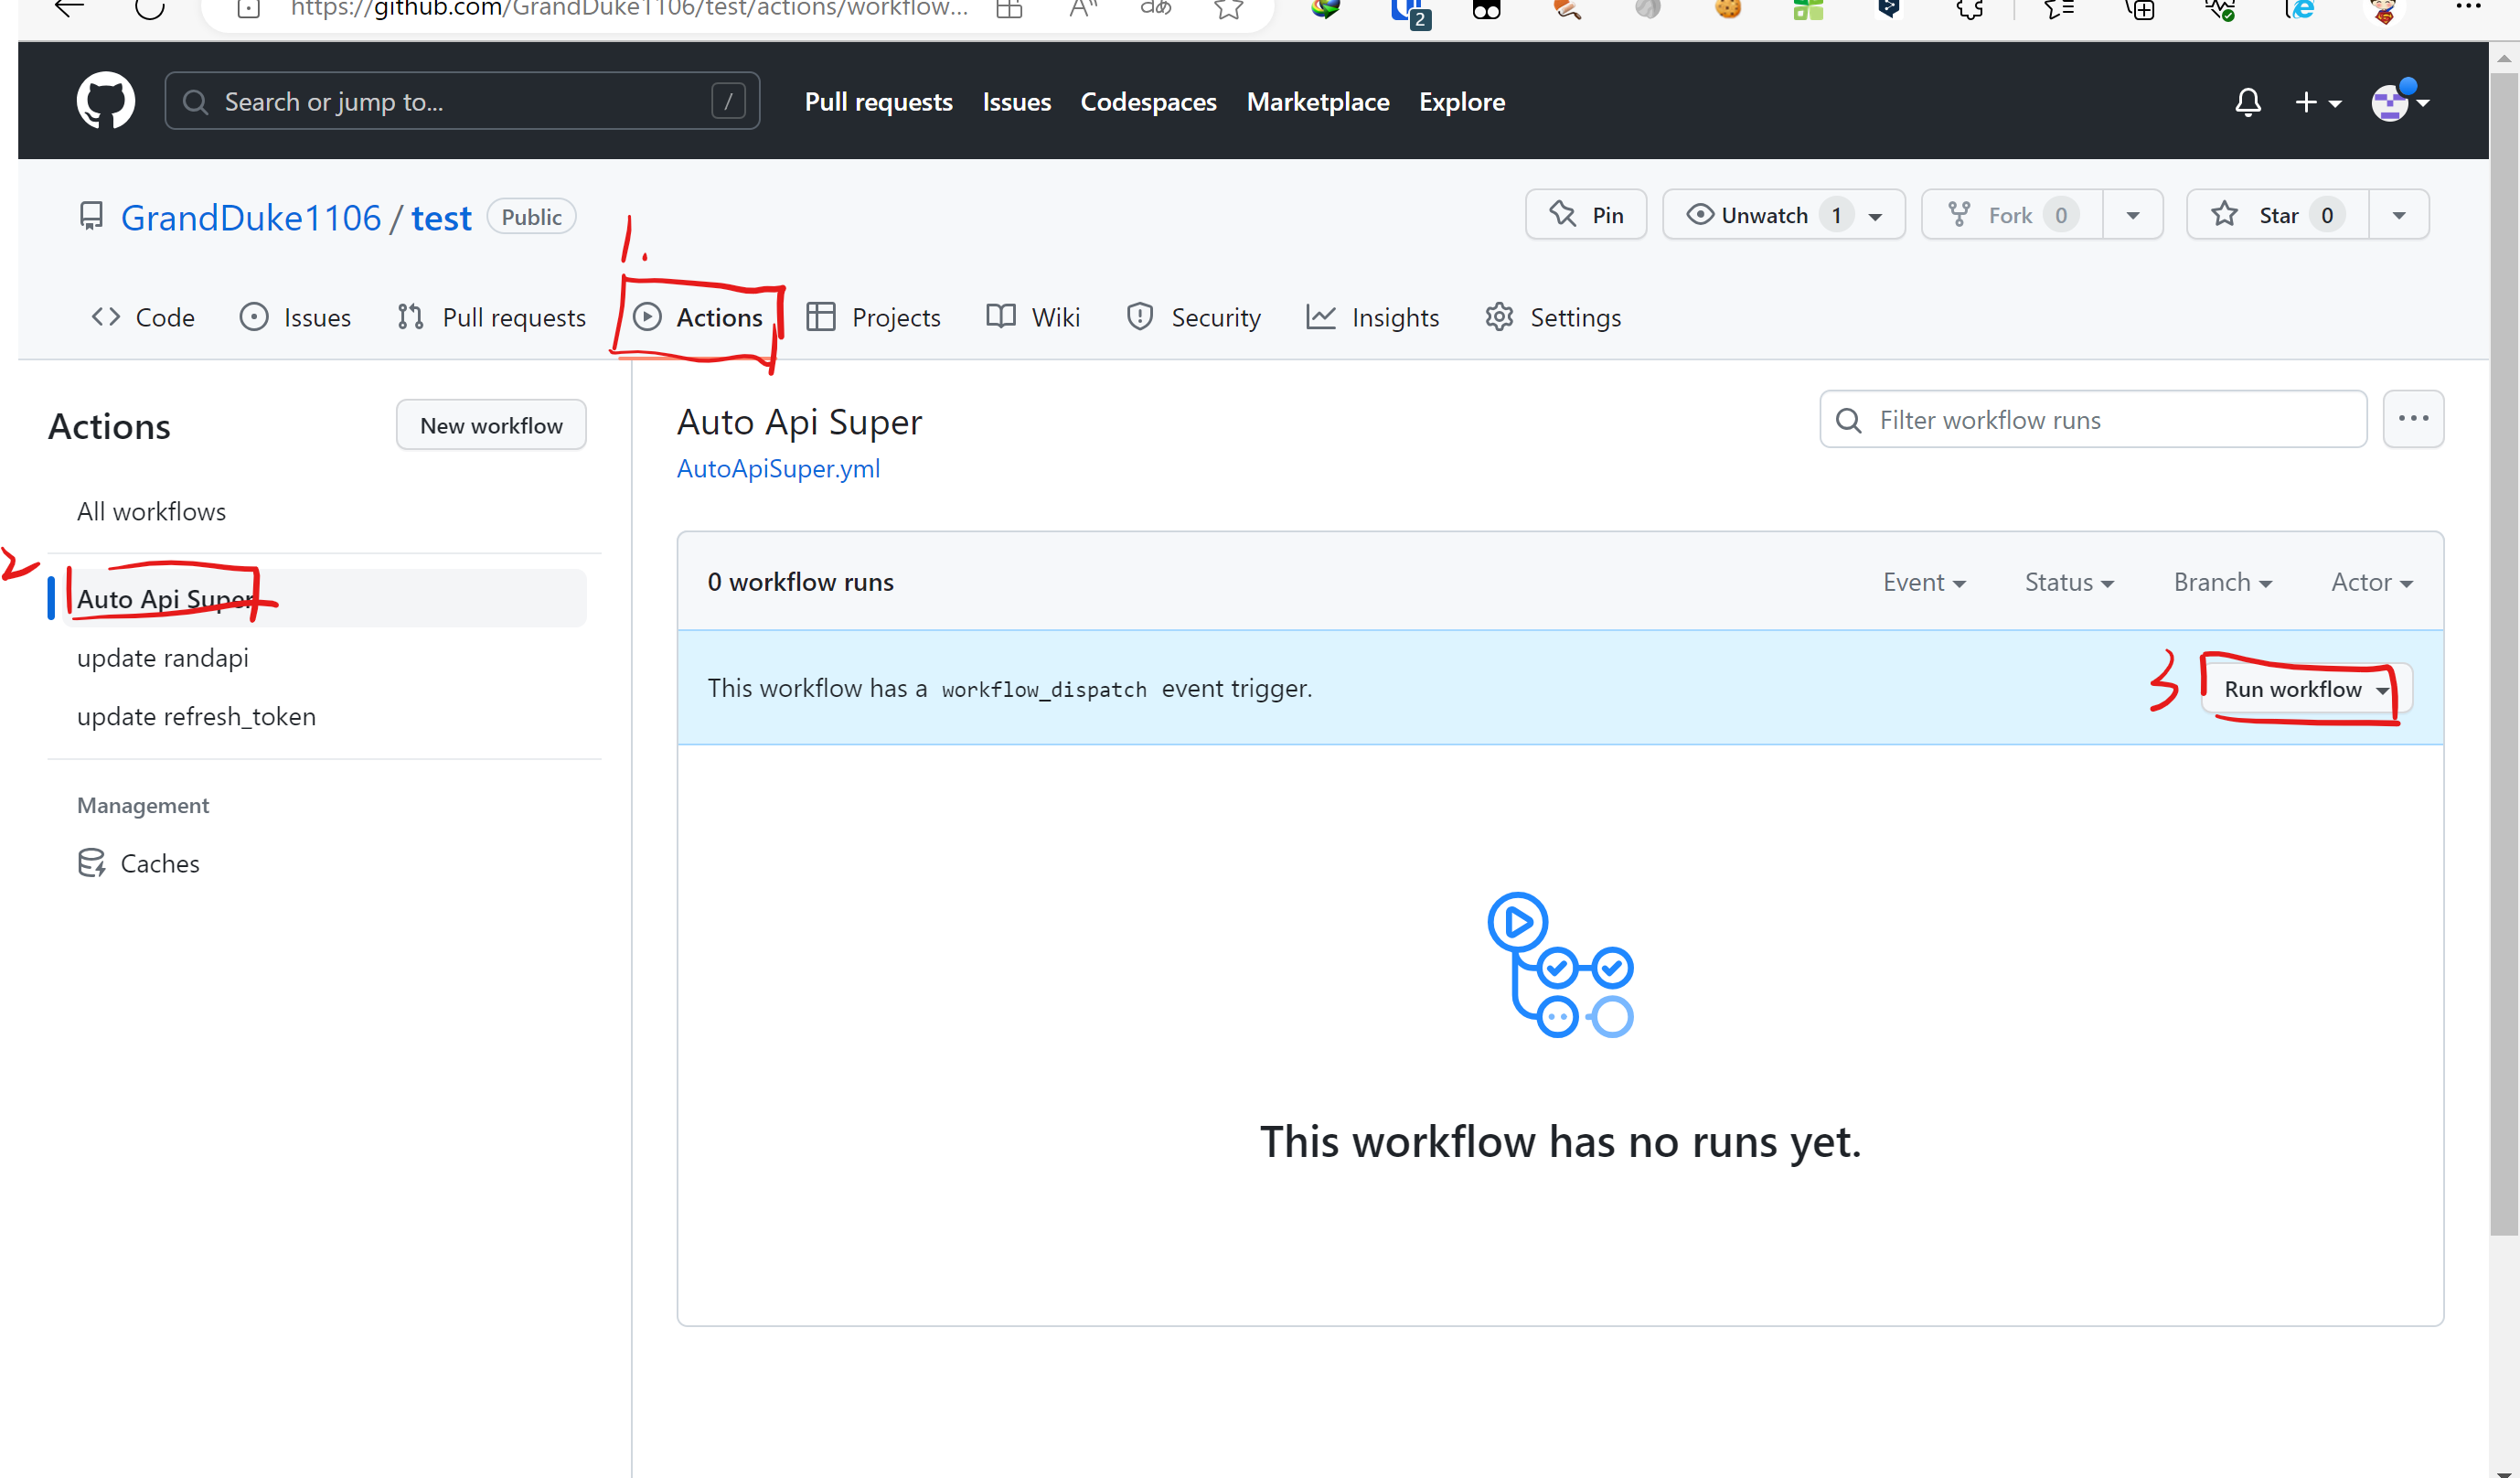
# 10. 启动Github Action
|
|||
|
|
|
|||
|
|
最后,点击``Actions``,在三个工作流中选择并手动运行测试即可。
|
|||
|
|
|
|||
|
|
|
|||
|
|
|
|||
|
|
你可以在``testapi.py``文件中将``是否开启测试``选项打开来快速确定是否能够调用成功;否则检查是否是因为机密等原因造成调用api失败。
|
|||
|
|
|
|||
|
|
# 最后
|
|||
|
|
|
|||
|
|
实在感谢wangziyingwen的脚本。
|
|||
|
|
|
|||
|
|
源代码[在此](https://drive.b2og.com/Tech/e5%E7%BB%AD%E8%AE%A2.zip),有需要自取。
|
|||
|
|
|
|||
|
|
咕咕咕~
|