
Some parts of this tutorial are copy&paste from Plan 9 wiki because they fit the flow of the writing as they are, so no claim from SDF's users is made over the authorship of such parts, which are clearly labeled as taken from Plan 9's wiki.
Plan 9 has active comunities which mostly interact by email. You are encouraged to join the 9fans mailing list where discussion about Plan 9 and related technologies happen.
SDF also host a mailling list mainly for sdfers running Plan 9 in one SDF's VPS slice.
SDF periodically runs a Plan9 Boot Camp which is open to anyone with an SDF user account. This Plan9 Boot Camps are announced on the bboard and are typically a Summer or Fall annual occurence and run for about 3 months.
Activities of the SDF Plan9 Boot Camp include:
During the SDF Plan9 Boot Camp you are encouraged to make screenshots and vidoes of your Self Guided Discoveries and share your experiences on plan9-l to inspire others to do the same.
After you have been allocated a VPS slice, connect by ssh <SDF member ID>@<VPS slice>.sdf.org (for example, ssh papa@vps2.sdf.org; you may omit your SDF member ID and the "@" if you are connecting from your SDF shell account). Your password is the same as your SDF member log-in.
At the VPS console and type x.
If asked install from the ISO type no. At some point there
was an option to install from Plan9 iso image; at the time of updating the
tutorial it does not ask for that option anymore.
Do you wish to continue? (yes/no) yes
Would you like to install Plan9 yourself from the ISO? (yes/no)

% Copying a fresh plan9 image [PLEASE WAIT]
[COMPLETE]
(continue)
After the install ends type z and then r to
restart the instance.
The Plan9 SDF VPS is the only VPS which is provided freely to SDF MetaARPA members. This slice includes cluster access to the SDF Plan9 Community 9p server as well as limited access to the Bell Labs server. It is highly recommend that you get involved in the 9fans mailing list and request commit access. With your help, Plan9 at SDF can continue to grow. To request your free Plan 9 VPS, type 'plan9' at the shell.
When your Plan 9 system boots, it will ask you where root is from (via the network, or a local disk). Just hit [ENTER] to select local (the default):
root is from (tcp, local)[local!#S/sd00/fossil]:
Next, you will be prompted to log in. Log in as the default user, glenda:
user[none]: glenda
time...
fossil(#S/sd00/fossil)...version...time...

init: starting /bin/rc
#m/mousectl: rc: can't open: unknown device in # filename
init: rc exit status: rc 24: error

init: starting /bin/rc
%
You will now be sitting at an rc prompt, Plan 9's shell.
In your control panel at vps3.sdf.org, note YOUR_IP
(e.g. 205.166.94.x) on the top line.
Start your server, and log in via the console. (default=glenda)
At the rc prompt (%), enter:
ip/ipconfig -g 205.166.94.1 ether /net/ether0 YOUR_IP 255.255.255.0This configuration lasts until you reboot Plan 9. To make this permanent it is recommended to add this line to your /rc/bin/termrc.local file.
To exit Plan 9 and be able to return without rebooting your server, see above.
You can get DNS resolution by editing /lib/ndb/local
and changing:
ip=127.0.0.1 sys=localhost dom=localhostto
ip=YOUR_IP sys=plan9 dom=plan9 dns=205.166.94.20Once you've done that, from rc type
ndb/cs
ndb/dns -r
This configuration lasts until you reboot Plan 9. To make this permanent it is recommended to add those two lines to your /rc/bin/termrc.local file.
To exit Plan 9 and be able to return without rebooting your server, see above.
Drawterm is essentially a BLIT terminal emulator which allows you to connect to your Plan9 system and load the rio windowing system. Rio is a direct successor of UNIX 'layers' and Plan 9 '8½'.
At the rc prompt (%) in your Plan 9 VPS, enter these
two lines.
echo 'key proto=p9sk1 dom=plan9 user=glenda !password=PASSWORD' >/mnt/factotum/ctl
aux/listen1 -t tcp!*!ncpu /bin/cpu -R &
Replace PASSWORD with the password you want. This password lasts until you reboot Plan 9.
To exit Plan 9 and be able to return without rebooting your server, see above.
Follow the instructions
to download and build Drawterm for your operating system. YOUR_IP must match
the IP address described in Networking.
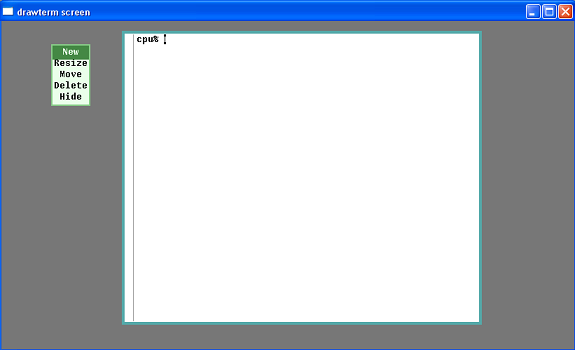
./drawterm -a YOUR_IP -c YOUR_IP -u glendaAfter typing your password, press the right button of your mouse.
A menu should appear. Then, release the button over the New
option.
Now, press the right button again near the upper-left corner of drawterm, and
drag the mouse to the lower right before releasing the button, drawing
a rectangle.
You should now have a terminal window. The first
thing you should probably do is to type cat readme.rio (or read
it from here)
You can use Abaco to browse the web. (Abaco is available in a default Plan 9 system.)
You'll need to have your IP configured and DNS working in order to browse
the web. After that, you'll have to run webfs and
then abaco. (You may want to add
webfs in your $home/lib/profile just before
plumber and rio; also, if you don't have a $home/lib/webcookies
file, touch it.)
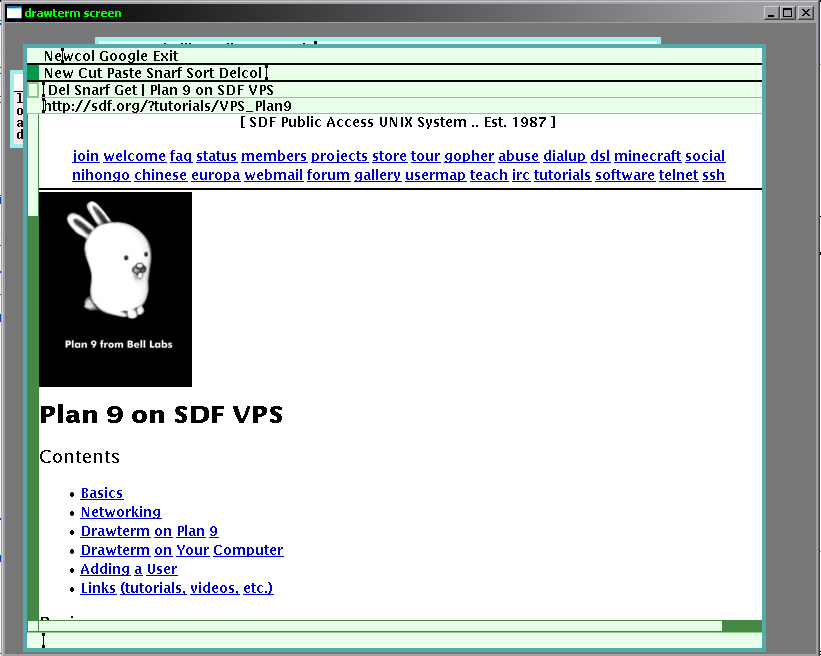
When abaco starts, you can go to a webpage by clicking "New"
with the middle button of the mouse, typing the address in the row below the
one with "Del Snarf Get …" (see the previous figure:
it's the one where the current address is), and pressing "Enter" on your
keyboard. You can follow links by clicking on them, as is usual, with the
left button (the shape of the cursor won't change, though).
You may wish to add a user to your system once you get the hang of things. There is really no need to create a new user when you are first starting out. To create a new user, you will have to connect to the file server console by typing:
con -l /srv/fsconsNow, at the file server prompt, create a new user. Replace USER with what you want your new user to be named:
uname USER USERYou will need to add that user to the sys group if you want
it to be able to change system configuration files. Again, change USER to
what your new user name is:
uname sys +USERExit the file server console by typing: ctrl+\. You will now
be at a >>> prompt; type q to quit.
Taken from Plan 9 Wiki Installation Instructions
You might want to configure your system's timezone. Figure out in which timezone you are, and then, assuming e.g. you are in the CET zone log in as user adm, then:
cp /adm/timezone/CET /adm/timezone/localLast, but not the least, you may also want to edit/change the
TIMESYNCARGS in your /rc/bin/termrc or
/rc/bin/cpurc; for example, to use an NTP service, set it to:
TIMESYNCARGS=(-n 0-north-america.pool.ntp.org)TODO check if title works
Now that you are connected to your Plan 9 console with your new user you should run:
/sys/lib/newuserAnd setup a password for the user in factotum so you can login from Drawterm.
Taken from Plan 9 Wiki Installation Instructions
When you drawterm to a Plan 9 cpu server, your local files will be available at /mnt/term. This means you can freely copy files between Plan 9 and your other os without the use of any additional protocols. In other words, when working with drawterm, your environment is actually a composite of your local os and the Plan 9 system - technically it is a three node grid, because the Drawterm program acts as an ultra-minimal independent Plan 9 terminal system, connecting your host os to the Plan 9 cpu server.
While there are many similarities between UNIX and Plan9, there are specific commands which may be unfamiliar to UNIX users. However, some of these commands have their roots in early UNIX systems as well as BTL Research UNIX.